


Light is the medium in which we as digital artists work. By manipulating the numerical proportions of the red, green and blue light that we see on the monitor, we have been granted unlimited control over how an image appears.
The way lighting is handled can make or break an image. Of course, it all starts at the initial photoshoot where the picture is captured, but post-capture digital techniques are frequently employed to enhance and dramatize the image content.
Digital Light
Light manifests in three forms on a digital image. There is the visible spectrum of color, the color’s intensity and the tonal range. These characteristics are referred to the as the hue, saturation and brightness.
By manipulating these characteristics globally or locally, an image can be dramatically altered to improve their relationship. In Photoshop or any image-altering software, there are basic tools that readily perform this task such as Brightness and Contrast, Levels and Curves that lighten, darken and increase or decrease contrast. These tools are essential for a generalized quick-fix that can improve the overall tonality of an image. There are however features that are more specific to lighting design that provide, in a single interface, an extensive tool kit for the instant and precise modeling of light. These features are the ones that I’ll explore in this article.
HDR-High Dynamic Range
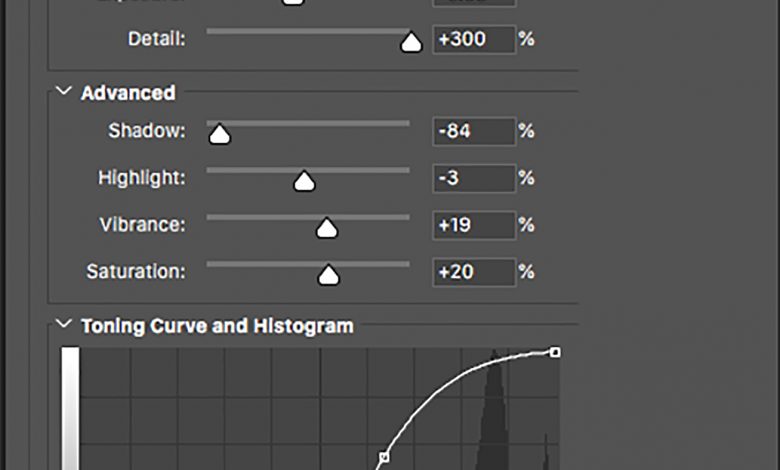
You see a lot of high dynamic range (HDR) images these days, as the technique is quite fashionable for its grainy, dystopian look. The HDR Toning dialog box, (see Figure 1) found under Image > Adjustments, is a cluster of tonal and color controls that globally enhance the color and contrast of an image so that there is more overall detail in the highlight, midtone and shadow areas. From this panel, color vibrancy and saturation can also be spiked, as can sharpening. There is even a Brightness Curve that precisely controls the specific range of contrast. The results have a look that can be edgy and dramatic. HDR works particularly well to improve lackluster landscapes (see Figure 2A), but I’ve seen it used to the extreme as in Figure 2B, and it’s questionable whether this treatment is desirable. On the other hand, if applied with restraint HDR can vastly improve the image lighting as in Figure 2C. People do tend to go overboard with it, especially with the detail slider, and it can be particularly unkind when over-applied to a portrait (see Figure 3).
Shadows/Highlights
When shooting a picture, the camera’s automatic exposure meter measures the light intensity of a specific area and bases the exposure on that measurement. If the meter measures darker areas and compensates to reveal more detail, then the lighter areas can become blown out. Conversely, when the meter measures lighter areas the darker areas become darker and lose visible detail. Thus, the foreground of a backlit image can become severely compromised as in Figure 4. As long as some detail exists in the highlight areas (and it’s not completely blown out) or the shadow areas aren’t completely filled, there is a miracle technique that can help perfectly balance the darks and lights.
The solution is the Shadows/Highlights adjustment found under Image > Adjustments. The controls (see Figure 5) individually target the light and dark image areas. To apply it, balance the dark-light relationships by dragging the sliders to the right to strengthen the effect or to the left to weaken it. Similar to HDR, there are color adjustments to saturate colors or to adjust the contrast of the midtones, and they are nicely clustered in a single interface. Shadows/Highlights is an ideal solution for enhancing detail in filled or blown-out areas and spiking overall tonality as in Figure 6 where the default settings have been applied.
Lighting Effects
Photoshop’s Lighting Effects filter has the capability of generating innumerable realistic effects to illuminate your image. Lighting Effects is a Smart Object-compatible filter so after it’s been initially applied, you can use it non-destructively, and at any time during the workflow reactivate the filter to modify your settings. Before applying the filter, go to the Layers panel and choose Convert to Smart Object.
The Lighting Effects dialog box is big and a little bit confusing. It has a lot of unfamiliar settings so let’s take look at each feature.
Light Sources
The Lighting Effects filter offers three types of lights to choose from:
Spot-focuses the light on a specific region. A spotlight’s intensity, direction, position and rotation can be modified (see Figure 7).
Point-is similar to a bare light bulb in an open space. Its location, intensity, size and color can be changed and the light bulb can be moved, but it illuminates from a center point (see Figure 8).
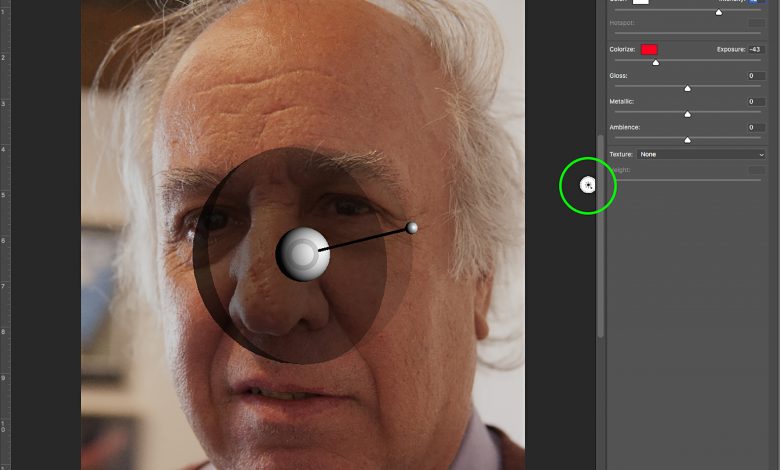
Infinite-simulates a distant light source. Its direction can be changed by dragging the widget that is displayed in the middle of the image. As you drag, a little white circle moves outside of the image indicating the direction from which the light source is emanating (see Figure 9).
Basic Lighting Effects Workflow
- Choose Filter > Render > Lighting Effects.
- From the Presets bar at the top of the interface, or the Properties panel to the right, choose a lighting style.
- In the upper half of the Properties panel, or directly on the image, do any of the following:
Adjust the color, intensity, and hotspot size. Each type of light source works a little differently but in general, dragging the ellipse encircling the lit area expands it or moves it. Dragging the intensity slider in the properties panel to the right increases intensity. - In the lower half of the Properties panel, adjust the entire set of lights with these options:
- Colorize-tints the overall lighting.
- Exposure-controls highlight and shadow detail.
- Gloss-determines how much surfaces reflect light.
- Metallic-determines whether the light or the object on which the light is cast is more reflective.
- Ambience-diffuses the light as if it were combined with other light in a room, such as sunlight or fluorescent light. Choose a value of 100 to use only the light source, or a value of -100 to remove the light source or anything in between.
- Texture-applies a texture channel. A texture channel uses grayscale images or alpha channels (called bump maps) to enhance the lighting effect and make it more three-dimensional.
Multiple Lights
You can add as many lights as you choose to create pictures with multiple light sources. To add a light, click on the desired light source icon in the Presets bar at the top of the interface. The new light source will appear in the Lights panel. Adjust its intensity and modify its characteristics. You can switch the light on or off by clicking the visibility icon in the Lights panel. If you want to adjust an individual light to make changes, choose the item in the Light panel or click on its marker on the image (see Figure 10).
Lens Flare
When a lens is pointed directly at a light source, there is often a reflection of the light on the glass. This is called a lens flare that at one time was considered an undesirable effect to be avoided by photographers and filmmakers. Nowadays though, lens flare is a bona fide technique in still pictures, film and video that is used to dramatize the intensity of a light source.
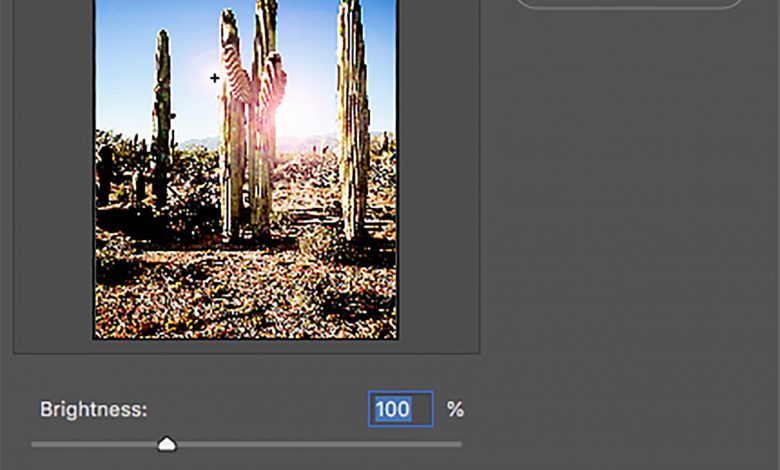
Once again, it’s always a good idea to duplicate the layer and convert it to a Smart Object so that adjustments can be made at any time. The operation takes place in the Lens Flare dialog box (see Figure 11). Choose Filter > Render > Lens Flare, where you select a specific type of lens; there are four to choose from. You control the brightness of the flare with the slider and the position of the flare by dragging the little cross in the preview box. There is no live preview on the image with this filter. You’ll have to view the edits in the rather small preview box. Clicking OK applies the filter to the image (see Figure 12A, B)
Lighting is an extremely important element of the image. It is “ambient content,” which means that it is very much present but not noticed except subliminally where it makes a big impact. Lighting sets the mood and tells a big part of the story. Creating and altering lighting using these techniques increases your ability to enhance detail and create drama. Now, think about what brilliant effects that combining these techniques could potentially deliver. If you want to push the creative envelope and open the door to exciting new vistas, experiment with these lighting techniques.