Flipping through page after page of a supplier’s catalog can sometimes leave us with more questions than answers. What material is right for the application? What film is going to save us the most money and still deliver a quality product to our customers? What film will make this installation easier? Is that reflective really that much better for the price?
You name it, and the list goes on. I used to look at the catalogs trying to pinch every penny I could to turn the most profit on the job as possible. And years later, after walking around my production room, I realized I had been asking all the wrong questions. The answers I had gotten to those questions (the mass amount of different job-specific films I had lying around the shop) had actually cost me more and caused me to lose money, not make it.
The wide-format printing industry has so many different niche markets, from the vehicle wrap-only shops to the outdoor signage and architectural shops, and a million different combinations in between. However, no matter how large or how small the shop, we all lose money in the same place … waste!
I’m not talking about the waste we should be building into the job that doesn’t fill up a full sheet. I’m talking about the 8-foot leftover on a print roll or the countless partial rolls of laminate we have lying around, the ones that cause us to cross our fingers, hoping there is enough left to finish those yard signs. That job came in at 2 p.m. Friday, and we rushed to print. Then deliver at the end of the day. I’m talking about the wasted money we leave behind and one day end up throwing in the trash because we’re tired of the domino effect that happens on a weekly basis.
I want to just share some tips and tricks to possibly help streamline the workflow, cut down on waste, and add profit from every possible inch of film we receive on a roll.
Savings in pre-production
The first way I was able to find a place to save some waste on material actually started in pre-production. The way we were saving our files and how they were getting over to production was a mess, so we adopted a new system.
 Yes, we have job tickets and track production, but let’s face it, sometimes people have an off day and just start to print stuff to get the job done as fast as possible and mistakes are made. So now every design or job is saved into a daily print-ready folder. That way, when production starts the day, each job that needs to print should be in that folder.
Yes, there are times a rush comes through, and it is not in there first thing in the morning, but we do our best to set the schedule up so each morning production knows exactly what files will be printed that day.
Inside that day’s print folder are separate folders with what base film and what laminate will be used for any given project. We make sure to gang up all the prints for the day that will be on the same media and finished with the same laminate to cut down on the amount of times a roll change happens.
We found that every time a roll is loaded, we lose on average 8-10 inches of film on the front side and about 4-6 inches on the back side when removing the print from the machine. Yes, you can build this into the cost of the job as we do, but by planning out our prints for the day – and not just the job and ganging as many together on a single run as possible – we cut down on the loading and unloading time and material waste.
Matching materials
This is the number one for us since we use IJ180cv3 for a ton of customers; some love gloss, and others require a matte finish laminate. I can’t even begin to tell you the amount of times we would be running the print through the laminator with our fingers crossed that the random roll of 8518 had enough to make it through to the end of the print. The number of times I got that wrong and the long nights of staying to reprint a file still drives me crazy.
 The solution to this problem we found was to have matching sets. When we order a roll of print film we order a roll of laminate with it. Each one of those boxes get labeled as a set. When the print film is opened up that label goes on the inside of the core so that we know, and we do the same with the laminate. That way, each time that roll is loaded or unloaded on the printer or on the laminator, we should make sure that we never run into the problem of running short on laminate.
Now you might be asking yourself, “Well, doesn’t that mean that if you have 2 feet of material, you need to print and laminate with gloss? And then you have five jobs printing on the same film with a matte laminate. You’re going to have to unload the machine to reload on the same material but a different roll.” Yes, you are, and in my opinion you should.
At one time, we had 70+ partial rolls of laminate all with varying amount of laminate left on them. Looking at the amount of film on those rolls and wondering why we had so many lying around, I spent some time watching production and seeing where the mistakes were.
Then I found it without knowing how much was on a roll, and no one ever wanting to say, “Adam, I’m sorry we have to reprint that driver side because the laminate ran short on the last 4 feet.” It was easier to just grab a new roll of laminate off the shelf than it was to guess and be wrong.
Production and equipment
The one way for production to know how much film is left on the roll is to use the printer’s setting to track media length. I wish I could say we are flawless with this, but we’re not. People get in a rush and need to crank out a job and skip the step to enter the remaining material, but I’m telling you it makes a world of a difference to know that, yep, there is 34.6 feet left on this roll so let’s use this one. Oh, by the way, this roll is labeled with a pink tag. It must match up with that pink tag on the laminate. Winning.
 Another way to check, just in case you forget, is just to Google “Roll Length Calculator.” Get a set of digital calipers, enter the three measurements it needs, and boom, you have a close estimate for how much is left on that roll. This is in no way the best option, but it gets you close. Err on the side of caution because we have cut it a little close at times, especially on banner material.
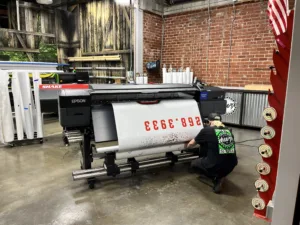
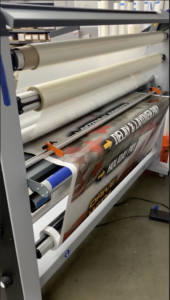
One thing that makes this process easier is having the right equipment. I recently visited a shop to teach installation. On the tour of the place, I noticed long tables behind the laminators. When talking with the production guy, he said that even when they print wall wraps, they print one panel at a time, lay it out on the table, run it through the laminator, and then it runs out on the table.
They had been doing this for a long time but were now getting into jobs that were much larger than what they were originally used to. And none of the laminators had take-up rolls. You need a take-up on your laminator; it will seriously increase your production and decrease your waste.
Mounting tables and materials
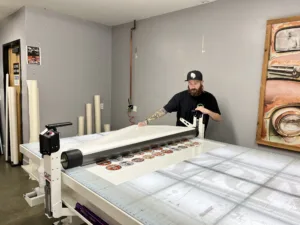
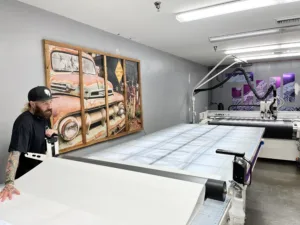
I can’t even begin to describe how valuable these machines are. I run the CWT mounting table, and I love it. We use it daily; it’s like having another employee. If you remember back in the beginning about the 5 feet left on the roll? This is where you make sure you get all your money out of that roll.
 Having the ability to laminate small sticker runs or that single graduation yard sign that came in at 2 p.m. on Friday before graduation, you’re able to use that last 5 feet by table-laminating that graphic. I have no idea how we functioned without it for so long. I highly recommend this investment.
Material stocking is the big one. Limit the options and start thinking about your business like In-N-Out. Deliver a quality product, and don’t make the menu too long. This is the one thing I have done, and it has saved me so much time and effort in ordering film, keeping stock up, and saying yes to that last-minute project because we have the material we need.
We have cut it down to three options for adhesive-backed vinyl. A film for our throwaway signage (temporary signs on foam board or Coroplast and small stickers). A better calendered option for short- to mid-term flat installations interior or exterior, and then our premium film for vehicle wraps and wall murals (always checking wall graphics with an adhesion test prior to production). This has simplified our stock of print film and cut down on the amount of overlaminates we have in the shop as the first two options use the same laminate, and our premium uses its own laminate.
The wide format printing industry is evolving, and shops are now migrating from where they originally started into bigger and more profitable jobs. As things scale up, don’t overcomplicate the process by adding new films. Find your staples, stick to them, and fine-tune your production to cut down on waste and increase the yield from each roll.