Create Contrast with a Laser on Wood: Part One
Here is the first of two methods you can try.
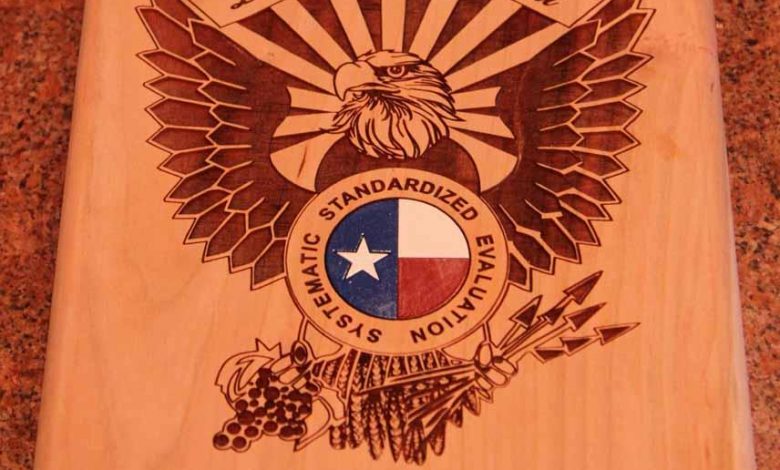
One way to create a better contrast with a laser on wood – which is almost a must on wood like oak or bamboo that do not engrave well – is to run the job, and if you are not happy with the contrast, run it again, but this time from 1/8″ to 1/4″ out of focus.
When you focus the laser (either with an auto focus or manually), if you use a 2″ lens, the laser needs to be 2″ off the surface of the wood or material. The beam from the laser starts off wide, then the curvature of the lens makes the beam into a small dot, making for a sharp clean beam at the 2″ mark. It starts to widen again by moving the lens 1/8″ to 1/4″ up (farther distance from the wood). If you increase the distance, as it widens, it will burn more. If you move the focus “down,” the beam gets just a little wider and is not as effective; you could get more splash back and more smoke on the lens. A dirty lens can and will cause the laser to not engrave or cut as well.
The engraving might not be as sharp as running the job on focus – that is why I like to run it once at focus, then if needed, run it a second time a little out of focus. You should still have a sharp engraving, and most people cannot tell, in most cases. The only time it might cause a problem is when engraving small artwork with a lot of details. Where the engraving is close together with small patches of wood not engraved, the wider beam could burn the details away. If you make the laser beam wider, it will burn the wood more. If the beam is too wide, you will not get a clean edge and could start a fire.
-Doug Green, Express Yourself Austin