Image editing software has made it possible to easily restore and revive damaged photographs. Before computers, artists and technicians had to rely on manual or optical tools such as the airbrush, liquid opaque, masking techniques, and giant process cameras. These techniques were labor intensive and required considerable skill.
Enter Photoshop 1.0, released in 1990. Since then, a vast arsenal of photo-restoration features have been introduced. Currently there are numerous tools and techniques that are specifically designed for the restoration workflow. Some of these features are manual, some are intuitive and automatic, and the latest features are driven by artificial intelligence (AI).
Old photographs
Time is not on our side when it comes to the life of a photograph. Several factors erode photographic prints over the years unless they’ve been archivally preserved in a literal vacuum, devoid of oxygen, light, and of course, the human touch. Physical damage such as dust, scratches, mold, tears, and abrasions may have been unintentionally inflicted from neglect or accident.
Emulsion on an image can deteriorate or change color caused by exposure to ultraviolet light, air, or fluctuating temperatures. The photograph might be clear and crisp on one side and gradually fade in one or more directions. Color photographs can develop yellow, green, blue, or red colorcasts, usually the result of the emulsion’s chemical reaction with air or the paper it was printed on.
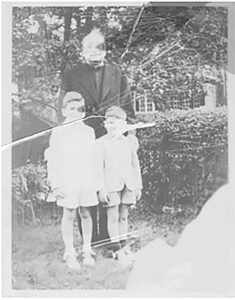
covered with scratches and dust, and the faces are barely decipherable.
A vital portion of the image such as a hand or a face might have a severe scratch or might be entirely missing. A corner might be torn, or an area of the photograph might have peeled or faded.
Finally, there is bad photography. The image could have been shot at the wrong moment, the composition might be unbalanced, or the image might be under or overexposed.
Consider this
Photo restoration can be quite labor intensive. Even though the challenge is seductive, some photos are not worth the effort. After examining the image and before attempting the restoration, ask yourself: “Is this photograph worth the time and effort?” Critical parts of the image may be missing, portions of the highlight areas are blown out, the photo is blurred, faded, stained, and covered with scratches and dust, and the faces are barely decipherable (Fig. 1). It’s conceivable that no matter what super tools you have at your disposal, your efforts will not be fruitful after investing a lot of labor into the restoration.
One possible solution to restoring an unworkable photo is that you can cut and paste portions of another similar image if one is available. Or as a last resort, you can simulate a restoration using AI technology — which doesn’t necessarily produce satisfactory results.
Scanning
Before scanning an old photograph, examine the image closely. Observe the darkest and lightest areas and see if there are details that need to be preserved. If so, adjust the contrast by using the scanner software’s brightness and contrast features. Don’t expect to correct the entire image. Adjust the image just enough to capture the details. You can later make more refined adjustments when you open the image in Photoshop.
Scanning at higher resolutions helps preserve detail. Scan the image at 300 pixels per inch or higher on a flatbed scanner. If the image is small, increase the scale and the resolution. Avoid exceeding the scanner’s optical resolution. For example, if the scanner’s optical resolution is 1200 DPI, you can scan it at 300 DPI and increase the size to 400%.
Scan black and white images in grayscale mode to eliminate discoloration or stains. For best results, scan the photo as a 16-bit grayscale to maximize the tonal range. After repairing it, convert it to an 8-bit grayscale before printing. If you later decide to add color or a sepia tint to the image, you can convert it to RGB mode and colorize it.
Always save the original scan as a background layer. Work on a duplicate layer so you can reference the original.
Basic Photoshop retouching tools

The seven basic retouching tools are available on the Tools panel. Some of them are intuitive, but they all are more-or-less manual, being applied directly to a layer by dragging a mouse or stylus. Even if you use Photoshop’s automated techniques or AI retouching features, inevitably you’ll have to rely on the manual tools for cleanup and final tweaks.
- The Spot Healing Brush quickly removes small scratches, dust spots, and blemishes by intuitively blending them with surrounding pixels. It’s best used in Content-Aware mode for natural blending. (Fig. 2)
- The Healing Brush is similar to the Spot Healing Brush, but requires that an area be sampled first. It provides more control over texture and tone.
- The Patch Tool repairs larger damaged areas. First, encircle the damaged region. Then drag the selection marque over a clean area to copy and replace the content.
- The Clone Stamp Tool copies pixels from one area to another. It’s ideal for reconstructing missing details when the healing tools aren’t
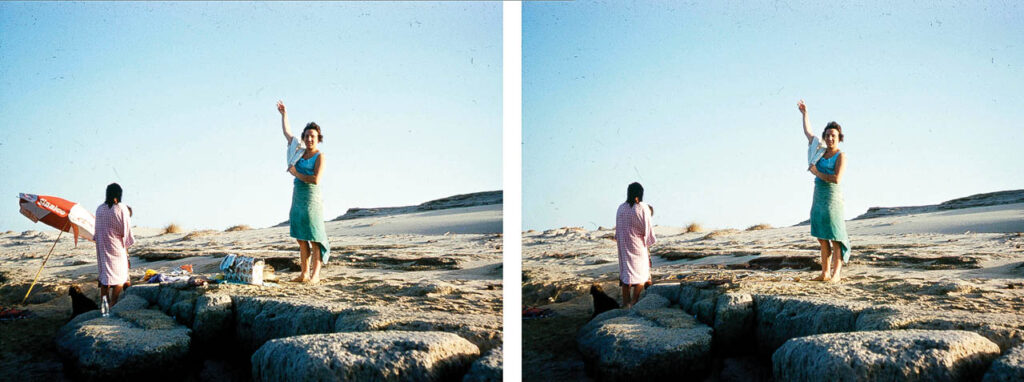
precise enough. - The Remove Tool removes elements such as unwanted objects and figures. (Fig. 3)
- The Content-Aware Move Tool selects and moves an area, then automatically fills the area left behind.
- The Red Eye Tool restores red eye caused by flash photography.
Rebuild missing content
A frequent problem encountered in restoration is that part of the photo, such as a corner or edge, has been torn and is missing. The technique for this type of restoration uses other areas of the photo to simulate the missing content. Using the Content Aware Fill command, fills missing areas with automatically-generated texture from nearby content. It’s useful for repairing tears, missing edges, or holes in the image.
When Content Aware Fill is chosen from the Edit menu, the interface displays a green overlay. The overlay can be added to or subtracted from with a brush tool, thereby controlling the source of the new content. A preview window displays the result as it happens. (Fig. 4)
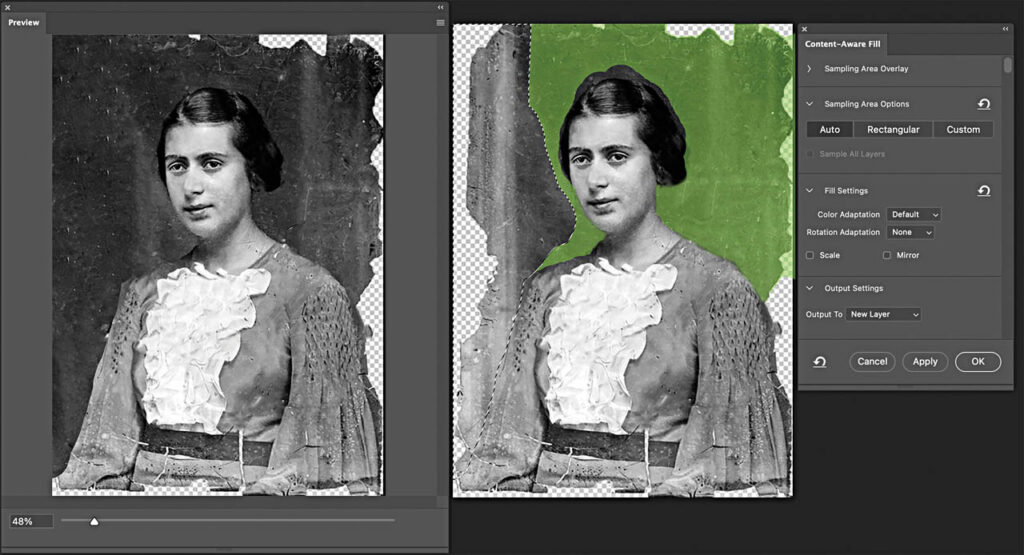
The new content is generated on a new layer. Merge the new layer with the source layer when satisfactory results are achieved.
Black & white conversion (from color to monochrome photos)
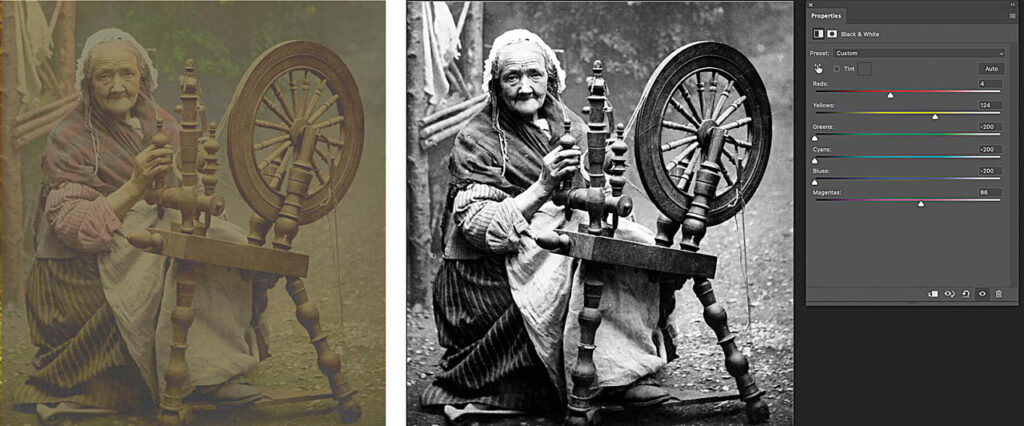
Sometimes converting a badly faded color image to black and white yields a better result. The Black and White adjustment feature found in the Adjustments panel will convert a color image into the perfect monochrome. Control the intensity of the tones by dragging the color sliders. (Fig. 5)
Dust & scratches
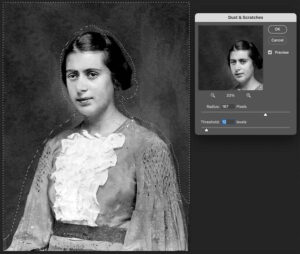
Superfluous artifacts are unavoidable when scanning old photos. These flaws are easily removed with the Dust and Scratches filter. It’s a powerful tool for eliminating the unwanted debris from an image. (Fig. 6)
When using the filter, select areas of similar texture. Each area of the image might require different settings. Applying the filter to the entire image all at once can result in a loss of detail.
The Dust and Scratches filter has two controls, Radius and Threshold. The Radius slider blurs, and the Threshold slider restores. Use the minimum Radius and Threshold you need to achieve the best results. Do not over blur the area with the Radius slider. Drag the Threshold slider just enough to restore the surrounding texture but not enough to restore the unwanted specks.
The Dust and Scratches filter is destructive. Convert the layer to a Smart Object first and apply it as a smart filter to keep the editing process dynamic.
Fading
Inevitably, black and white or sepia photos will fade from exposure to UV light or the deterioration of emulsion over time. As long as there is some vestige of tonality in a faded area, the photo can be salvaged. If the areas are entirely blown out, not much can be done except for cloning content from a similarly textured area. The two basic tools for tonal correction are:
Levels, which restores contrast in faded photos. Adjust the black, white, and midtone sliders under the histogram to bring back tonal depth.
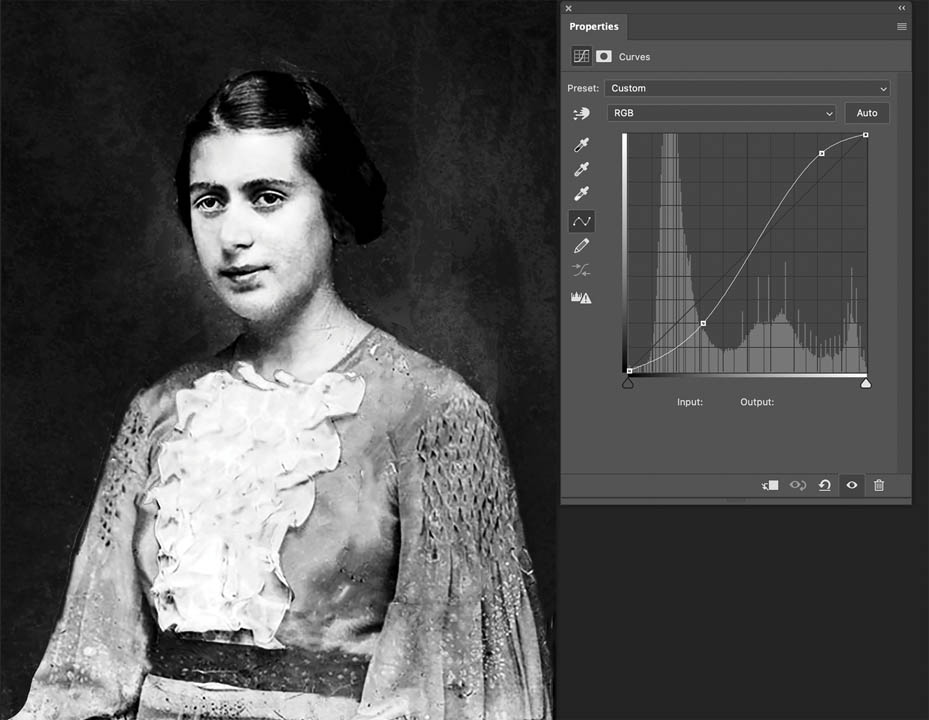
Curves adjusts contrast more precisely by bending the brightness curve upward to brighten or downward to darken. Create an “S” curve to enhance contrast. (Fig. 7)
Neural filters
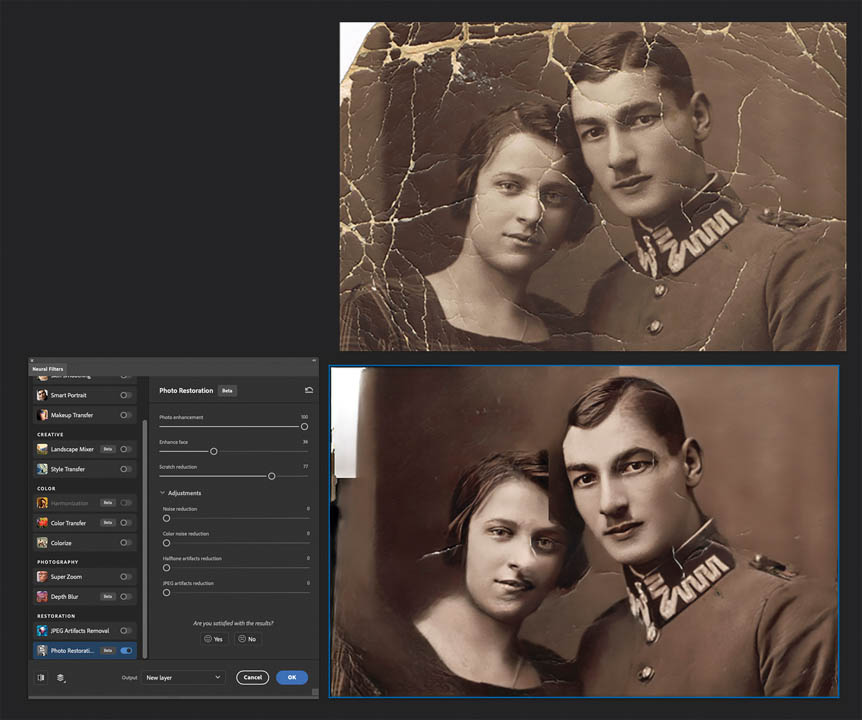
Within the past few years, Adobe has introduced a series of AI features to Photoshop that are designed to be an all-in-one solution to common workflow scenarios. The Neural filter, Photo Restoration, has several features that automatically restore images. It provides controls for Photo Enhancement, Face Enhancement, Scratch Reduction, Noise Reduction, and Artifact Removal. As you can see by the example, results are not always perfect. This AI-controlled filter, however, can be a time saver, especially if the photo is badly damaged like the example in Fig. 8. After the Neural filter is applied, glitches and mistakes can be cleaned up with the manual tools.
Colorize
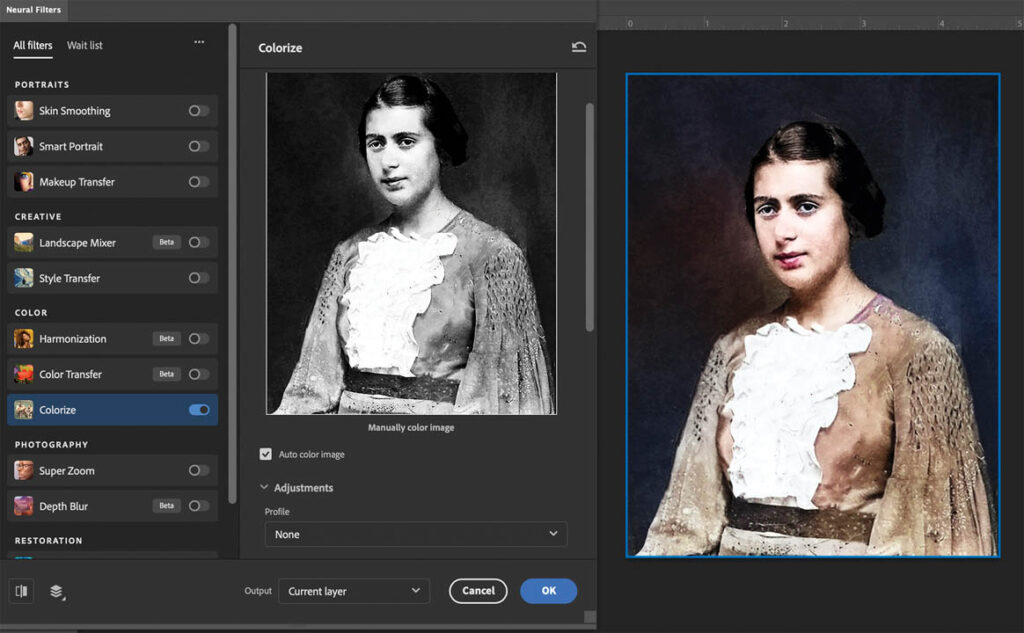
Colorizing an old black and white photo is a snap with the Colorize Neural filter. It’s so easy and accurate you’ll want to experiment with it just to see the variations you can achieve. Select the Neural filter option in the filter menu. Drag the Colorize button to the “On” position. If the Auto Color box is checked, the process is completely automatic, or you can scroll down the interface and play with numerous manual color adjustments. The amazing results make it very seductive and a real time saver. (Fig. 9)
Common pitfalls
Here are a few common pitfalls that are often seen on restored photos. Be aware of them so that you can avoid these mistakes.
- Over-smoothing is caused by too much noise reduction, blurring, or aggressive healing and cloning. Texture and grain are part of a photo’s characteristics. Removing too much can make faces look plastic or waxy. To avoid this problem, work on smaller areas and preserve the natural texture.
- Repetitive cloning is caused by dragging the Clone Stamp or Healing Brush over large areas without varying the sample points. It produces repetitive patterns and patchy surfaces. Instead, as you clone or heal, sample from several nearby areas until the effect looks natural.
- Over-sharpening is caused by applying low radius, high amount sharpening to enhance detail. It over-emphasizes grain, cracks, and dust, making the damage more visible. Remedy this by sharpening selectively at the very end of the retouching process.
- Over-adjusted contrast is caused by applying the Levels or Curves adjustments too aggressively. Old photos often have soft shadows and highlights. Filling blacks or blowing out whites can subdue subtle details. Instead, apply contrast adjustments selectively on adjustment layers. Adjust the opacity of the adjustment layers until a natural contrast is achieved. Use the Adjustment Layer’s layer mask to isolate the contrast to specific areas.
- Overuse of automatic features by relying too much on Content-Aware Fill or Neural filters. This practice can produce blurry or mismatched areas. Automatic and AI features will speed up the restoration but can create problems. Use automation as a starting point. Then refine the image with the manual retouching tools and techniques.
Dynamic workflow
After restoration, a final sharpening is a must. Use the Unsharp Mask or Smart Sharpen filters applied as Smart Filters to enhance detail. Don’t over sharpen! As always, work with a dynamic, nondestructive workflow by creating duplicate layers, smart filters, layer masks, and adjustment layers. Be sure to retain the unedited original scan on a separate layer. Observing these practices will assure that your restoration will proceed smoothly and efficiently as you revive a picture to its original glory.