If you’re a graphics professional or a photographer, I’m sure you’ve encountered the RAW image format. But what does it mean? First and foremost, it’s an overall category for a variety of proprietary file formats such as Canon’s .CRW and .CR2, Minolta’s .MRW, Olympus’ .ORF, Nikon’s .NEF, and Sony’s .ARW that share important common features. By shooting in RAW format, all the data points captured by your camera’s sensor are recorded with no data loss from the camera’s built-in processor. These formats extend the capabilities of image processing and editing because they contain unprocessed data taken directly from the digital camera’s sensor. They contain more information than other formats such as JPG or TIFF files and provide more flexibility in image processing.
Plug-in
Adobe Camera Raw is also the name of a plug-in used in Adobe Photoshop and Adobe Lightroom. This plug-in enables the opening and editing of RAW files and the capability of adjusting exposure, white balance, and contrast, among other settings, without altering the original image data.
Adobe Camera Raw is an application unto itself that can help prepare files destined for the printer or to be published online. It does so much in a single interface that many digital artists, photographers, and print technicians find it indispensable for improving color, contrast, and tonality. It is universally used for importing and enhancing images and has been a must-have tool for graphics professionals since its first released in 2003. Applications that support Adobe Camera Raw include Photoshop, Photoshop Elements, After Effects, Bridge, and Adobe Lightroom. FYI: Corel PaintShop Pro also has RAW editing features.
RAW conversion
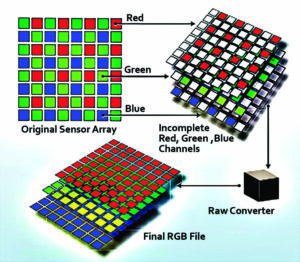
A RAW file is a record of the data captured by the camera’s sensor. The sensors count photons on three filtered arrays and convert the combination of red, green, and blue data into pixels. When a RAW file is opened, the pixel information is processed by the RAW Converter algorithm that expands the amount of data so that there is more tonal information than other types of graphic files like JPG or TIFF. (Fig. 1) With more data comes more opportunity and control.
The interface
Adobe Camera Raw works by enabling the direct adjustment of RAW image files. When you open a RAW file in the Camera Raw plug-in, it first converts the raw data from the camera’s sensor into a preview image. This conversion uses the data directly from the camera’s sensor and metadata such as white balance, ISO, and exposure.
Once the RAW file is opened, Camera Raw presents a set of tools and sliders for editing. This interface lets you adjust various parameters such as exposure, contrast, shadows, highlights, and color balance, among others.
Non-destructive editing
Any adjustments made in Camera Raw are non-destructive. The original RAW file remains unchanged. Camera Raw creates a set of instructions or metadata that describes the changes that have been made. This enables you to modify or revert these changes at any time without affecting the original image data.
Processing
As adjustments are made, algorithms process the image based on the settings you apply. For instance, if the exposure is increased, Camera Raw recalculates how the image’s brightness should be displayed. This processing is done in real-time, so you can see the effects of your adjustments instantly. After you’ve made your adjustments, you can either save the edited file as a TIFF or JPG or open it in Adobe Photoshop for further editing. In Photoshop, the adjustments made in Camera Raw can be fine-tuned or combined with other edits.
Output
When you save or export the image, Camera Raw applies all the adjustments and generates the final output file in the format you choose. The original RAW file remains intact, allowing you to reopen it in Camera Raw later if need.
Opening files
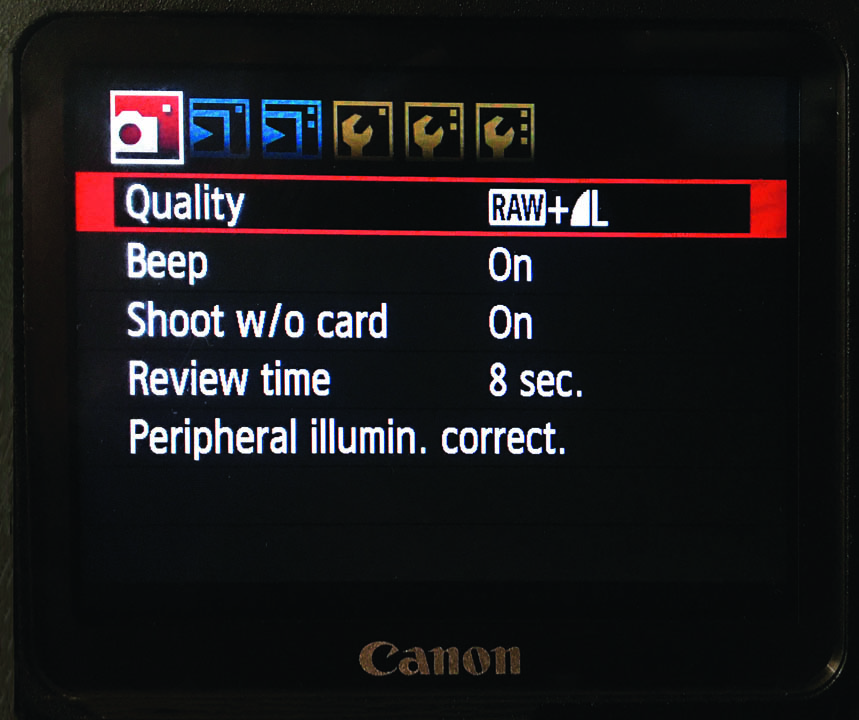
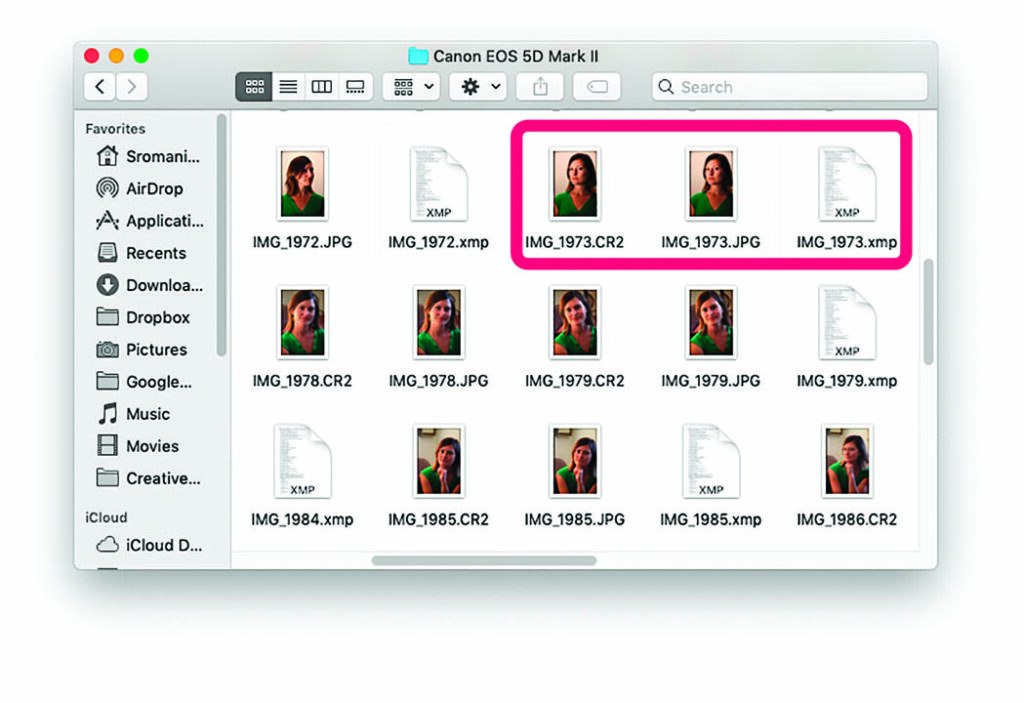
Many digital cameras support the RAW format. It can be designated as an option when you assign an image quality to the camera. (Fig. 2) RAW images automatically appear in the Camera Raw interface when you open them. In addition, with each RAW file, a JPG and a XMP file are generated. (Fig. 3) A XMP (extensible metadata platform) is a metadata file used by Adobe programs such as Photoshop or Lightroom that records edits made to a RAW file.
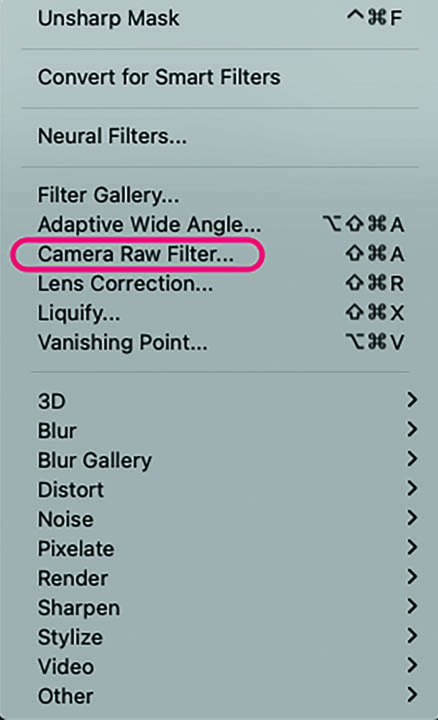
If the picture wasn’t shot in RAW format, it can still be edited in the interface providing that it’s a JPG, a PNG, or an unlayered TIFF. Photoshop has a built-in Camera Raw filter used for this purpose. (Fig. 4)
When to use it
Every picture you take does not need to be shot in RAW format. If you plan on publishing or printing the picture or if you think the lighting isn’t quite right or the tonality of the image is going to need extensive editing, then shoot in RAW format because it affords much more control. Snapshots or other quick work, or if you are shooting dozens of images that you need to review quickly, may be better shot as TIFFs or JPGs. RAW images have larger file sizes. If disk space is a consideration, assign JPG or TIFF formats that can be easily compressed.
Controls
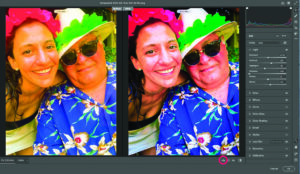
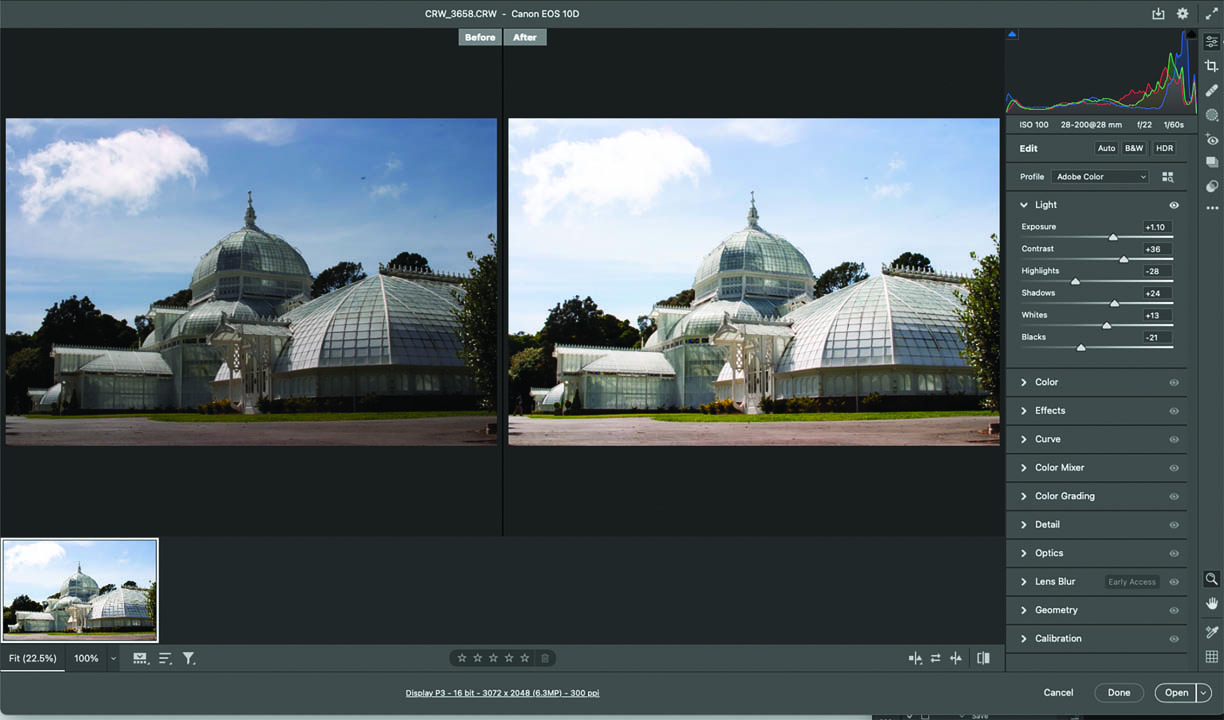
The Camera Raw Interface displays the image window on the left, and the controls on the right. The control menu affects a wide range of image characteristics. If you click the icon at the lower right of the image field, you’ll see two images; the original and the edited version that changes in real time as you edit it so that you can compare the two. (Fig. 5)
Understanding these image characteristics is important so that you know exactly what you are editing when you start playing with the controls. Here are descriptions of the four most-used tools of the 11 features that Camera Raw interface controls:
- Light: The Light category addresses the overall tonality of the image controlling Exposure, Contrast, Highlights, Shadows, Whites, and Blacks. The sliders adjust various ranges of these characteristics. Positive values increase and negative values decrease the intensity of each control. The goal is to achieve a balance of all these elements into a perfectly toned picture. (Fig. 6)
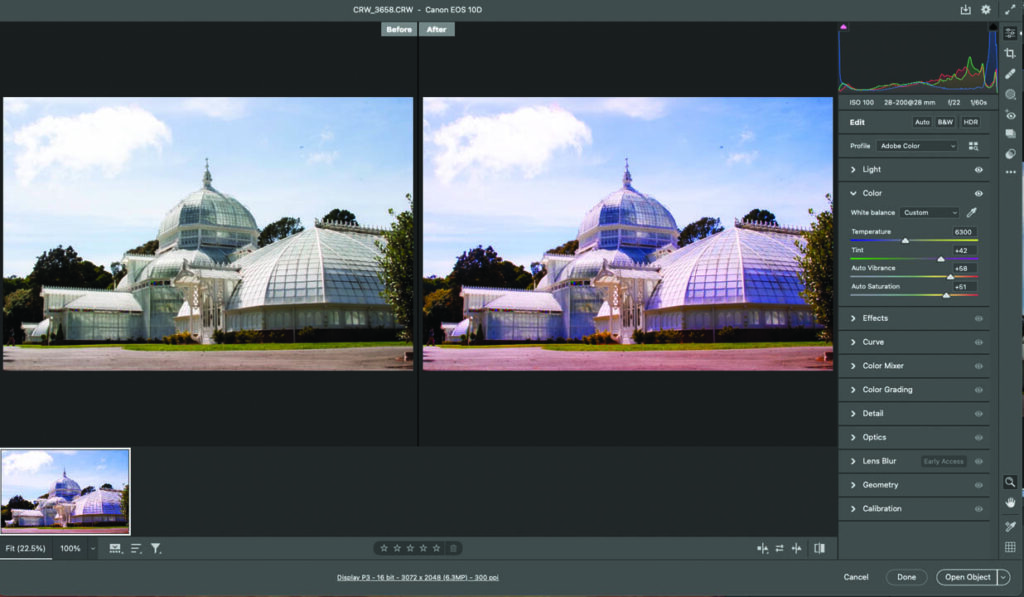
- Color: The Color sliders control the control color characteristics of the image including the White Balance, Temperature, Tint, Vibrance, and Saturation. When using these controls, the goal is to enhance and perfectly balance color and eliminate color casts. (Fig. 7)
- Tone curve: The Tone Curve is a powerful feature providing access to the entire range of the image’s tonality. It is similar to the curves feature in Photoshop but adjusts color with sliders. The Tone Curve offers precision tonal control and is often used to tweak the image after it has been altered with the Light and Color settings. (Fig. 8)
- Details: The Detail controls can eliminate noise and make an image really pop. (Fig. 9)

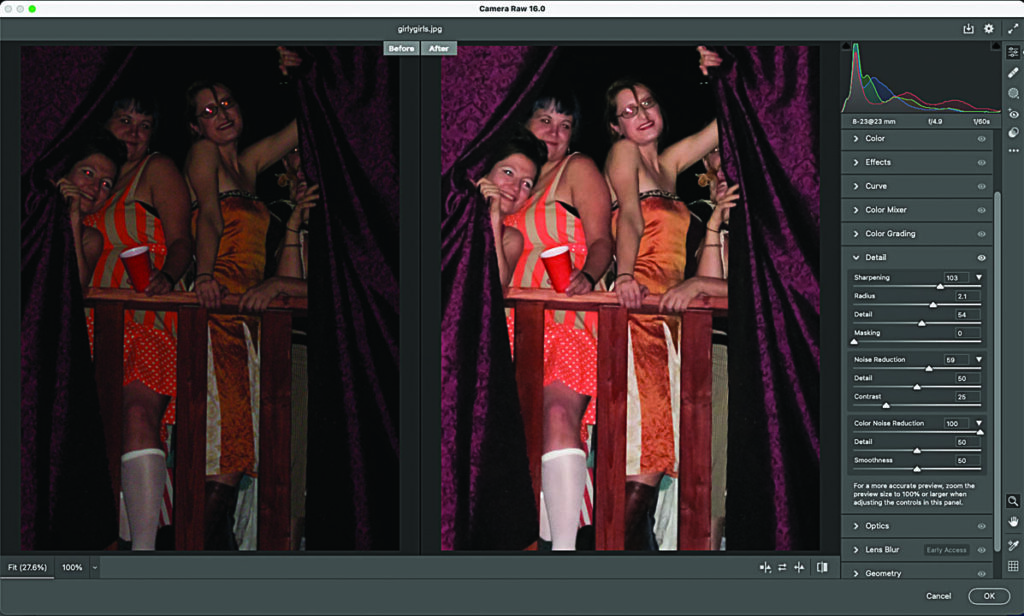
There are three controls in the details field. The sharpening feature is used to control the contrast of adjacent edges and, if pushed to the extreme, will enhance image grain. Noise Reduction eliminates noise, grain and artifacts. Pushed to the extreme, it will compromise detail and texture. Color Noise Reduction helps eliminate noise that results from images shot in dark lighting conditions. Images with deep unwanted grain are easily repaired without sacrificing detail.
AI & RAW images

How can I write an article about RAW images without mentioning the latest trends in AI software? DxO PureRAW (Fig. 10) uses artificial intelligence to enhance RAW photos before they are processed by other editing software. It automatically applies noise reduction, sharpness enhancement, and lens corrections to improve image quality. It has received great reviews, so if you’re lazy and tired of dragging sliders, you might want to give it a try.
Advantages
Here are some of the advantages of shooting images in RAW format and opening them in the Adobe Camera Raw interface:
- RAW images and the Camera Raw interface can significantly enhance the quality and flexibility of your photo editing workflow!
- RAW formats retain more detail than JPEGs, allowing for better quality in post-processing.
- RAW formats have a larger dynamic range that captures a wider gamut of light and dark areas, preserving details in highlights and shadows.
- Adobe Camera Raw enables non-destructive editing. The original file remains untouched, allowing you to revert to the original at any time
- RAW provides more options for adjusting exposure, white balance, contrast, and other settings compared to JPEGs and TIFFs.
This overview is presented to help you decide whether to shoot your images in RAW format and to edit them in Adobe Camera Raw. Is it the be-all-end-all wonder tool? Well, it certainly offers a lot of essential features for enhancing those not-so-hot pictures. Of course, experimentation is always the key to creating the perfect image and I’m sure you can agree that Camera Raw has the potential to make your images pop off the page.
- Here’s a tip: You’ve worked an image in Camera Raw, experimented with its many features and applied the settings by clicking Done to save the changes or Open Image to open it in Photoshop. Now you can apply additional tweaks and enhancements. Camera Raw doesn’t do everything that Photoshop can do, but it is a great beginning to your workflow. It gives you an edge from the get-go to get the most out of your pictures.