I’ve repeatedly written about the efficiency of automating your Photoshop workflow and how, with actions in your arsenal, you can save yourself a lot of work. Working in the digital world has hopefully eliminated the need to perform tedious repetitive processes that are both boring and inefficient.
Photoshop confusion
The problem is that the process of creating and modifying actions and automations can be confusing. There are controls in those little panels that can be baffling when you are trying to configure, save, and run an action. I will cite my experiences with a photographer friend of mine who wanted the ability to attach a copyright to all of his images with the press of a key. I created a droplet for him several years ago.
Every year, in January, he calls me to help him change the date of his automated copyright. For some reason he can never get the update to work. I troubleshoot the glitches until we have a simple button on his desktop that assures that his thousands of images will be protected by copyright with the correct year. Since it does take some time to figure out why a simple update doesn’t function properly, I will present a full breakdown of the actions and automation processes, as well as earmark potential traps that can slow you down if you don’t pay attention.
Actions
An action is simply a recording of a command or series of commands that is automatically applied to an image. Whether they are simple, with two or three commands in the sequence, or complex with dozens of commands, actions can be recorded, saved, loaded, and applied to individual images. Actions can be applied to groups of images, too.
Automatic commands can be run directly from Adobe Photoshop, Illustrator, and Bridge. They are also available in Corel software. Since creating an action differs slightly from program to program, I will use Photoshop Actions as an example because they are easiest to understand. Rest assured, except for the terminology and the location of panels, the process in all software is essentially the same.
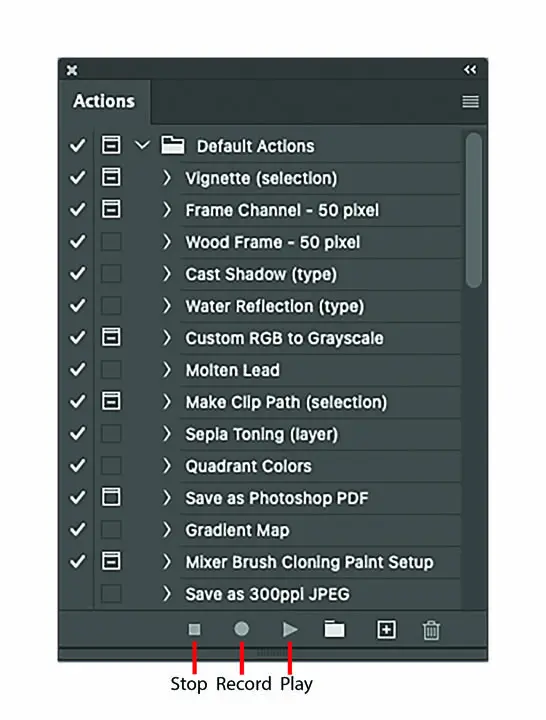
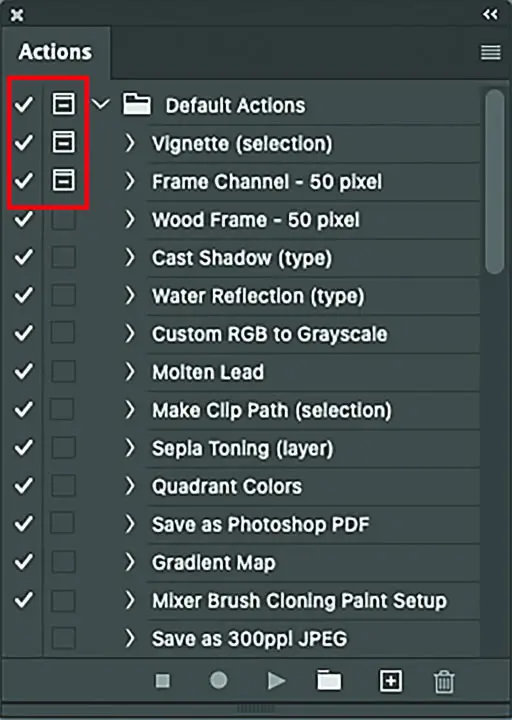
An action is created by accessing the Actions panel from the Window menu. When the panel is opened, default actions are displayed (Fig. 1). The default actions are bundled with the program and include everything from automatically casting shadows to framing your picture in a fine wooden frame, among dozens of other processes. Running an action is simply a matter of choosing one in the Actions panel and clicking the Play button.
Sounds simple
Here I should warn you that applying an action to an image frequently requires some preparation of the target image. For example, type layers, fill layers, and smart object layers need to be rasterized first if the action applies a filter to them. Another example of pre-action prep is if the action is programed to select the background layer and the current document does not have a background layer, the action will fail. You’ll need to create a background layer. The target document must physically correspond to the action. The point is that it’s usually not just a matter of pressing a key.
Create an action
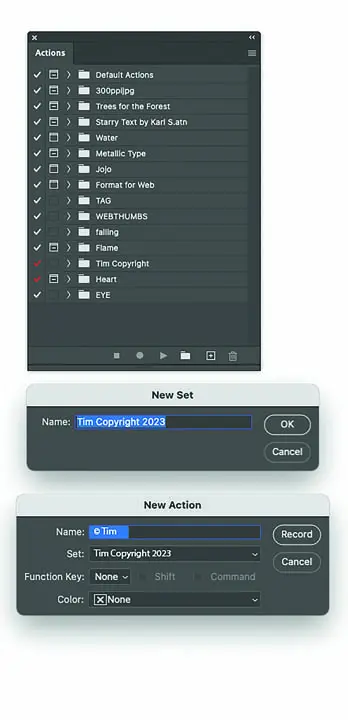
Let’s look at the process of creating an action, and then we will iron out the hurdles you may encounter when you apply it. First, open the current document. Before you can record an action, you must create an action set. A set is a folder where the action resides. Click on New Set in the panel options menu. Name the set. Click on New Action from the same menu and name the action in the New Action dialog box (Fig. 2), then click Record.
Be careful
For the duration of the recording session, almost every command that you perform will be recorded. The exceptions are changes to the preferences or certain manual tool operations such as painting, cloning, and healing.
The panel displays a little red dot when the action is being recorded. When a command is executed, its name appears as a separate item in the Actions panel. When the commands are completed, click the Stop Recording button (the little square).
Apply the action
To run the action on a new image, open the image and select the action in the Actions panel. Click the triangular play button. The action automatically applies the commands listed in the panel in sequence to the new image.
Modify the settings
Because the settings often need to be readjusted to achieve the desired results on a different image, you can automatically stop the action during the process of applying it and display its dialog box to modify adjustments. In the Actions panel, click the icons in the second column next to the command (Fig. 3). These are On/Off Dialog icons that pause the action and present the command’s dialog box. After modifying the settings, click the dialog’s OK button to proceed, at which point the action will continue to run.
Saving and loading actions
I mention this now because you’ll need to be able to save and load actions in order to troubleshoot problems that may arise.
- To Save — Click Window > Actions. In the Actions panel, click on the action set that you want to save. Choose Save Action from the Panel Options menu and designate a location for the saved set.
- To Load — In the Actions panel, click the Panel Options menu. Choose Load Action. Navigate to the location where you saved the action. Find the action and click OK.
Troubleshooting
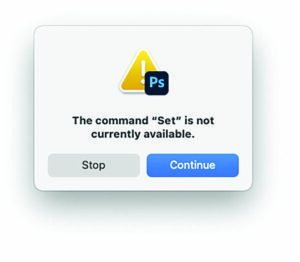
Sometimes, when an action is applied, there may be glitches or error messages that pop up. (Fig. 4). The following are a few of the most common issues with Photoshop actions and how to troubleshoot them.
- Problem: Actions that used to work well are now glitching.
- Quick fix: Delete the action and then reinstall it. This fix solves 99% of the issues that you may encounter.
- Drag the glitchy action set onto the Trash icon at the lower right of the Actions panel.
- Quit and relaunch the program.
- Reinstall the action set from the original file.
- Problem: Layer interference.
- Quick fix: When applying actions to an image, it’s important to keep a well-organized image and, if possible, keep layers to a minimum or at least in layer groups. Save and merge layers or flatten the image regularly when editing (Fig. 5).
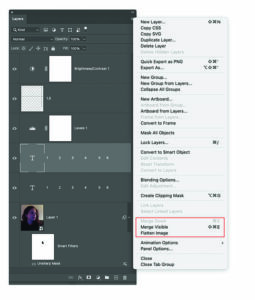
Often, an action will produce a layer, and some actions need a simplified Layers panel to apply their effect. If there are too many layers, the results can be confusing. It can affect the runtime of the action and cause error messages and program errors. Keep things clean and simple! Before you run the action, save a backup version of the image.
- Problem: Program error.
- Quick fix: Restart Photoshop.Sometimes the dreaded program error message appears while an action is running. The error message indicates that the program has encountered a glitch in sequencing. The solution is to restart your computer and check for updates. If this happens again, go to Adobe Support, as there might be some internal software problem.
- Problem: The command Invert is not available/the command Select is not available/the command Set is not available.
- Quick fix: Make sure default layer masks are turned on.
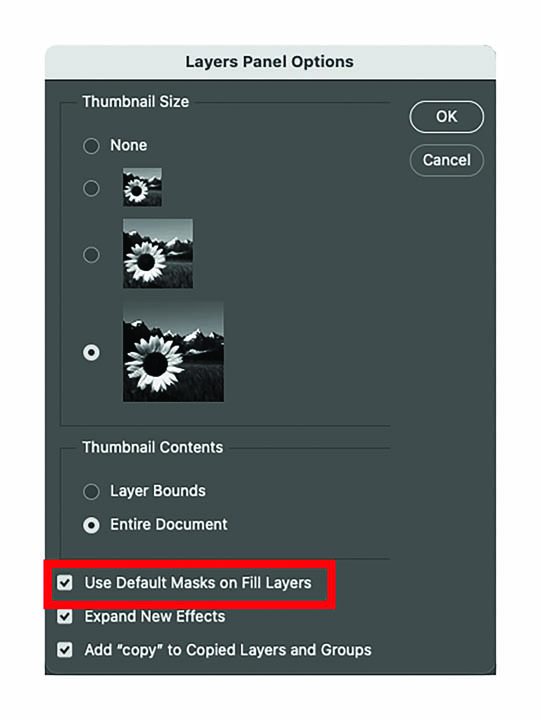
If you get this error, it’s because many actions create layer masks to produce their effect, especially with fill layers and adjustment layers. If the default layer masks are turned off, you will see an error message. In that case, follow these steps:
- Open an image in Photoshop.
- Make sure your Layers panel is visible (Window > Layers).
- Click the Panel menu icon at the top right of the Layers panel.
- Scroll down to Panel Options.
- Check the Use Default Masks on Fill Layers box (Fig. 6).
- Also be sure to select the thumbnail size option.
- Close this window.
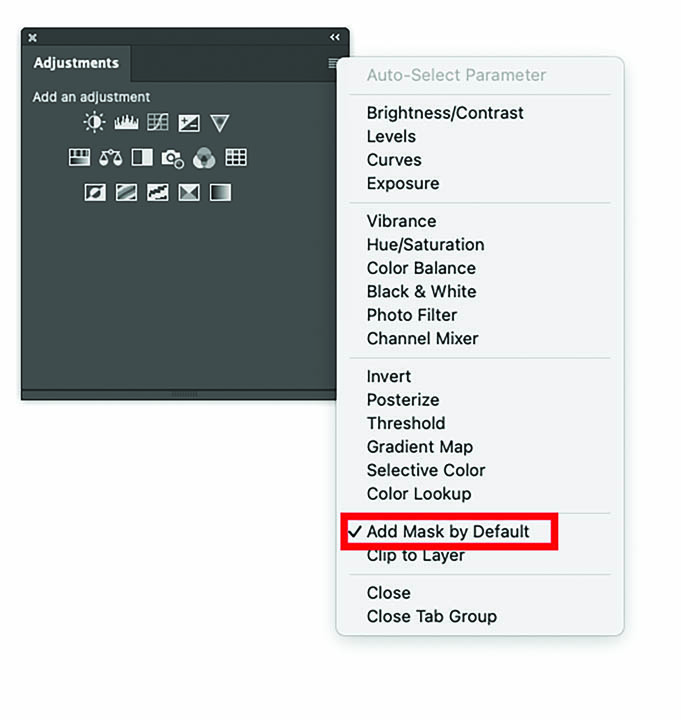
- Next, open up your Adjustments panel (Window > Adjustments).
- Click the Panel menu icon at the top right of the Adjustments panel.
- Scroll down and select Add Mask by Default (Fig. 7). (A check mark appears next to it).
- Your layer masks are now set to display by default.
Automations and scripts
An automation is a script very much like an action, but is usually more complex. Automations trigger a JavaScript when opening, saving, or exporting a file. Ten individual scripts are provided with the program (Fig. 8, page 55).
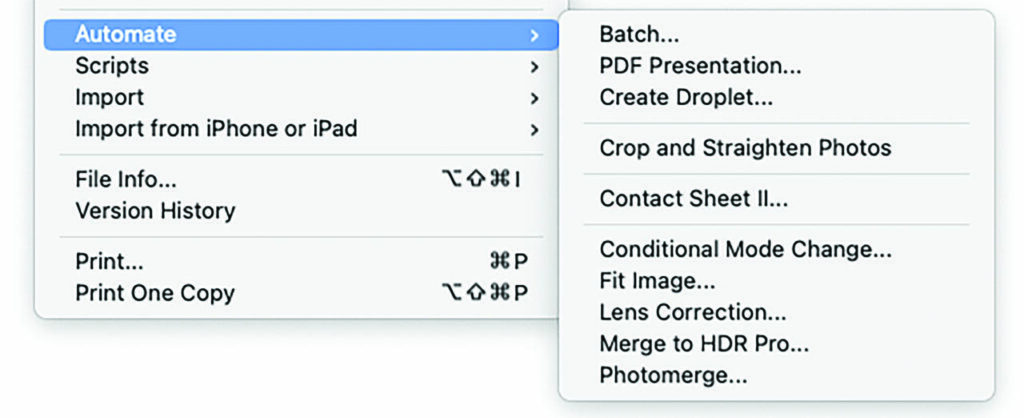
Let’s look at two of the automations that, in my opinion, are most useful. They reside in the File > Automate menu. You can also find some of them in Adobe Bridge.
Batch
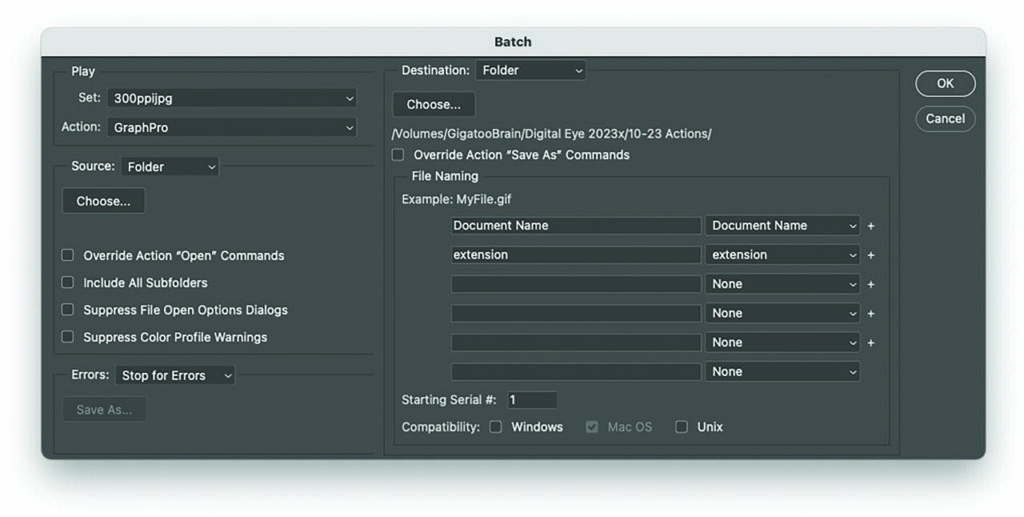
At the top of the Automations menu is Batch. It applies an action to a number of images and is a fantastic time saver. The Batch dialog box (Fig. 9) specifies the action, the source folder (where the images are stored), and the destination where the new processed images will be saved.
I can’t stress enough how learning to use this feature can lighten your workload. As an example, I’ll use my Digital Eye writing experience to show you how batching lets me quickly format images for publication.
I submit an article each month to GRAPHICS PRO magazine. There can be as many as 20 illustrations for each article. The publisher, Cahaba Media Group, requires images to be 300 pixels per inch; five to eight inches wide; and saved in JPEG format. The first step is to configure one image while recording an action.
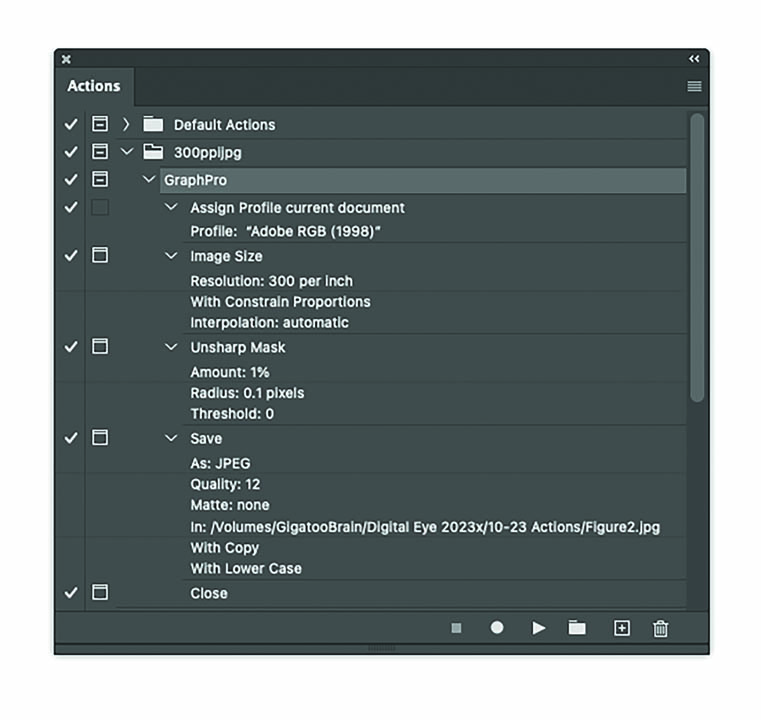
I begin by making a set (a folder containing the action). I create a new action and begin recording. I first apply the Adobe RGB 1998 profile to the picture. Then, I size it to the specifications. If the image is a screenshot, I usually sharpen it to tighten it up a bit. Next, I save it to a specific location in JPEG format. Finally, I close the image. Then, I stop recording. Fig. 10 shows the Actions panel with the recorded sequence.
I make sure that all of my screenshots and any additional images are in a single folder called the source folder. I create a destination folder where the modified images are saved once they are processed. I choose File > Automate > Batch, then choose the action, the source file, and the destination file. Then I click OK. The action places all of the newly modified images in the destination folder ready to be sent to the publisher. All I did was assign a few specs and click the mouse, and the automation did all the work for me.
Droplet
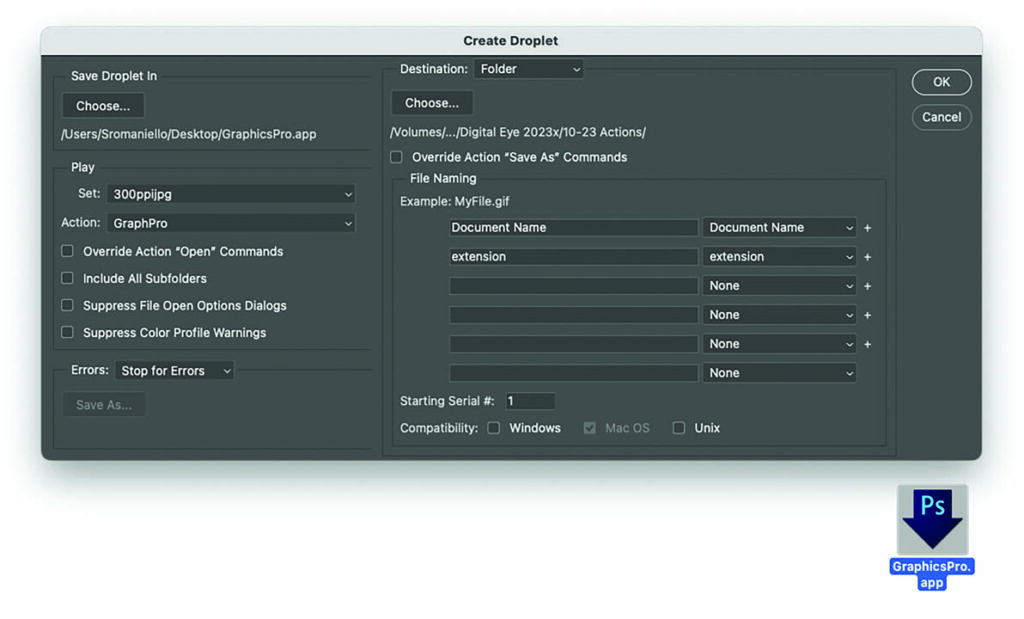
A droplet is an icon that sits on your desktop (or anywhere else) that triggers an action when you drag images onto it. It’s also great time saver! The dialog box (Fig. 11) is similar to the Batch dialog, with a few exceptions. Designate where you would like the droplet to reside, specify the destination folder where the edited images will be saved, make any necessary changes to the naming conventions, and click OK. The droplet will appear. Click on the droplet icon and the new revised images are saved to the destination folder.
Streamlined workflow
I’ve written several times about actions and automations because they are practical, time-saving methods that apply a sequence of commands to one or more images. Though you may experience an occasional glitch or error message, you now have a guide that will help you troubleshoot some of the more common difficulties. Believe me when I tell you that these techniques can assure that your workflow is streamlined. Furthermore, if you build up an inventory of actions, you will have them at your complete disposal. Several websites offer actions to download. Google “free Photoshop Actions” and you’ll find dozens of Photoshop action sites.