Let’s Talk Shop: Pre-Wrap Pre-Planning
Here are some ways your shop can save money from the very beginning of the process...


There are so many little things during the wrap installation process that can make your install go faster, with better results. Experience, proper technique and efficient tools all help your actual hands-on installation job go more smoothly. But often the most time-saving steps come well before the vinyl is even printed.
Since I’m involved in both the design and installation of many of our wraps, I have a good idea of how the graphics are going to go onto the vehicle. My hands-on experience helps me plan the layout and installation back in the computer design stage. This pre-planning saves a lot of time when we actually apply the graphics to the vehicle.
Templates
We frequently get phone calls from people looking for a rough quote on a wrap. Often with these calls we’re working off nothing more than the template for the vehicle until they can bring the vehicle to us.
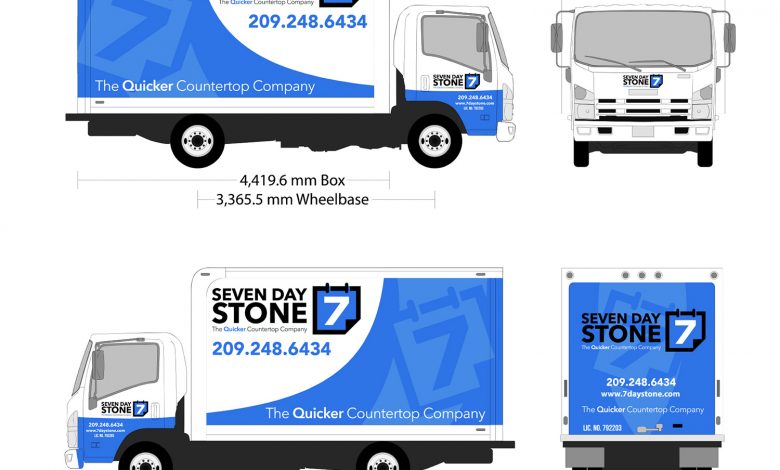
We recently had a customer that we’d previously wrapped a fleet of vehicles for, who was adding two box trucks to their fleet. The company designer sent us vector artwork laid out on a template for the first box truck. We pulled up the same template from Art Station Vehicle Templates and scaled it to size. Using the template, we determined the total square footage and gave the customer a quote to get us started.
Once they approved the estimate, it was time for us to see the actual box truck to double check measurements, obstacles and the condition of the paint. The company sent us photos of the truck for reference before bringing the truck in.
At this point we found out there was a door on the passenger side of the box as well as a vent. The rear roll-up door also had a lift gate that blocked the bottom third of the rear graphics.
The designer hadn’t been told about these obstacles before designing on the template. This was a great example of why it’s so important to see a vehicle prior to starting production.
Inspection
When a vehicle comes in for an inspection we’re looking at the condition of the paint and any obstacles that may affect the wrap. We try to print out either photos of the vehicle or a vehicle template before the customer comes in. On these printouts we note the paint condition, if there is any flaking paint or chalky finish, and if there is any rust or other damage that may affect the graphics.
Any after-market parts, body molding, rubber window trim or other obstacles that need to be considered during the design process are also highlighted. A Jeep Wrangler that we recently wrapped had large hinges on each door as well as door handles that stuck out quite a bit. When taking our photos it’s hard to see how these obstacles stick out and might cause issues so we noted it on the paperwork for later consideration.
We also take straight-on photos of all sides of the vehicle. We step back, stand at the center of the side we’re shooting and try to get at an even eye level for the least amount of distortion. Since the camera is out, we’ll also snap a few photos of obstacles or paint conditions worth documenting.
Reference Measurements
Reference measurements are another important part of the vehicle inspection. We note these sizes on another vehicle template or printed photos so we can clearly see what two points we measured from.
We use these measurements to scale the photos we’ve taken. A photo can appear fairly flat and doesn’t take into account the curve of a panel, so while we still get vertical measurements, we also make sure we get plenty of clear horizontal measurements.
Having those vertical measurements is still important when we setup our print panels later on in the process. Some vehicle doors or vans will curve under quite a bit at the bottom. When you’re just looking at a flat photo you can’t tell that you need to extend your panel another 10″ for example to be sure that the wrap covers all the way under the vehicle.
When I note a curve on my template with the dimension I use a curved arrow to indicate that the panel will curve under. This insures I give myself plenty of vinyl to cover, but also that important information isn’t placed in this area where it can be lost under the curve.
Design
At the design stage of a wrap job we’re also able to do some pre-planning that will speed the installation process. The artwork the customer provided for the box truck job was all vector art and was easy to work with. In this case we do all our designing in FlexiSign Pro. If we’re dealing with a lot of photos or raster artwork then we do our designing in Photoshop.
Whether we’re working with vector or raster artwork, we essentially set up our artwork the same way using layers. We start by pulling up the photos we took of the vehicle, cropping them down a bit and doing any brightening or sharping for better presentation. These photos are saved and then brought into our FlexiSign Pro software where we scale them to actual size using the reference measurements we took.
If we’re going to do our layouts in Flexi we will use the masking tool to create layers that we design within. The back layer will be the original photo of the vehicle and the top layer will be another copy of the photo with the areas we’re wrapping left out of the mask. Between these two layers we place our vector graphics and we’re able to move them around, avoiding obstacles and creating the most effective design.
Layouts that are created in Photoshop are essentially done the same way. Our background layer is the original photo and our top layer is the same photo with areas that will be wrapped deleted out. By designing in additional layers between these two copies of the photo we’re able to move the graphics around “on” the vehicle.
Panels
When printing, we’ll either setup our panels individually or we’ll export large sections that are then separated into panels through our RIP software. If we’re trying to achieve a seamless wrap we typically pre-setup the panels. If it’s a large van or most box trucks and trailers we just export a side and let the RIP software break it down into panels.
In the case of the box truck with the door we decided to setup the individual panels ahead of time to not only work around obstacles, but to also best maximize our material. The box of the truck was approximately 13.5′ long. With panel overlaps we were able to have three even panels plus a narrow panel. Pre-setting up the panels allowed us to nest these narrow panels, and any other odd-sized panels, to maximize media usage. Having panels that were already planned to best fit the space makes the installation much more efficient.
Spot Graphics
There was a vent on the passenger side of the box truck that I almost missed during the design stage as it’s painted the same color as the truck. I originally had the artwork designed where the slogan ran right across this vent and these smaller letters would have been cut out.
The slogan is large and the panel is flat so it’s not necessary to cut it separate, and use more vinyl, but by remembering the vent I was able to move the slogan up about 6″ ahead of time. This will avoid the cut out lettering and will also speed the installation of the graphics.
When it comes to tighter spaces though, it’s usually best to just cut those graphics separately. On the doors of the box truck there is a large colored swish that continues off the box. There is also a logo and contact information. These smaller graphics have to fit around the mirror, existing truck ID labels and the bottom swish. By cutting these separate, we have better control over where the graphics land.