If you’re a Photoshop user, you are no doubt aware of the infinite potential to transform images. From enhancing contrast to color correction to creating amazing artwork, the gamut of Photoshop’s powers seems infinite. In the shadow of these vast powers, and often neglected by beginners, is Photoshop’s dynamic workflow capabilities. The non-linear environment enables incredible editing potential. At any point in the creative process content can be modified. There are a variety of techniques that correct errors, transform previously created content or even generate completely new versions of an image. In short, if you are aware of these techniques, it’s virtually impossible to make a mistake.
Smart objects
One technique for assuring that content can be easily manipulated is by using Smart Objects. Smart objects are often used for migrating vector data from a vector-based program like Illustrator to pixel based programs like Photoshop. Photoshop uses the vector data when increasing the size of image content, thereby preserving image quality and preventing softening and pixelization. More frequently, Smart Objects do a whole lot more than resolution independent transformations.
Clever, clever, clever
When we think of the words “smart object” we expect that the object exhibits canny intelligence and has an acute memory. Indeed, smart objects offer us several more options than ordinary old dumb objects. In addition to having memory, and can embody vector data between programs, they apply filters globally or locally and offer complete control at any point in the non-linear workflow.
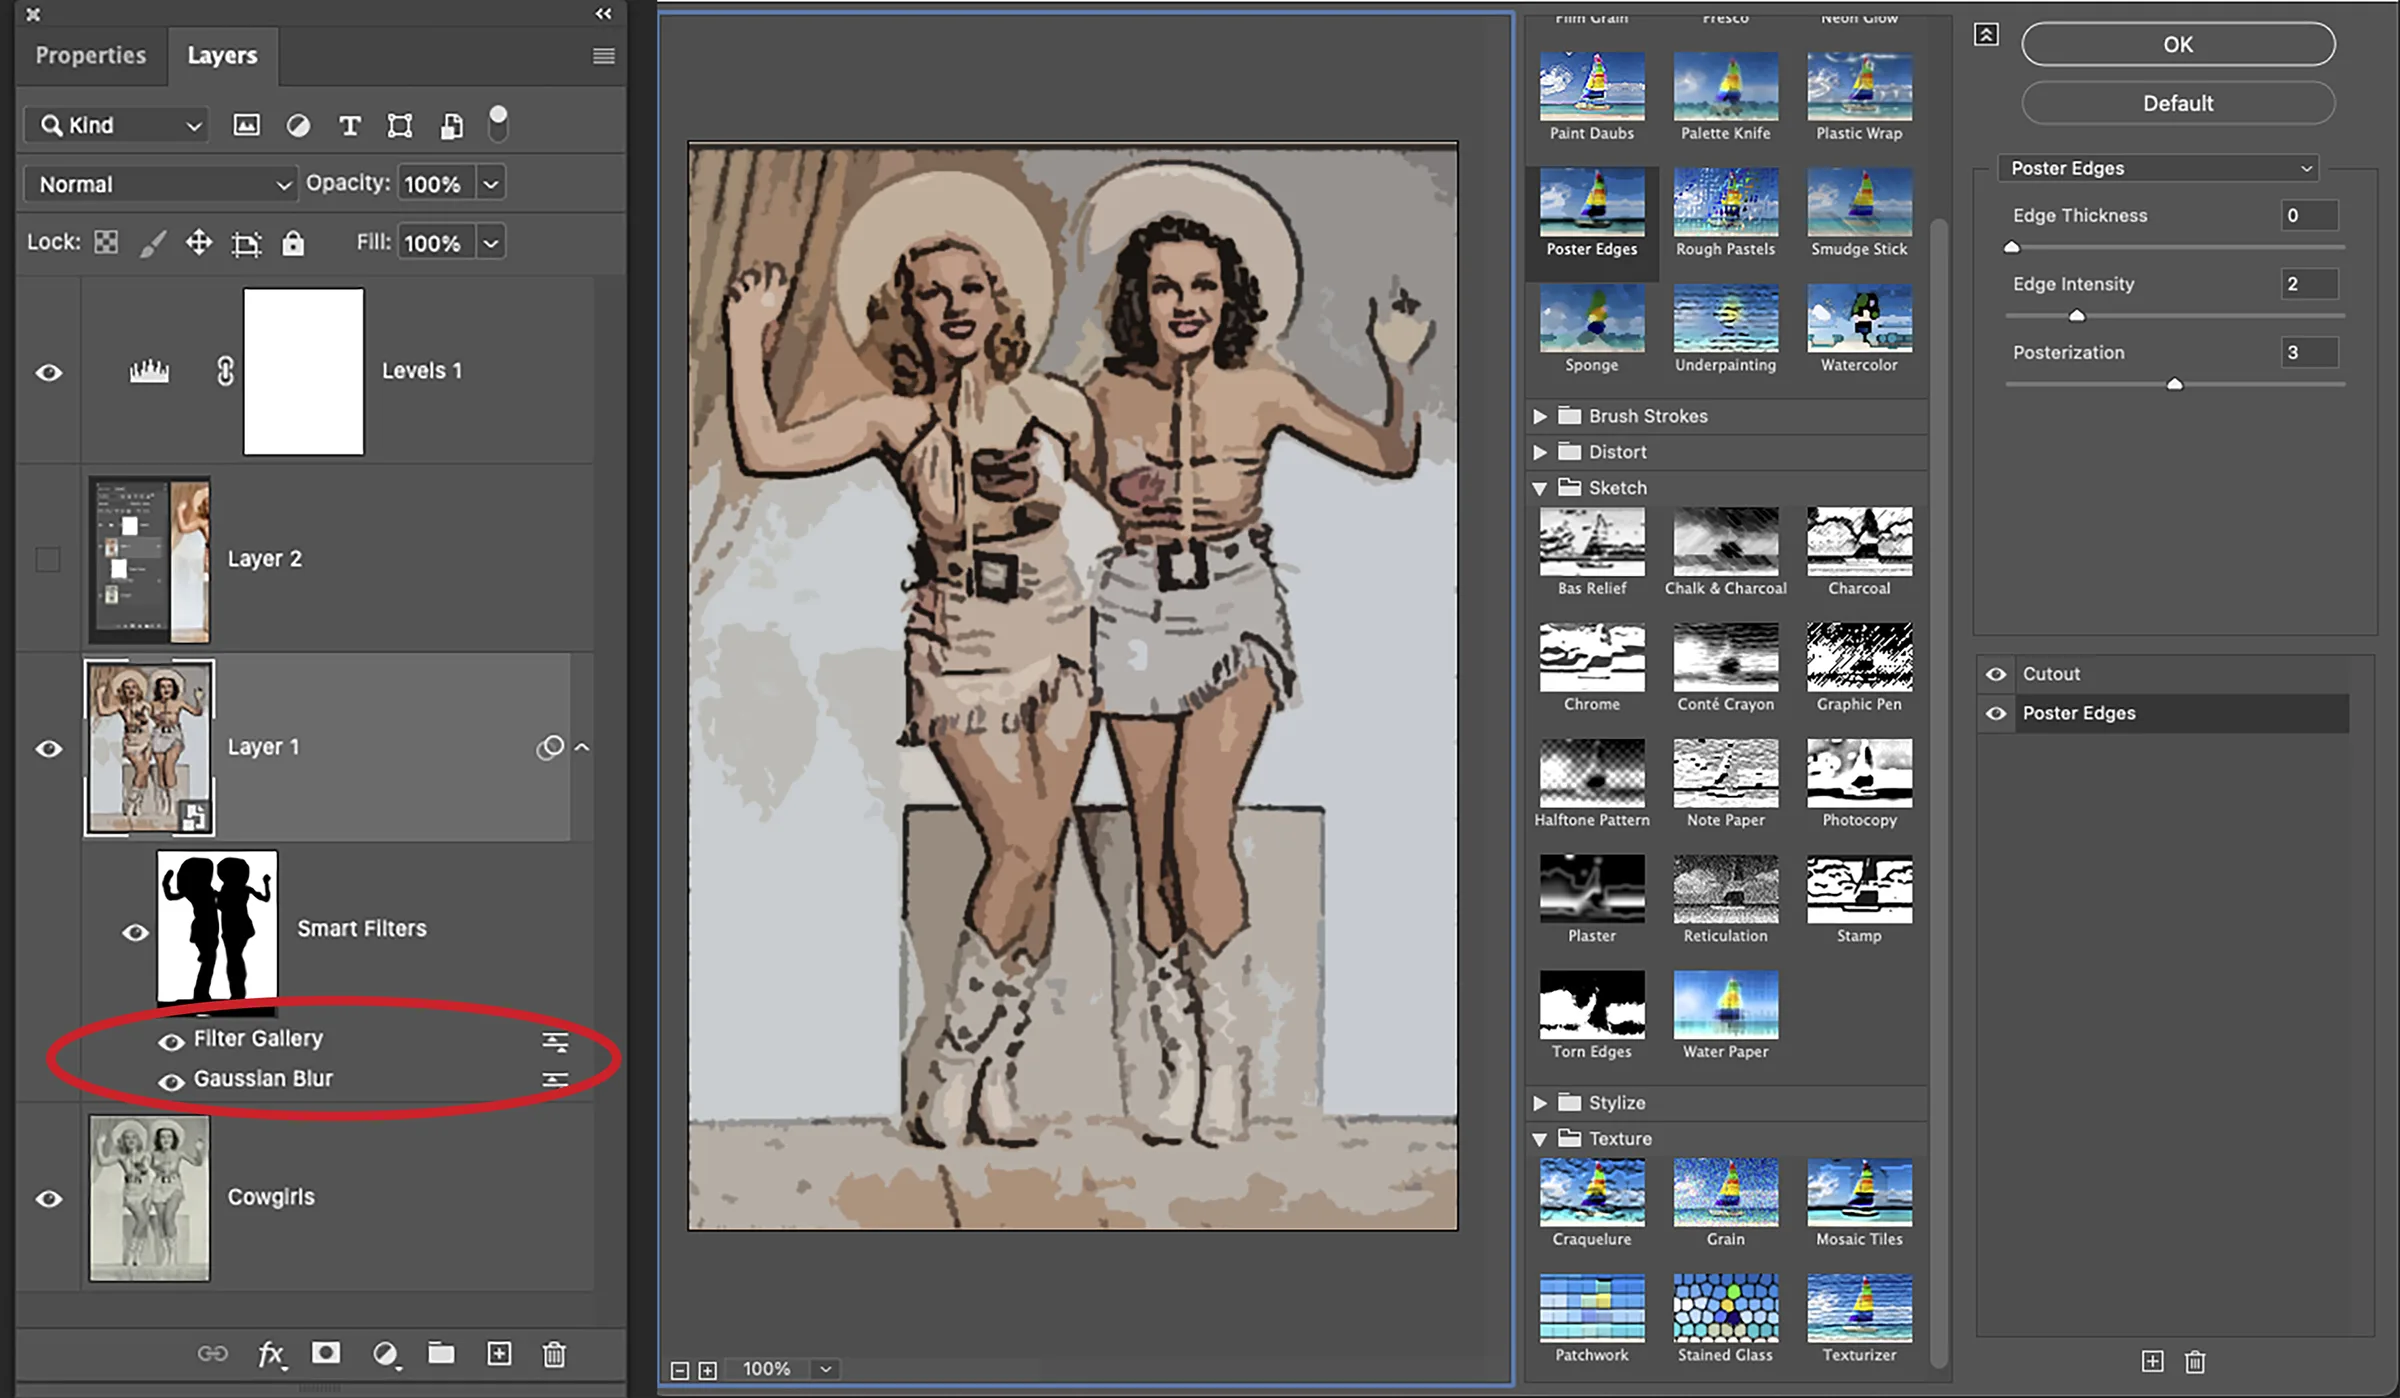
Before you apply a filter, convert the layer into a smart object. To convert a content layer to a smart object and apply a filter, the filter becomes a Smart Filter Filters. You can apply any of Photoshop’s filter effects (with the exception of one or two) and go back at any time and change the settings we’ve applied without harming image quality. We can layer these clever little objects on top of each other and then re-arrange their stacking order to create different filter effects. We can change the blend mode and opacity of each filter independently. Furthermore, we can mask their effects so they only apply to a local region of the image.
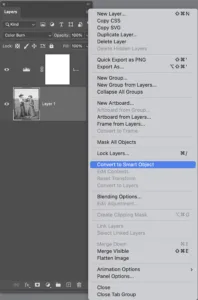
It’s quite easy to convert a layer into a Smart Object. Highlight the layer and choose Convert to Smart Filter from the Layer Options menu. A Smart Object is recognizable by the icon on lower right of the layer thumbnail.
When a filter is applied to a Smart Object layer, it is called a Smart Filter. The filter is applied to your image nondestructively. Technically, the filters are applied to your pixel data, but the Smart Object remembers the original pixel data. Then, each time a filter is edited, Photoshop installs the original pixel data and reapplies the filter.
Layer tweaks
Prior to applying the smart filter create a Levels adjustment layer – standard practice to optimize the tonal variations of the image. Convert the original content layer to a Smart Object, and now you’re ready to apply a filter.
Go to the Filter menu and choose your preferred filter. In the Example shown here I’ve chosen the Gaussian Blur filter because I want to emphasize the baby and blur the elements. Click OK to apply the filter over the entire image. If a selection is active when you apply the filter, a mask is automatically created with the inside of the selection marquee being white (the area that is affected) and the outside being black (the unaffected area).
If no selection is active the filter is applied to the entire image.
In the Layers panel, the mask is displayed underneath the layer. Below that is the name of the filter. These tools are crucial in localizing and modifying the effect. First click on the mask icon in
the Layers panel to highlight it the filter mask. Then, just paint directly on the mask with black to hide the filter effect or white to reveal it. Painting with shades of gray partially conceals the effect depending on how dark the gray happens to be. You can see how the filter has been localized to affect the background, and part of the man holding the baby.
If you are inclined to change the filter’s settings, click on the filter’s name just below the mask. The filter dialog box will appear with the original settings that you applied. Drag the sliders to the desired position to modify the effect and then click OK.
More filters
You can add additional filters too. Select another filter, apply the settings and its name will appear directly below the mask. In this case I’ve added three Filters from the filter Gallery. The filters are all affected by the same mask which I think is a drawback because it limits the Smart Filter’s capabilities. It would be nice if each filter had its own mask, thereby adding hyper-control to the region where each filter is applied. But alas- no such thing has been added yet. That being said, Smart Filters are still a viable option to a dynamic workflow.
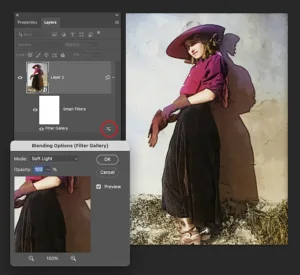
Blending options
A neat aspect of Smart Filters is the ability to control the opacity and blending options of the filter. Click the icon on the far right of the filter’s name to display the Blending Options controls. Here you can precisely control the strength of the filter by reducing or increasing it’s opacity. In addition, you can apply the
filter through a blend mode providing even greater capabilities to alter the look of the image. It’s absolutely worth experimenting with this feature. Check the Preview box and run through the various blending modes and opacity settings as you observe the results on the image.
Alias Image
If you attempt to paint or otherwise alter a smart object with one of the many retouching tools, you’ll see a circle with a line through it indicating that you can’t. You have two alternatives: you can rasterize the image and reconvert the Smart Object into an ordinary layer. From the Layers Menu choose Layer > Rasterize > Smart Object.
Of course, choosing this alternative means that you’ll lose the editing capabilities of the Smart Object. A better alternative is to create an alias image to apply your effects and then save the alias image back to the original image. It sounds a lot more complex than it actually is, so here’s how you do it.
First, double click on the smart object thumbnail. A prompt will appear that indicates that you will be working on an alterative image and that you should save to commit the changes. The alias image appears in the image window without the filters that you’ve applied. You’ll want to experiment with the effects on the alias, save and then preview them on the original. If you don’t like the results go back to the alias, go into the History panel, undo them and save again. Then try the effects again with different settings. In the case of this image, I’ve colored the dad’s glasses with the brush tool and dodged and burned here and there on the alias. I then saved the changes to the original image.
There’s no denying that Smart Filters extends your imaging capabilities. With the ability to apply virtually any filter (with the exception of a few) through an integrated system of masks, blend modes and opacity adjustments and to be able to access those effects at anytime during the workflow to make alterations, you will be able to experiment to your heart’s content. Once you start using Smart Filters you will not want to return to the old destructive method of applying a filter directly to an image. I can pretty much guarantee that.