Determining what is sharp and what is blurred in a picture can control the visual emphasis of its content. There are several tried-and-true techniques, and a few new ones, that dramatically affect the clarity of an image. It’s important to become familiar with these effects because they can enhance your picture’s impact and help it tell a better story. In this article, we’ll look at techniques that heighten impact by fine-tuning focal elements.
Depth of field
The term depth of field (DOF) refers to the range of distance in a photograph or scene that appears acceptably sharp and in focus. It is a fundamental concept in photography, cinematography, or any printed or projected image. DOF is derived from the phenomenon of the gradual blurring of visual elements as they recede in space. The areas of focus in the front of the scene are crisp but the surrounding areas that are further from the camera gradually blur as they recede in the picture plane. Adjusting the DOF can emphasize the important regions of an image and make them dominant by blurring surrounding areas that compete for the viewer’s attention.
In a camera, shallow DOF is achieved by increasing the size of the lens aperture when the exposure is made. The wider the aperture, the shorter the DOF. With shallow DOF, only a small part of the image, usually the subject is in sharp focus. Backgrounds appear blurred. Shallow DOF is common in portraits to emphasize the subject.
With deep DOF, most of the scene, from foreground to background, is in focus. It’s frequently seen in landscapes and architectural photography. Deep DOF is achieved with a narrow aperture, for example, f/11, f/16 or f/22, a shorter focal length, or when the subject is farther away.
Filters
Similar DOF effects can be achieved in digital editing software like Corel PaintshopPro or Adobe Photoshop. Digital manipulation offers far more control after the exposure is made by using filters that mimic the DOF. These filters blur or sharpen regions within the picture plane. Blurring and sharpening have opposite effects on an image’s clarity, and each serves different purposes in image processing. I suggest that when using the Blur, Blur Gallery, or the Sharpen filters, that you convert the targeted layer to a Smart Object and apply the filter as a Smart Filter so that it can be applied non-destructively and later adjusted at any time in the workflow.
Note: Bear in mind that I have exaggerated the blurring or sharpening effects in the illustrations to better illustrate their potential.
Blur filters
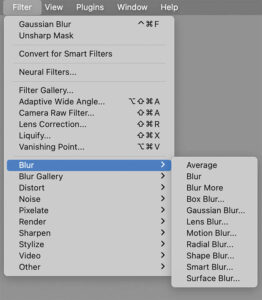
Blurring an image reduces clarity by softening edges and details. Blurring averages nearby pixel values and smooths transitions. Aside from controlling DOF, it’s often used to reduce visual noise.
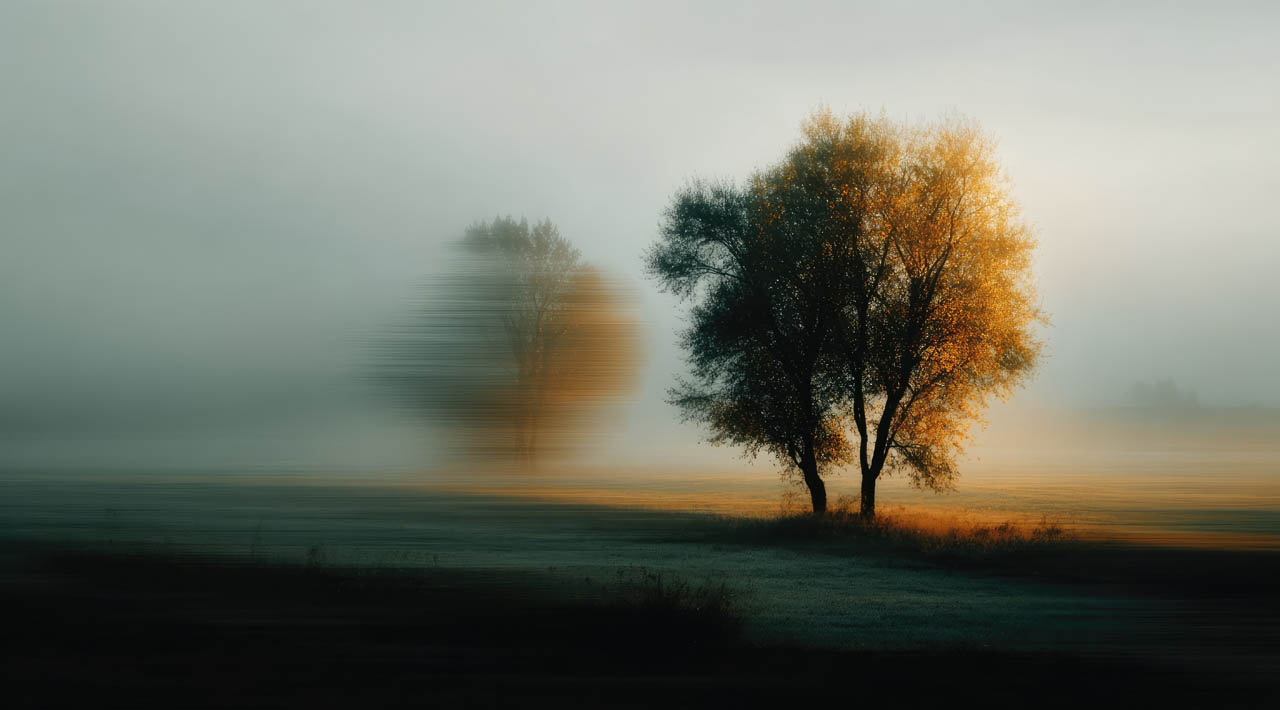
Photoshop offers 10 filters in the Blur menu. (Fig. 1) Each one has controls that affect pixels by altering their numerical values that degrades contrast over a specific distance to produce a blurring effect. A filter often used to control DOF is the Gaussian Blur filter applied through a gradient mask. The mask controls the strength of the filter over a distance. It’s more weakly applied at front of its range and stronger at the back. This technique produces the illusion of a gradually receding DOF. (Fig. 2)

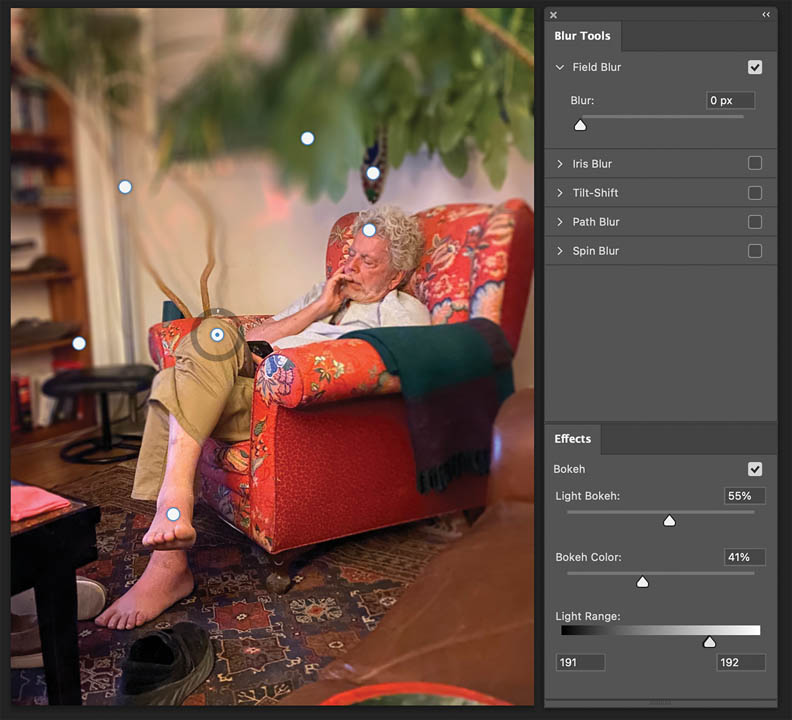
Blur Gallery
Photoshop’s Blur Gallery is a complete interface that has five different blur filters that simulate traditional camera settings. There are several choices including Field, Iris, Tilt/Shift, Path, and Spin blurs and some of these filters can be used in to simulate or enhance DOF. Here are descriptions of the best filters in the Blur Gallery that are useful for manipulating DOF:
- Field Blur applies a gradual, customizable blur across an image, horizontally, vertically, or diagonally by placing multiple pins and assigning different blur levels to each one. (Fig. 3) Photoshop then blends the blur smoothly between the pins. Field Blur is ideal for creating DOF effects or selectively softening parts of an image.
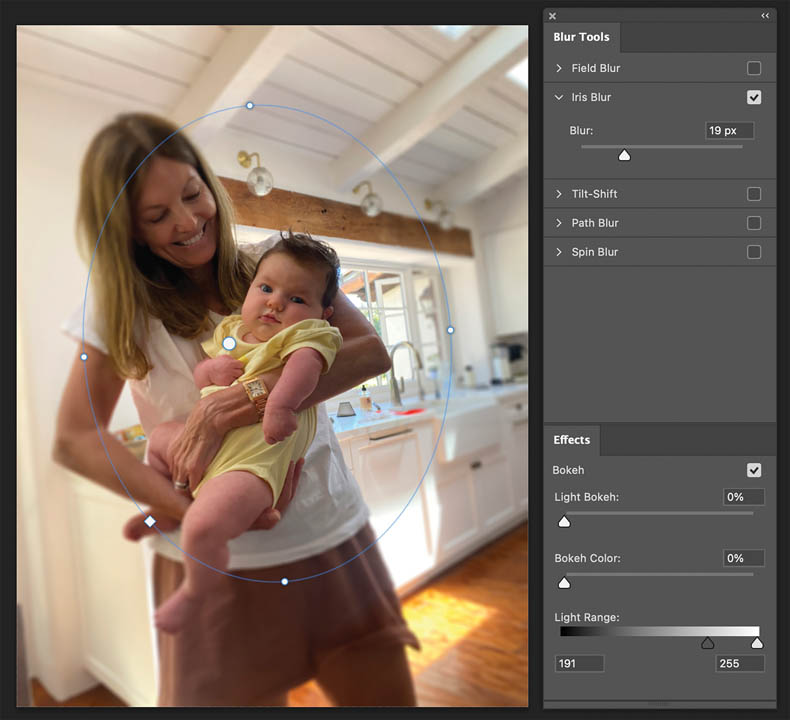
- Iris Blur mimics the shallow depth of field effect created by wide aperture lenses. An area is defined with an elliptical or circular marquee that remains sharp. The blur increases toward the edges of the marquee. Drag the Fade handles (the little white circles) to adjust how quickly the blur transitions. Iris Blur is useful for portrait-style focus or emphasizing a central subject. (Fig. 4)
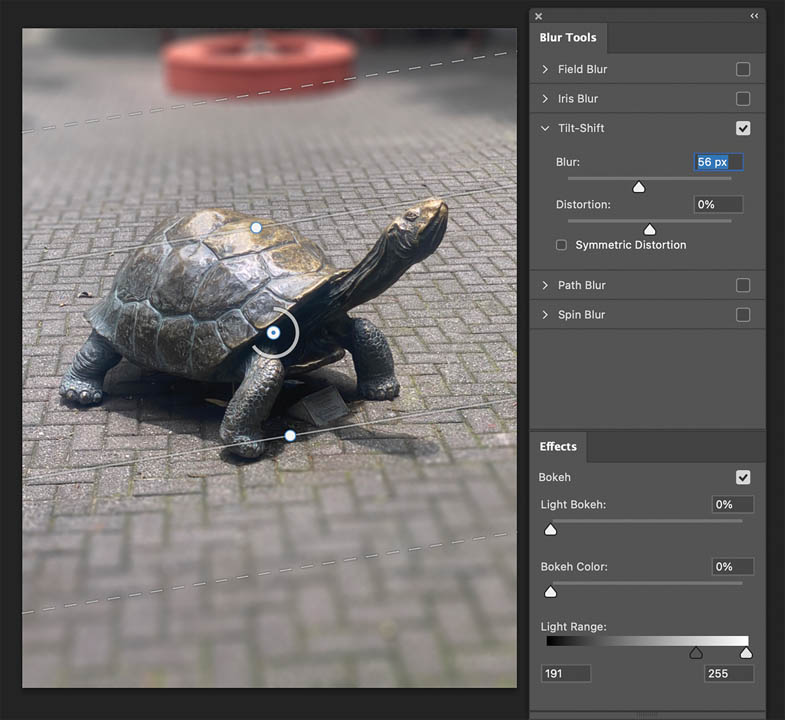
- Tilt-Shift simulates the effect of a tilt-shift lens that was used in old large-format cameras. This filter creates sharp focus between the two parallel lines and adds a blur above and below. (Fig. 5) The blur field can be rotated and repositioned and distortion can be adjusted. It’s great for architectural shots or creative effects like making real-life scenes look like miniatures.
- The two additional filters, in the Blur Gallery, Path Blur, applies a blur along a designated path, and Spin Blur apply motion blurs to a defined area. They aren’t recommended for managing DOF.
- Bokeh Controls is the effect created when the camera lens renders out-of-focus points of light. When the Bokeh box is checked, the light range, highlights, and color can be fine-tuned.
Sharpening
Let’s look at the blurring’s opposite sibling-sharpening! Where blurring obscures clarity, sharpening enhances it by emphasizing edges and fine details to make the image appear crisp and more defined. Sharpening increases contrast between neighboring pixels, especially around the edges of content. It’s frequently used to improve the perception of focus and highlight details in textures, text, or patterns.
Unsharp Mask
Two of Photoshop’s filters are worth considering when manipulating the in-focus areas of DOF. Most commonly, the Unsharp Mask filter is used. The Unsharp Mask filter is a sharpening tool used to enhance the perceived sharpness of an image by increasing the contrast along edges of content. Despite the confusing name, Unsharp Mask actually sharpens an image. The name comes from a traditional darkroom technique.
The Unsharp Mask filter detects edges by looking for pixels that differ from their neighbors by a threshold that you set. It then increases the contrast of those edge pixels. Light pixels become lighter and dark pixels become darker enhancing the edges produces the appearance of a sharper image. (Fig. 6)
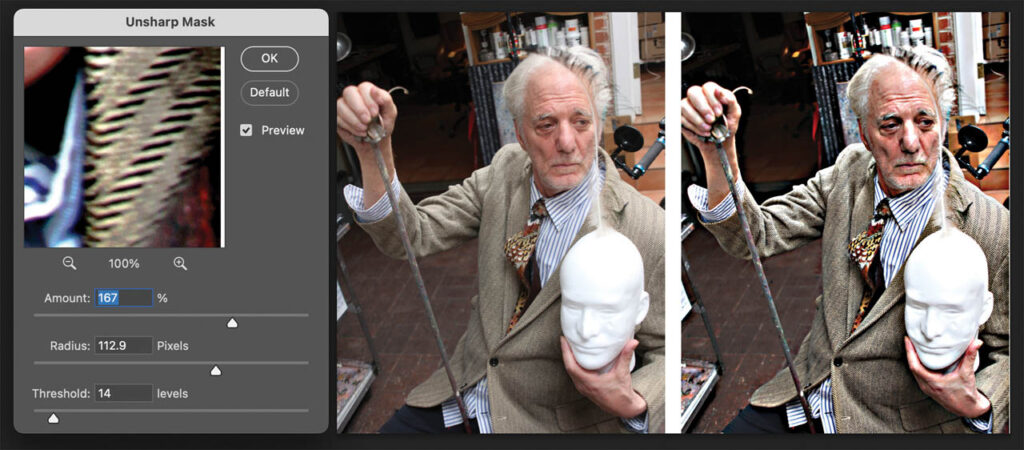
become darker enhancing the edges producing the appearance of a sharper image.
The Unsharp Mask filter (Filter > Sharpen > Unsharp Mask), has three controls:
- Amount controls how much to increase the contrast of pixels. Low values (like 50%) create subtle sharpening. High values (150% or more) produce a more dramatic effect.
- Radius determines the quantity of pixels surrounding the edge pixels that are affected. Small radius (0.5–1.5 pixels) is good for fine details like hair or texture. Large radius (2–5+ pixels) produce broader sharpening.
- Threshold sets how diverse the sharpened pixels must be from the surrounding area before being affected. Low threshold (0–3) sharpens everything, including noise. Higher threshold (10–20) limits sharpening to more distinct edges, reducing noise amplification.
It’s best to apply the Unsharp Mask filter after the image has been resized or the resolution has been changed. For high-resolution images, use higher Radius amounts. As usual, it’s advisable to duplicate the layer and apply sharpening non-destructively or convert the image to a Smart Object and apply the filter as a Smart Filter. Use layer or filter masks to selectively sharpen specific areas.
Smart Sharpen
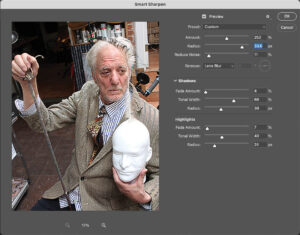
The Smart Sharpen filter (Fig. 7) is an advanced sharpening tool that offers a bit more control and precision than Unsharp Mask. It’s designed to sharpen image details while minimizing common sharpening problems like halos, noise, and over sharpening of shadows or highlights. It can be found in the Filter menu (Filter > Sharpen > Smart Sharpen).
It has several controls:
- Amount controls the intensity of sharpening (similar to Unsharp Mask). Higher values increase contrast along edges.
- Radius determines how many pixels around the edge are affected. Smaller values preserve fine details; larger values affect broader areas.
- Reduce noise: A slider that helps suppress noise while sharpening. Which is useful for low-light or high-ISO images.
- Remove corrects various types of blur effects. Choose the type of blur to correct: Gaussian Blur; a general obscuring of regions of the image. Lens Blur; accurate sharpening for natural image blur caused by lenses. Motion Blur attempts to reduce linear blur caused by camera movement.
- Shadow and Highlight tabs fade the sharpening in dark or bright areas. It’s useful for preventing halo effects and blown-out highlights or noisy shadows.
Smart Sharpen has a few advantages over Unsharp Mask. First, it has more intelligent edge detection. Second, it sharpens with noise reduction and provides better shadow and highlight control. Third, it can reduce specific types of blurring.
When using Smart Sharpen, its best to preview and zoom to 100% to judge the effect. As with Unsharp mask and other blur or sharpen filters, apply it to a Smart Object layer for nondestructive editing and use filter or layer masks to sharpen selectively.
Neural DOF
The Blur and Sharpen filters are certainly handy but there is one more option that controls DOF that is AI driven that is found in the Neural filter interface. It’s called Depth Blur and is currently in Beta awaiting your opinion of it. (Fig. 8)
It specifically designed to control DOF using Adobe’s Sensei AI to estimate depth, even without real depth map data. Its controls automatically select the subject and mask it from a blur effect. It produces realistic background blur to an image and mimics the shallow DOF effect produced by wide-aperture lenses, helping direct viewer focus and create a more professional, cinematic look even if the original photo was taken with a deep depth of field.
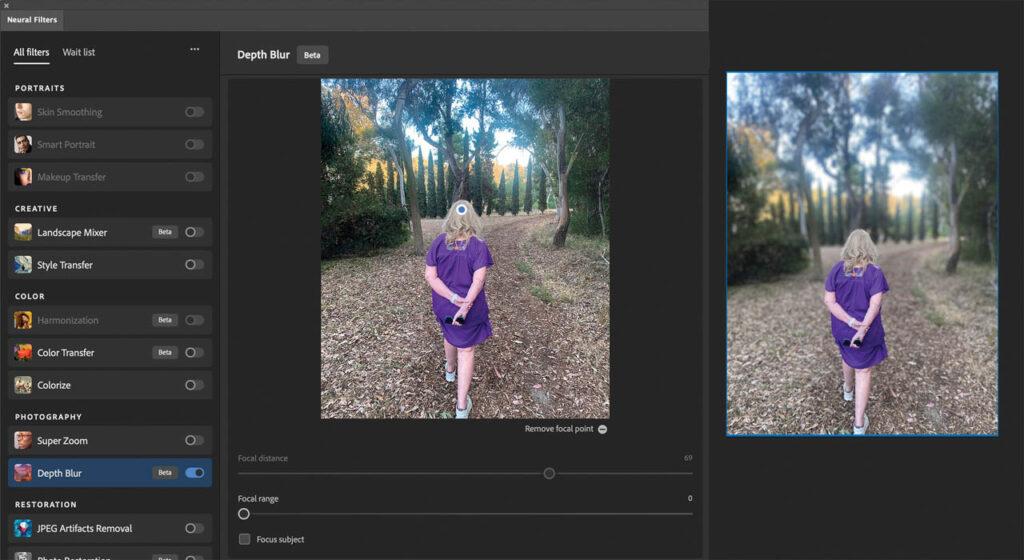
It has seven controls:
- Blur Strength controls the intensity of the blur applied to out-of-focus areas. Higher values have a stronger background blur.
- Focal Distance determines where the image stays in focus, like focusing a camera. Drag the slider to shift the focus forward or backward in the image or click directly on the image to set the focal point.
- Focal Range adjusts how much of the image, from foreground to background, stays in focus. A narrow focal range blurs everything except the focal point.
- Blur Quality: Choose from options like Low, Medium, or High for better edge handling and more realistic bokeh.
- Bokeh Settings controls the appearance and brightness of blurred highlights.
- Temperature, Tint, Saturation, and Brightness help you subtly match the blurred areas with the in-focus subject for a more cohesive look.
- Output Options: Output to New Layer, Smart Filter, or Duplicate Layer allowing for nondestructive edits.
Blur or Sharpen?
DOF is a powerful compositional tool. Whether you’re blurring out a cluttered background or capturing every detail in a scene, it helps you control focus, guide the viewer’s eye, and strengthen your image’s message. Furthermore, it creates mood, for example, a blurry background can create a dreamy or artistic look, or sharp content across the scene can impart a crisp, realistic appearance. Well-considered DOF controls visual storytelling and helps emphasize important elements while hiding distractions.
Whether blurring or sharpening, the filters and techniques presented in this article provide a serious edge to total control over your picture’s depth of field. I encourage you to experiment with these extraordinary tools. They will empower you! Find the technique that works best for your particular image and go for it.