Note: This article appears in the March 2018 issue of A&E magazine.
This column is being written to demonstrate practical uses of CorelDRAW for those working within the awards and engraving industry. For those new to Corel, I suggest concentrating on the basics from books, media, seminars or tutoring, with the aim of becoming productive as soon as possible. Earn while you learn. And the most effective way to learn is by repeated use, gaining proficiency and then moving forward adding new skills. These articles try to focus on skills relevant to our readers’ needs. Procedure descriptions are somewhat generic due to wide variation in Corel versions. Consult your version documentation as needed.
We’ll continue with our CorelDRAW 2017 toolbar tour so that anyone recently upgraded or thinking of doing so will feel at home. Some of the tools have been around for a while, but we’ll explore what’s useful and interesting.
Smart Fill Tool
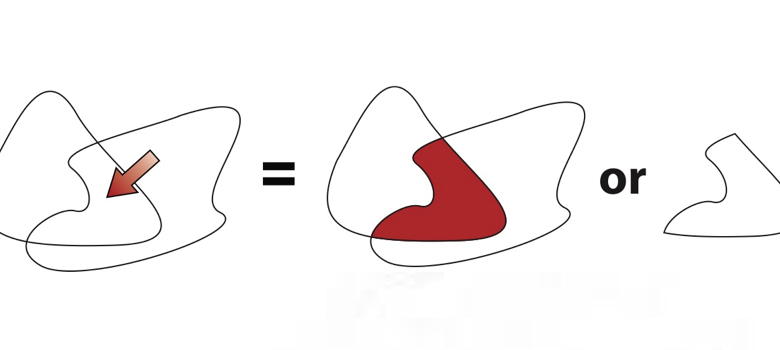
Let’s begin with the Smart Fill tool. It used to be a big job to create a new object out of the area created between two overlapping objects-much cutting apart and gluing back together (just kidding about the glue, but you know what I mean). This now happens instantly with the Smart Fill tool by simply clicking within such an area. CorelDRAW not only fills that area with your choice of color, but turns that area into a new object sitting on top of the original overlapping objects.
On the one hand, it can be a neat way to add color to a complex design with overlapping objects, but because a new object is formed, the tool also provides us with a quick way to create new objects from others. You can either use the tool to add color to here-to-fore difficult areas or use it as a strategic tool for quickly building new objects altogether. We love dual purpose, but because the name Smart Fill tool suggests filling with color, we might be slow to recognize its value as a shape builder tool.

Along those lines, keep in mind that if the tool is clicked anywhere on the page outside the overlapping objects, a new object made from both the existing shapes is formed on top of them and is filled with the color of choice. The original shapes remain intact and the new shape can be pulled off to the side awaiting further use. So, you can create new shapes from the area where two shapes overlap, or create a new shape from both overlapping shapes depending on whether you click within the overlap or outside of the overlapping shapes. In essence, the Smart Fill tool works much like the shape tools, trimming or welding as needed but in a more streamlined fashion.
Let’s not forget the Properties bar options. Look before you click, because up there you can make decisions about the fill options-whether to use a Default fill, a Specified fill, or no fill-and the outline options-the same choices but also including stroke width specifications. Those Properties bar options also contain a button for selecting the colors of choice for both outline or fill from palettes. Whether you are adding color to normally hard-to-color places or want a quick way to build new objects from old, the Smart Fill tool is worth experimenting with.
Rectangle, Ellipse, Polygon, and Font Tools
These tools remain much as they always have, including the 3-point Rectangle and Ellipse tools, which I covered in recent articles.
Parallel Dimension and Straight Line Connector Tools
These tools have specialized uses not normally used in our industry, so I won’t cover them here.
Drop Shadow Tool
The Drop Shadow tool has evolved over time into something much more intuitive to work with. Select the object that you want to attach the drop shadow to, click on the Drop Shadow tool, then click where you want the drop shadow to start. Drag it out in the direction you want the drop shadow to travel and to the desired length.
A Start marker appears near the starting point and an End marker appears at the end point of the drop shadow. These two markers are connected by an arrow showing the direction of the drop shadow. On the arrow is a slider control that allows you to change the opacity of the drop shadow. Moving the Start marker makes it possible to change the start location of the drop shadow. Moving the End marker allows you to change the angle of the drop shadow. Dragging a color from the Color Palette to the end marker changes the color of the drop shadow.

In addition to these intuitive controls, the Properties bar displays many additional controls over the appearance of the drop shadow. From left to right in the Properties bar are the following numeric controls: Drop Shadow Angle (same as moving End marker); Shadow Length; Shadow Fade as it moves away from the point of origin; Drop Shadow Color Transparency (same as Marker slider); and Drop Shadow Feathering-sharpening or softening the edges of drop shadows.
The final few Properties bar controls include a button with a dropdown menu of options for the manner in which feathering occurs; a Feathering Type button that activates when the Feathering Manner is established; a Shadow Color selector; dropdown options for Color Properties to better coordinate the color of the shadow with the color of the object (if in doubt, leave at Normal setting); a Copy Shadows button to apply the same settings to another object; and finally, a button to delete the drop shadow from an object.
That’s about as much as anyone would want to know about drop shadows. As with so many aspects of using software, I can only point you in the right direction. Once you actually start experimenting with drop shadows, the use of all of these controls will become clearer.
Transparency Tool
In my own work, I’ve found the Transparency tool to be quite useful, but this Transparency tool takes it to the next level. Not only is it possible to add transparency to your objects in a uniform way, but it also makes it possible to do gradient transparencies.
Vector graphics have been known to suffer from a too-finished appearance due to the fact that objects have been limited to flat color areas and strokes. The various ways in which gradient color can be applied has greatly helped to make objects lose their flatness and appear more organic. Being able to apply uniform transparencies has furthered the possibility of a natural appearance. Being able to apply gradient transparencies is a big leap forward in that direction.
In a manner similar to the application of drop shadows, gradient transparencies are applied by clicking in one spot to establish the Start marker, and dragging to establish the End marker. Similarly, an arrow runs between the two markers and a Slider control makes it possible to adjust the intensity of the applied transparency. This alone offers a great deal of control, but then there is the Properties bar with even more options available than with the Drop Shadow tool.

So here goes. From left to right in the Properties bar there are six Transparency Fill tools each dealing with a close cousin within the Color Fill tools: No Transparency, Uniform Transparency, Fountain Transparency, Vector Pattern Transparency, Bitmap Pattern Transparency, and Two-Color Transparency. Yes, even you can apply a polka dot transparency to your favorite vector graphic… and so much more. Essentially any color fill tool is also available as a transparency except that instead of multi-colors, there are multi-levels of transparency. That’s a lot to consider.
The next option is choosing the Color Merge Mode. As mentioned in the drop shadow paragraphs above, keep this at Normal unless you know what you are doing or want to experiment. This is followed by a dropdown menu for saving favorite transparency settings to apply to other objects.
Next are four options for choosing the type of transparency: Linear, Elliptical (sometimes referred to as Radial), Conical, and Rectangular. Each type can be applied to any Transparency Fill tool such as a Radial Fountain Transparency.
There are then three options for moving the Transparency Tool Nodes (not to be confused with Vector Nodes). The Start Transparency marker or node is white and an arrow connects it with the End Transparency. Note the default color, which is black. Along the Arrow line is a third intermediate node for positioning the transparency. Each of these nodes can be positioned manually, making the process responsive and intuitive, but for more accuracy, they can be adjusted numerically using the next three options in the Properties bar.
The first is called Node Transparency and can be applied to any of the three nodes, allowing you to adjust the transparency of the color below each node. The second is called the Node Position button for accurately positioning the intermediate node. The last is called Rotate, allowing you to select either the start or end nodes and rotating the angle of the arrow line between them. In each case, the transparency gradation shifts so that you can determine how it fills the object.
You can apply the transparency to both fill and outline, just the fill, or just the outline in the options that follow. You can also scale the transparency up or down by clicking on the next option, placing the cursor in the Start Node marker, and dragging out or in. This doesn’t scale the object in any way, just the transparency effects inside the object.
This is followed by a Freeze button, which allows you to create a transparency, then freeze it so you can move the object without disturbing the fill. The next option allows you to copy the Transparency fill to another object, and the last option opens up a dialogue box containing all of these properties bar settings.
That’s a lot of options that need to be explored, but the subtle opportunities it opens up for filling objects is well worth the time invested in learning.