In the digital workflow, there are always a million paths to one particular end result. Similar effects can be applied in Photoshop with a multitude of methods to achieve the same outcome. That being said, the mantra I’ve been chanting over the years is, “Keep the workflow dynamic!” Those four words make the difference between producing an image that is fluid and flexible and one that is static and immutable.
In graphics, fluidity means, above all, to make changes that are reversible with the intent that any command can be reversed or changed at any time without compromising the entire image.
One of the most important reasons to produce images in a digital environment as opposed to an analog one is that choices are always prevalent in every phase of the design process. Here I’ll discuss options that provide greater flexibility when filling areas with color, gradients, or patterns. I’ll be using the latest version of Photoshop 2023 to demonstrate these techniques, but of course, similar features are available in Corel PaintShop Pro.
Fill ‘er up

Filling an area with color is super easy. Select a region with one of the selection tools and choose Fill from the Edit menu. A dialog box is displayed that applies the current foreground or background color or a variety of other choices to the area (Fig. 1). A blend mode or opacity can also be specified. If you want to avoid the dialog box altogether and just apply 100 percent of the color, a key command worth remembering is Option + Delete (Mac) or Alt + Backspace (Windows).
These techniques are simple and straightforward, but they are not dynamic. Once the fill is made and the image is saved and closed, the fill cannot be easily altered without reselecting the area and modifying it, which usually affects the areas around it – an editing process that can be quite labor intensive.
Layer it
A far better and more dynamic method for applying color is to create a fill layer. Fill layers combine the potential of the Fill command with the flexibility of layers. As a layer, the color is independent from the rest of the image and accessible at any time during the workflow. You can create and edit fill layers with solid colors, gradients, or patterns.
Solid colors
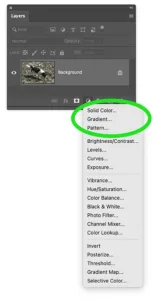
To create a solid-color fill layer, choose Layer > New Fill Layer > Solid Color, or click the circular icon at the bottom of the Layers panel (Fig. 2). The New Layer dialog box is displayed with the layer named Color Fill 1 by default. Type a custom name for the layer to better identify it, and click OK.
Color Picker
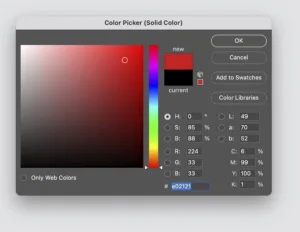
The Color Picker (Fig. 3) is then displayed. The Color Picker is an efficient way to apply the three characteristics of a solid color (hue, saturation, and brightness) to the fill layer. Here’s how the Color Picker works…
The color ramp in the middle of the picker determines the hue. It is actually a color wheel that’s been cut at the red point, or 0/360 degrees. Drag the slider on the ramp to the desired hue. You’ll notice that, as you drag, the large square field at the left changes color.
The horizontal axis of the square field controls the saturation of the color from white, black, or gray (zero percent saturation) on the left to 100 percent intensity on the right. The vertical axis of the square controls the brightness of the color, from brightest at the top to darkest at the bottom.
Click and drag anywhere on the square to select the saturation and brightness of the hue. Two color swatches to the right of the saturation/brightness square indicate the former color on the bottom, with the new color that you chose on the top. Modifications can be made by moving the little circle on the square field or entering numerical values in any one of the four color mode fields. Click OK to apply the color to the fill layer.
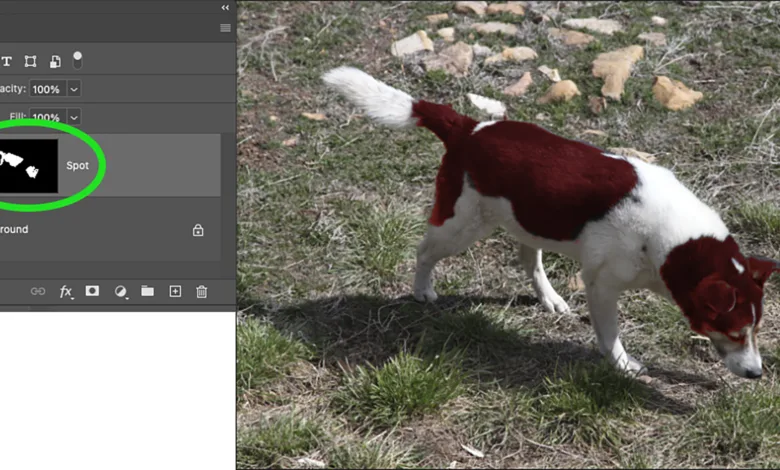
Layer mask
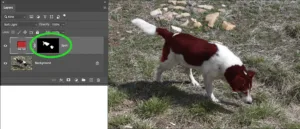
The new fill layer that appears in the Layers panel has a layer mask linked to it and is represented by the thumbnail to the left of the layer’s name. If you draw a selection prior to creating a fill layer, the new fill layer will fill only the selected area and create a layer mask that conceals the unselected areas.
The layer mask thumbnail that appears in the Layers panel displays the revealed area as a white shape and the masked area as a black shape. Fig. 4 shows the layer mask and the red fill layer icon. The color is filtered through a soft light blend mode.
Modify color
It’s easy to make changes to the fill layer. Double-click on the fill layer thumbnail in the Layers panel to bring the Color Picker up again. Adjust the hue, saturation, and/or brightness, click OK, and voila! The color is modified.
Gradients
A gradient is a continuous blend of colors. Just like solid colors, gradients can be applied to the image as fill layers.
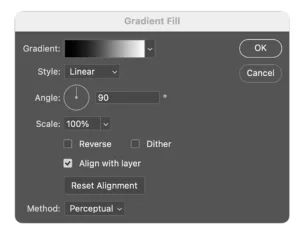
To create a gradient fill layer, choose Layer > New Fill Layer > Gradient, or click the icon on the bottom of the Layers panel and choose Gradient. When the New Layer dialog box appears, the name of the new layer defaults to Gradient Fill 1. Rename the layer to better identify it. Then click OK, and the Gradient Fill dialog box will appear (Fig. 5).
I really can’t talk about gradient fill layers without mentioning the Gradient Editor. To edit an existing gradient or to create a new one, click on the gradient ramp in the Gradient Fill dialog box to display the Gradient Editor.
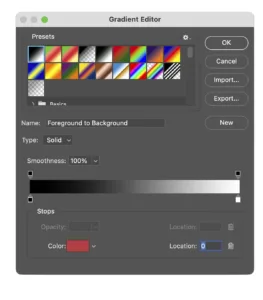
Choose a gradient from the swatch list that is displayed. I usually start with the default — Foreground to Background (Fig. 6). Name the gradient. Choose a type: Solid or Noise. Solid is a simple display of colors while Noise presents a control panel for editing in various color modes. Solid is much easier to use, but Noise presents some interesting effects.
The colors of the gradient are displayed as a ramp with little house-shaped stops. Click the left lower stop to display the Color Picker and assign a color. The ramp changes to display the gradient in its current state.
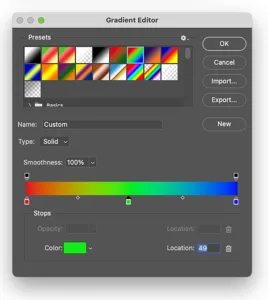
To add a color, click just below the ramp to generate a new stop (Fig. 7). Once again, assign a color. To adjust the distribution of the color, drag the stop to the right or left. Drag the mid-point diamond icons to adjust distribution between two colors. Add as many colors as you want and distribute them. To delete a stop, drag it away from the ramp.
The upper stops adjust the opacity of a section of color on the ramp. Click on a transparency stop and enter a value from 0 to 100 percent. The transparency stops are similar to color stops and can be redistributed by dragging to the left or right. Click OK to apply the gradient to the fill layer.
Pattern fills
A pattern is a repeating rectangular element. To make a pattern from any image, choose the rectangular marquee tool and drag it over an area on an image (Fig. 8). The marquee must not have a feathered edge. Choose Define Pattern from the Edit menu to store the pattern in the pattern presets.
The pattern can be applied in several ways, either with the Pattern Stamp tool or with the Fill menu, but the most efficient and flexible technique is to create a pattern fill layer.
Choose the Pattern option from the Fill Layer icon at the bottom of the Layers panel to display the dialog box. Click the down arrow to choose a pattern, and set the following options:
- Angle: Enter a value in degrees or drag the angle line to adjust the angle of the pattern
- Scale: Choose a percentage to determine the size of the pattern from zero to 1,000 percent
- Link With Layer: Check this box if you want to align the pattern’s layer mask to the layer
- Snap To Origin: If you want to move the pattern, drag your cursor over it in the image window Snap it back to its original position by clicking the Snap To Origin button
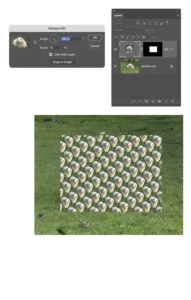
Click OK, and the pattern appears within the selected area as a repeating series of images. In the Layers panel on the fill Layer, a thumbnail of the pattern is displayed along with a layer mask (Fig. 9).
Editing
After they have been created, color fill, gradient fill, and pattern fill layers can be edited by double-clicking their thumbnails in the Layers panel to reveal the Color Picker, the Gradient Fill dialog, or the Pattern Fill dialog.
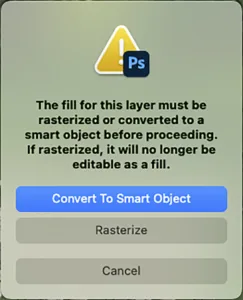
If you want to apply a filter to a fill layer, it will have to be rasterized, which converts the layer to pixels. However, a rasterized fill layer is no longer editable as fill content (Fig. 10), so you may want to plan your workflow so that rasterization is among the final techniques that you apply.
Advantages
Fill layers have all the advantages of layers, including the ability to adjust opacity or apply them through a blend mode to alter their strength or color. Furthermore, they can be repositioned in the stack.
Unlike content layers that are filled with pixels, fill layer effects are dynamic and will resize if the canvas is resized. Since fill layers are isolated to individual layers, they can be edited at any point in the workflow. I recommend that you consider using them whenever you need to fill a region of the image to maintain flexibility and keep the design and editing process fluid and dynamic.