Choosing to add a piece of equipment is an investment. Making that investment means the equipment should serve to create a profit for you, add or improve a service, or make your shop more efficient.
We’ve bought numerous digital printers over the years – choosing to buy a new one when the older one starts having costly repairs or when the technology improves. We purchased a laser engraver when we wanted to expand into laser-engraved plates for the solar industry. A separate cutter was purchased to contour cut on a machine other than our printer, making our print/cut process more efficient.
Buying an application table was a different investment. We couldn’t print wraps or engrave plates – machines that give us a direct profit, but like the separate cutter, we could be more efficient with our labor because of a table.
Because the return on our investment was less obvious, we debated it for a few years before taking the leap. Hands down, buying the table was one of our best purchases.
One person
We run a pretty busy shop with very few people. My husband and I have a sign production background rather than a sales/management background, so our approach to sign shop ownership has been very hands-on.
This background has worked well in many areas as we have a good understanding of ways to improve production since we’re entrenched in it alongside our employees. We noticed that the application of large signs on the table was inefficient.
For years we ran our signs through the laminator to apply them, and this works great. You peel back the edges of the graphics or tape them to the substrate and run them through to speed application. This doesn’t work as well for larger signs since the substrate is unwieldy and difficult for one person to maneuver, hold up the end, and peel back the backing paper as the graphic is run through.

So, even though we didn’t have to apply the graphics by hand, it usually required two people to run a 4′ X 8′ sheet through the laminator. On the other hand, applying a large sign on an application table is much more efficient.
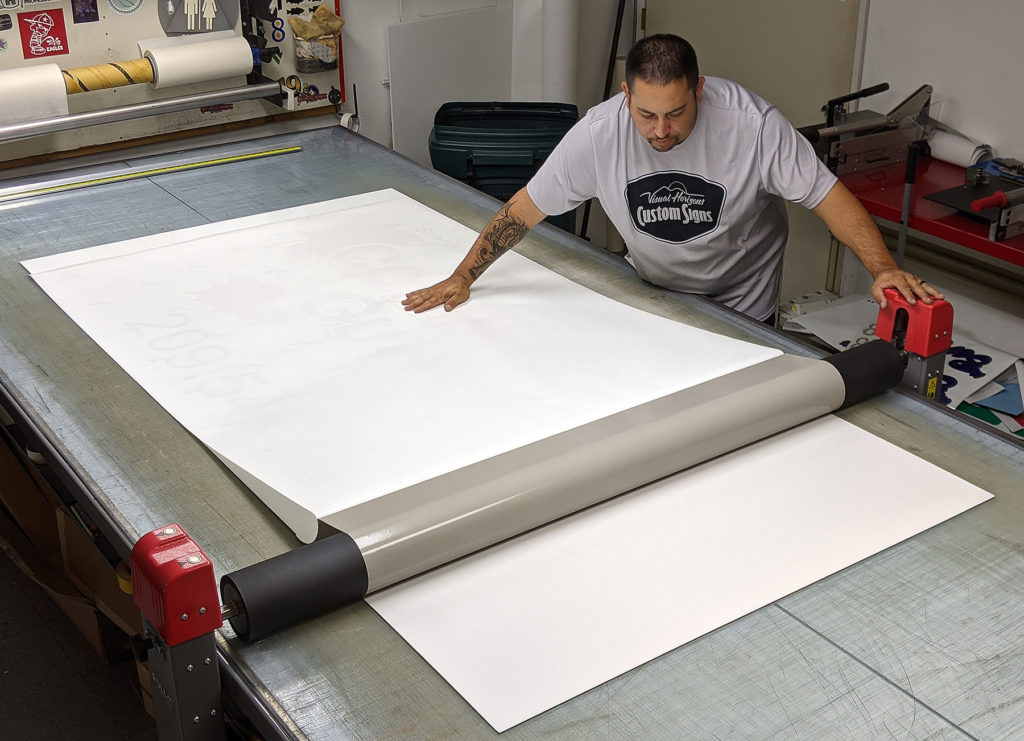
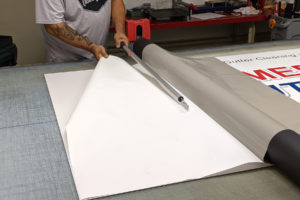
Once the substrate is laid on the table and cleaned, the graphics can be positioned in place. No taping or moving the substrate and graphics is required, risking losing placement. The pressure roller is simply lowered down, and the graphics are applied. The whole process takes less than five minutes for one person to complete.
Features
I am not an expert on application tables or how their features have evolved over the years, but I do know that there were features we were looking for when deciding to invest in an application table. Ultimately, we chose the ROLL-X Multipurpose Applicator by ROLLSROLLER. The table met the needs we had and was the right choice for our shop. I would recommend doing your research in the tables on the market and compare the features included.
Here are the features that our table has that have been either essential or simply handy. We like to say that our table is like having another employee – one that doesn’t complain about the workload and never calls in sick.
Masking
Our table includes a roll holder glide beam that is used for applying masking tape. We order 54″ wide rolls of application tape and mount it on this bar. One person can mask graphics 52″ wide by 12′ long in seconds, with even pressure.
For more access, the roll holder can be removed. Once the beam is removed, a large knob on each side is loosened, and the brackets can be slid off.
Our table butts up against a wall on one end. On this wall, we’ve mounted an application tape holder that my father-in-law built years ago. On this bracket, we keep 15″ and 24″ rolls of application tape.
For smaller graphics requiring masking, we pull the mask off these wall-mounted rolls. The glide beam can then be slid to the end of the mask, lowered using the button controls, and then slid toward the wall. Again, even pressure and no squeegeeing.
Height control
I’m going to mention two completely different features under this heading. The first is the height control under the roll beam itself.
When we used our laminator to apply graphics to a substrate, we were sometimes limited by the space available under the roller. The application table has plenty of clearance under the roller, allowing us to place nearly any substrate thickness on the table and apply graphics.
The table also allows us to adjust the height of the table surface itself. We can lower the table as low as 33″, making it convenient to sit in a chair to work at the table. We can also raise the table’s surface to 42″, making working on the surface more ergonomic.
The legs can also be adjusted manually or electrically (depending on the model you choose) for leveling. Lowering the table all the way down also allows the wheels to make contact with the floor, and the table can be easily moved around.
Laminating
While one end of our table is against the wall, the other end has the laminator positioned against it. We typically keep the height of our table in alignment with the feed out at the back of the laminator.
Our printed graphics are fed through the laminator, and the laminated graphics slide out right onto our work surface. Guiding the graphics from the printer to the drying area to the laminator, right onto the work surface, keeps the process efficient.
If you don’t have a separate laminator or want to laminate on the application table itself, you can do that as well. Because we do so much cutting on the tabletop, we don’t feel that our cutting mat is smooth enough for laminating, so we do it through our laminator. But, lamination with your application table is an option.
Worksurface
Years ago, we built a wood production table and cut a section out of it that we mounted a light fixture under. It didn’t look the greatest, and if we left the light on too long, it would warm and temporarily warp our cutting mat, but it did the trick in providing a backlight for aligning graphics or cutting hard-to-see weed borders.

While we have other small production tables with cutting mat surfaces, our application table is our primary work surface. The entire table is backlit under a glass surface, which is overlaid with a self-healing cutting mat.
The backlighting is excellent illumination in the production area for general weeding and cutting but is especially helpful when cutting white vinyl or aligning multiple colors. Quick tip: If you’re still having a hard time seeing your weed borders for accurate cutting, try flipping the graphics over and cutting from the back or turn off overhead lighting, which allows the backlighting to make the edges easier to see.
Tool storage
Another simple but unbelievably helpful feature of the table is storage trays on each side. The trays are removable if you want to sit at the table without your knees hitting, but we use the trays.
Knives, squeegees, scissors, pens, tape measures, and masking tape are stocked on each side. The table also included a long-reach cutter so that mask and graphics can be cut across the table’s width from one side. It has a magnet on the back so the tool can be hung from the metal table or set in the storage tray.