When a new job enters the workflow, like a raft on a river, it heads downstream with the current to its ultimate destination: completion and customer satisfaction. There are many “ports” along the way that can aid in a successful outcome, and a few key practices can be observed to ensure the job is completed to the highest standards and with maximum efficiency.
Plan ahead
A smooth workflow in the digital graphics workplace is a lot about planning. The job begins well before entering the print shop. During the creative phase, the purpose of the piece and its production standards are initially determined by the art director and/or a design team in discussions with the client.
The overall picture is envisioned, and the important elements are ironed out. With the purpose of the piece firmly established, the development of a concept begins.
Creativity
Let’s talk a bit about the creative process in the workflow. This subject is often neglected in the glamor of razzle-dazzle, instant-gratification technology. Believe you me, nothing is more important to communicating an idea than a conceptually interesting, meticulously constructed, and beautifully presented work of art. And yes, graphic design is a high art form that has permeated our everyday lives in countless ways.
A design begins as a seed in the mind of a designer after discussions with the client. Once a concept is established, research is required to establish the many characteristics of the piece. Does it reflect a specific era, ethnicity, or gender? Who is the target audience? What are we trying to say or sell?
Multiple versions
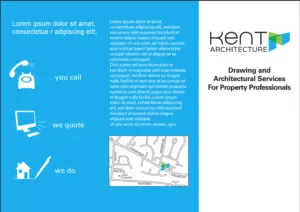
The designer develops multiple rough layouts that support the concept using appropriate images and graphics with dummy text blocks to indicate areas of copy. (Fig. 1) These layouts are sometimes presented to a design team that critiques and further refines them. During brainstorming sessions, the design team will present ideas about key factors such as aesthetic and narrative considerations, subject matter, dimensions, color schemes, graphic styles, atmosphere, etc. Most of the ideas will be discarded, but the ones that remain will constitute the direction of the project. At this time, dramatic changes to the original concept, layout, copy, and graphics can occur.
The purpose of these sessions is to uncover the best, most appropriate approach to visually communicating the concept. The designer can then further refine the layout based on the refinements of the design team and, along with the art director, present them to the client for approval.
Composite
The approved roughs are composed into a “composite” with the final copy, high-resolution images, and graphic elements assembled into a specific composition. A hard copy proof is run to be sure all the elements are correct and in place. Not to be neglected, multiple readers proof this hard copy again for errors. Final tweaks and edits are performed to ensure that all is perfect.
Yay team!
The design team may consist of a photographer, illustrator, graphic designer, copywriter, and production artist who contribute specific aspects of the piece and the art director who orchestrates the whole process into a cohesive whole.
The creative phase of a graphics project can also be tightly integrated with the production phase. At one time, the job divisions of graphic production were quite specifically carried out by individuals with unique skills who were assigned specific tasks, such as graphic design, typesetting, negative stripping, and production photography. It is more likely nowadays for many of the processes to overlap and be performed by a single individual. For example, a graphic designer or digital artist will set type, configure a layout, choose design elements and colors, and prepare images for print or other media. The integration of tasks is primarily due to the accessibility and compatibility of the various software programs that are utilized in the workflow.
Software
There are several features in mainstream graphics software that neatly combine and integrate the information that constitutes published artwork. Much of the software in the Adobe Creative Suite is an integral part of a scheme to prepare complex files with many formats for ultimate output. Graphic arts software like Adobe Illustrator, Photoshop, InDesign, Acrobat and Bridge or Corel products such as CorelDRAW and PaintshopPro function in a non-linear workflow, which allows image elements to be independently accessed and altered or converted back to former states with little effort and without affecting other elements. There are features in all these programs that support a dynamic workflow.
Syncing colors
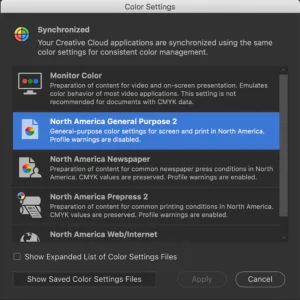
Interestingly, the first step in the dynamic production workflow consists of a form of insurance. An environment must be established where colors are consistently predictable on all equipment. This includes image capture devices such as the scanner or digital camera, monitor, and printer. The system of calibration is called Color Management (CM) and is a feature in all graphics software. If multiple programs are part of the workflow, it is important to synchronize CM in each of the programs so that the image content enters the same “color working space” in every phase of its production. Synchronization is simply a matter of ensuring the color working spaces of all the software are the same. To synchronize all Adobe products to the same working space, launch Adobe Bridge and choose Edit > Color Settings (Fig. 2).
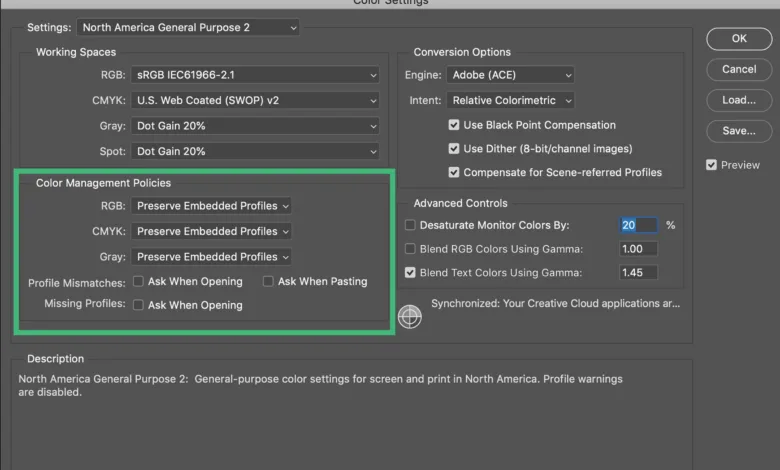
Synchronization doesn’t automatically convert files to the current working space as they are opened or pasted into another program. Color Management Policies in the Color
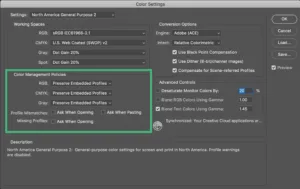
Settings dialog boxes of each program determine how the files are processed when opened (Fig. 3). By default, the document’s embedded color profiles will be preserved, but there are options for automatically converting files to the current color working space or, even more useful, programming a dialog box to appear that offers choices to convert or not convert when opening or pasting images with mismatched or missing profiles.
Formats that move
An image format consists of a configuration of data that supports its placement in a software program. Among the 40 that Photoshop opens and the 21 formats that it saves to are the most common and versatile formats specifically designed for preparation for printing and publishing environments. Because of this versatility, Photoshop can be quite useful for opening and converting files for placement into specific editing environments.
Save As
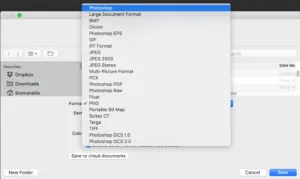
The Save As dialog box enables file conversion on the fly. An image can be opened and saved as a different format by choosing a specific format from the pull-down menu, as shown in Fig. 4. When a format is selected, the dialog box presents checkboxes with the individual characteristics of the document that the format supports.
For example, the TIFF format supports layers, but the Layers box will only be checked if the document contains layers; otherwise, it will be grayed out. To flatten the image when saving the file, uncheck the Layers checkbox. When the box is unchecked, the file name will automatically add the word “Copy” to prevent discarding the original layered file. Flattening an image destined for print is recommended to reduce processing time.
Output
At this point, we’ve covered the key design and production essentials of the workflow. But what about the final steps – printing multimedia and web publishing? Of course, these steps depend on how the piece is going to ultimately be used. Is it going to be distributed in a magazine, a brochure, a poster, a billboard, or exclusively online? Hopefully, the destination of the piece was determined at the initial stages of the workflow because production is inevitably dependent on numerous factors specific to the type of output. Frequently, during the production phase, multiple versions of the layout are developed simultaneously that account for the specific characteristics of individual media, including size, resolution, color management, quality, and distribution.
Bottom line
Ultimately the successful integration of type and images generated from multiple software programs and combined into a single publishable document relies on the knowledge of the artist or technician on how best to unite the images, text, and graphics into a cohesive whole. Brilliant design concepts can only be realized if the big picture is taken into account from the start, researching and developing a concept into a tangible composite and engineering documents whose color is synchronized and whose formats are compatible. The realization of the many elements of a quality media piece is a combination of aesthetic and technical skills that are acquired through education, practice, and experience.