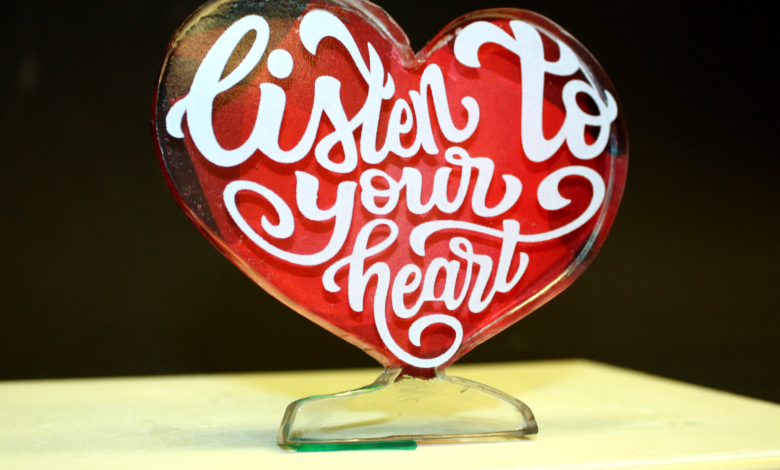


One of the most beautiful materials you can decorate can also be one of the easiest. Acrylic (also known as Plexiglas, Lucite, Perspex) is a versatile plastic that comes in a wide range of sizes, thicknesses, colors, and finishes. It can be easily cut with woodworking tools and laser cutters and can be bent, molded, and finished with heat. Expand your business with keepsakes, jewelry, religious images, corporate awards, signage, memorials, and more.
This example uses a white toner laser printer, a sheet of 3/8″ clear cast acrylic, Versa Sheen hard surface transfer media, a heat press, 1/8” to 1/4″ thick silicone baking mat, jigsaw, and a trigger fired MAP gas torch.
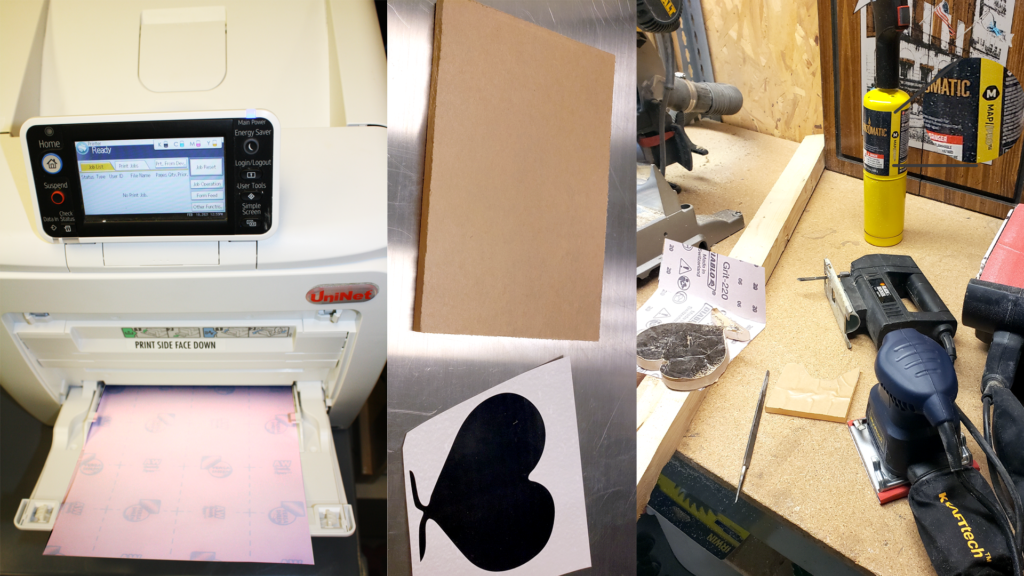
Learning by trial and error, heat pressing the cutting line directly to the paper-coated acrylic was a great idea but later revealed a bit of a texture in the acrylic—more on this later. After cutting, use sandpaper or a file to smooth away cutting marks for nice smooth edges before polishing.
Search YouTube for “fire polishing acrylic” and get a MAP gas torch at the hardware store for about $50. A propane torch might work for thinner sheets, but the MAP gas has a much hotter flame. Run the flame along the edges in a smooth fashion, and the cloudy edges will turn crystal clear for a very professional look.
Achieve the 3D effect using both background and foreground art. Use the Adobe Illustrator (AI) image trace function to convert the white script image into a vector and then use the AI feature called Envelope Distort > Make with Mesh to distort both the heart and the adage to fit the cutting outline. Make sure the background is larger than the cut line, and the foreground fits inside it.
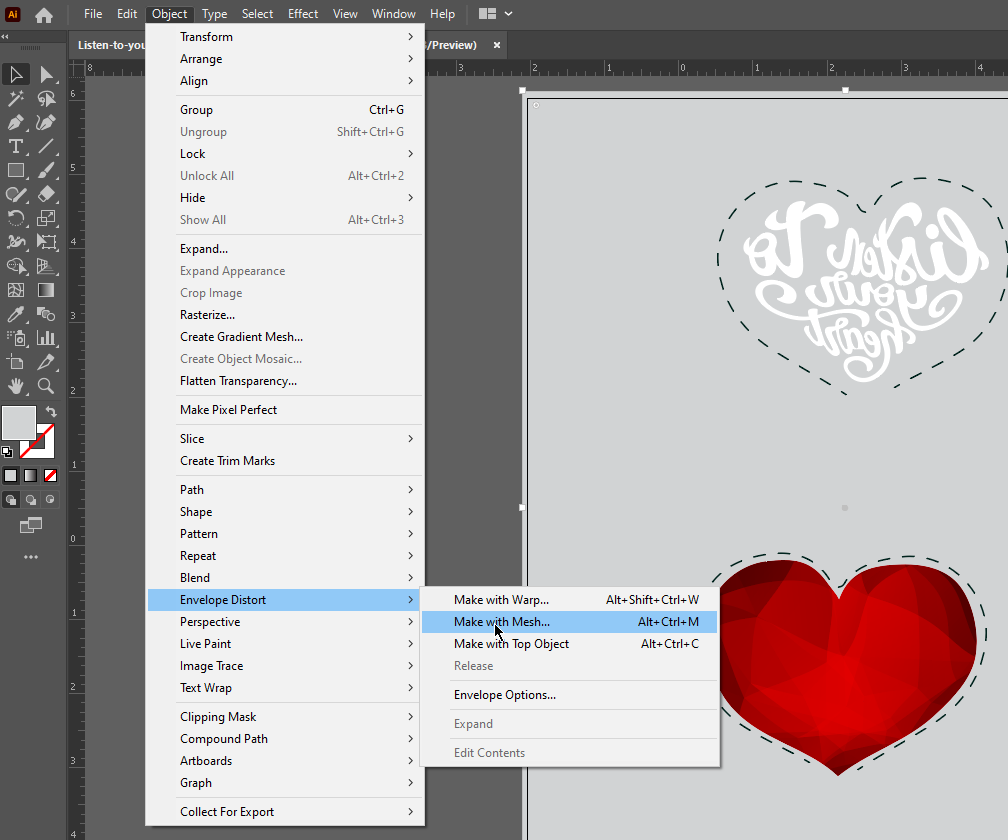
After finalizing the artwork and placement guides, and since the foreground text is white, use Transform > Reflect only on the text. The backside design should print in right-reading mode, and the front side design should mirror-print. Also, keep in mind your use of white. Since the foreground art is pure white and mirrored, it can print on the same sheet as the background image without reconfiguring the printer.
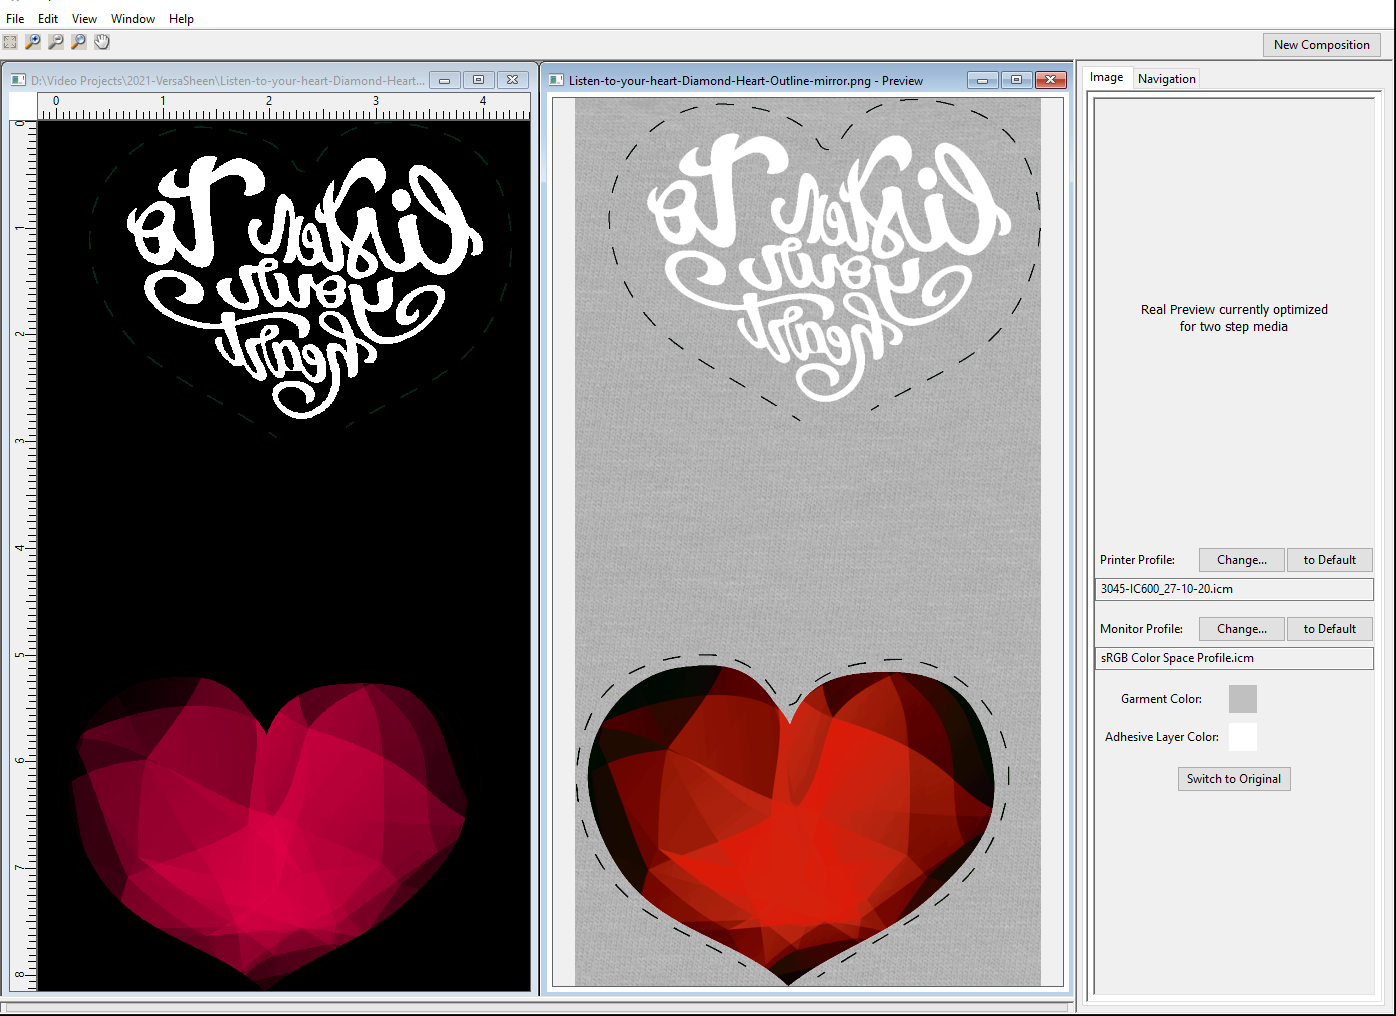
Next, preview your final artwork. Export it as a high-res PNG with transparency and then use the Real Preview function available in SmartCut. Using built-in monitor and toner profiles, Real Preview displays amazingly close to the final print colors. If you are not happy with the preview, then open it in Photoshop and modify the saturation, vibrancy, or levels to get the color you want.
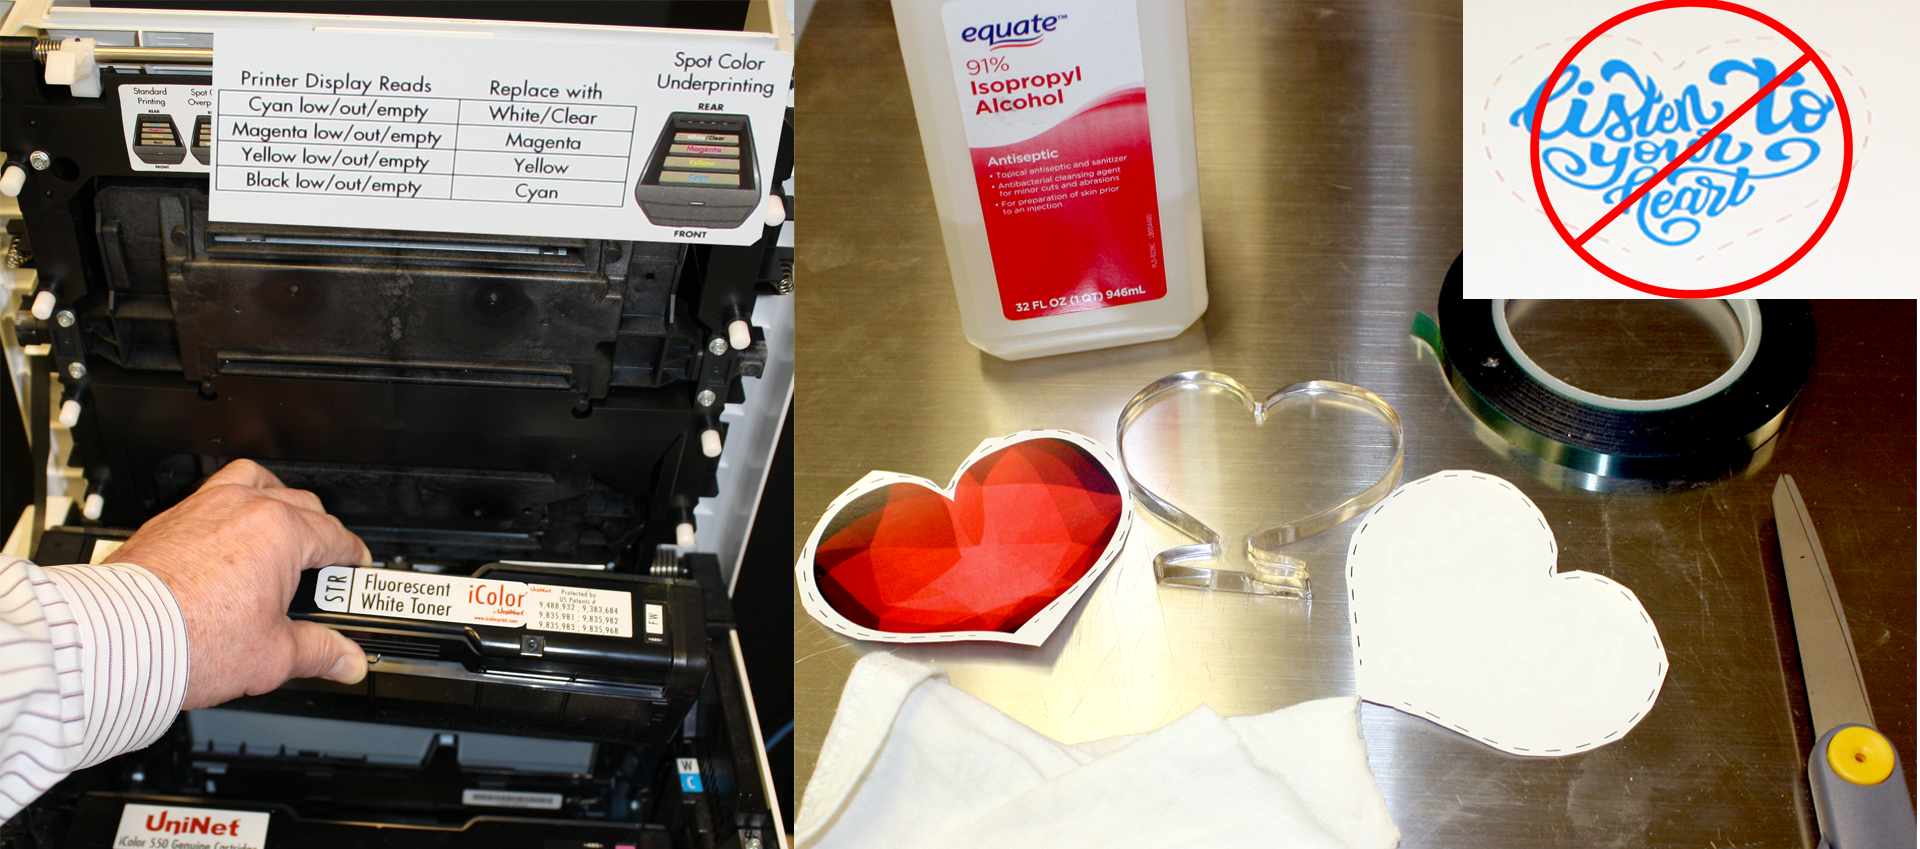
Print the pure white text using a white toner printer. You can print some designs using a regular CMYK printer. Many white toner laser printers have print modes for either underprint (white first under the color) or overprint (white last on top of the color). Use the white underprint mode to put white behind the background image and white only for the foreground image. If you usually use your white toner printer for transfer printing garments, then, in addition to changing the print mode, you should also reconfigure the printer by swapping the cyan and white toner cartridges. If your white comes out blue, then you have not done this.
Assemble the pieces for the heat press by positioning the more critical foreground image first with heat tape and then position the full-bleed background into a final “image sandwich.” Most people use a time/temp combination to control the heat press—for example, two minutes at 320 F. The problem with this is the size and thickness variables of acrylic sheets. For reliable results, purchase a digital thermocouple “k-Type” wire thermometer from Amazon. Set your heat press to any temp over 330 F, and attach the wire between a scrap of acrylic and media. Monitor the digital thermometer to release the press when it reads 270 F. Otherwise, you may have to experiment starting around 300-320 F for about two to five minutes depending on thickness.
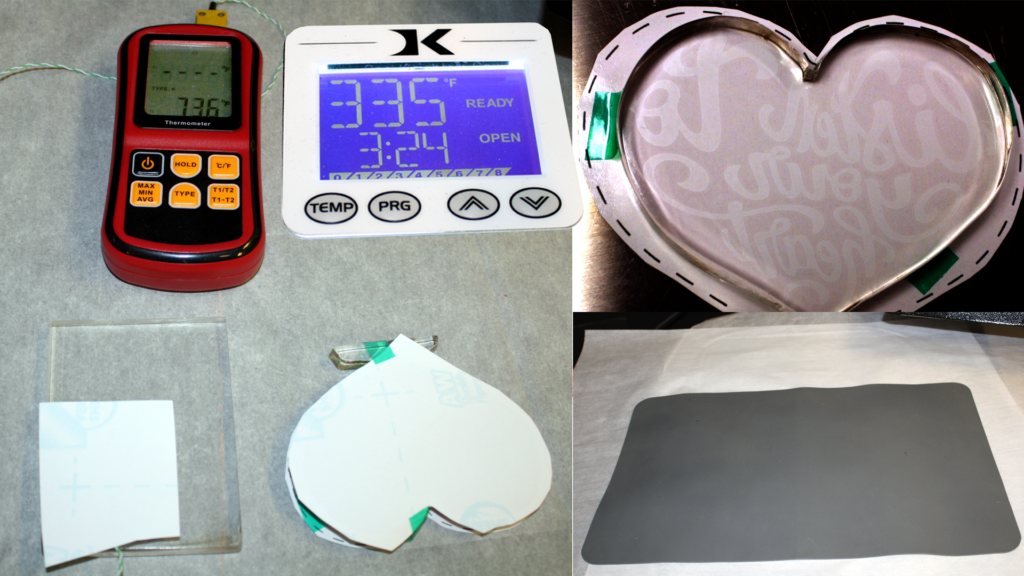
Heat press pressure is critical when working with hard surface items. Imperfections, variations in thickness, paper, toner, and more can affect your transfer. To compensate for these, always press using a silicone pad of some sort. Most home goods stores have silicone baking mats available for purchase. Get one that has no patterns, and buy several different thicknesses. For this project, a 1/8″ to even a 1/4″ thickness is best, but even 1/16″ is better than nothing. Apply heavy, even pressure to maximize contact between the toner and the acrylic.
After pressing, let the piece cool down a bit before peeling—do not peel the product hot. Clean the final product using either rubbing alcohol or an orange cleaner like Goo Gone to remove any residue left from the transfer. See some imperfections? A quick hit with the MAP gas torch across the surface will reduce imperfections, increase clarity, and further harden the toner.
Optionally, spray the backside with white Rust-Oleum acrylic paint and then bake it under the heat press or oven. This step is a must if using a regular CMYK printer.

White toner laser transfer printing can open the door to many new market segments, from awards to weddings.