Many people puzzle over how to embroider cleanly on knitwear fabric, but each variety of knit materials presents unique challenges for machine embroidery. In this tip, I’ll focus on two categories: thin knits and thick knits. Though there are commonalities to all knits, like the need to use a ballpoint needle that will push threads out of the way rather than punch through them to avoid creating a snag or ‘run’ in the fabric, there are very different ways that lightweight and heavyweight knits must be handled.
Thin Knits
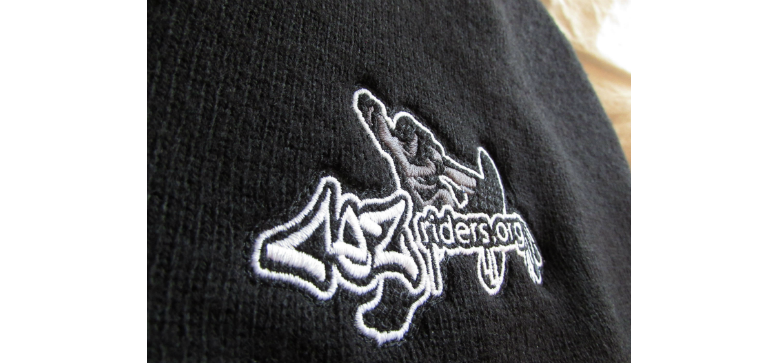
Thin knit materials can include anything from the relatively smooth, but stretchy jersey knit common to T-shirts, the thickly-ribbed and incredibly stretchy ribbed knits seen in many tank tops, and the textured pique knits often seen in classic polo or sports shirts. All thin knits pose some common problems that can be easily addressed.
Stability: On thinner knits, you’ll want to arrest the stretch of the material to avoid excessive distortion in the final piece. Use a cut-away stabilizer to provide stability after the garment is stitched as well as during the embroidery process. For the heavier knits, a piece of medium-weight, standard cut-away is a good starting point. If your knit garment is exceedingly light, has a very soft hand, or is somewhat translucent, you may want to use a layer of polymesh or cut-away designed specifically for performance wear. For extremely stretchy knit materials and those prone to rippling, you can enhance stability by adhering the fabric to the stabilizer with a light spray of embroidery-specific adhesive before hooping. Digitizing an underlay that stitches the decoration area to the stabilizer, progressing from the center of the design toward the outside edge, can also help keep things stable.
Hand: Digitize with the least density possible to achieve coverage in your color combination with thin knits. The heavier the stitching, the more distortion you’ll see in the embroidery and heavy designs will hang and droop on malleable performance materials. When attempting to correct show-through start with structural underlay, not additional density.
Hooping: Over-stretching a knit fabric in the hoop before embroidery will create ripples and wrinkles in your finished project as the stretched fabric returns to its original shape around the design. Instead, lay the material carefully over the stabilizer and allow it to stretch only so much as you’d expect the garment to stretch when worn, more than that will allow for excessive rebound.
Some thin knitwear may be hard to hoop firmly or may suffer from extreme hoop burns or semi-permanent rings due to overly tight hooping and abrasion during the process. You can use a ‘window’ of stabilizer over the garment to protect the area under the hoop. To do this, just cut a hole larger than the decoration area in a piece of stabilizer and place it on top of the garment when hooping. These can be reused throughout a run.
Texture: With textured knits like pique, you may see some degradation of the edge quality in your design, particularly on satin stitch borders and lettering. Use an ‘edge run’ or ‘contour’ underlay inside the edges of your elements to give the topstitching some reinforcement and help the edge avoid sawtoothing or stair-stepping. Small, unsupported elements on these textured knits can also benefit greatly from the application of a water-soluble topping material that temporarily holds topstitching up above the texture, allowing stitches to form without sinking in.
Stitch angle: With knits that present a distinct grain, like the vertical grain in rib knits and jerseys, you’ll want to avoid your stitch angle being vertical as well. Vertical fills will have excessive show-through and distortion on these vertically-grained knits. Using structural underlay that doesn’t match the fabric grain, as well as running stitches in a more horizontal angle, will reduce show-through and stretching.
Thick Knits
With thick knits, though stitch angles and stretch solutions are similar to those in their thinner counterparts, problems specific to their thickness can crop up.
Pull compensation: As knit materials get thicker, embroidery elements will experience extra pull distortion, getting ‘thinner’ in the direction of the stitch angle. This is particularly true of satin stitches. Increase pull compensation to counteract the thinning.
Extreme texture: This is especially true of the ‘knit cap’. Whether you call it a beanie, toque, or have some other regional variant, you will be faced with the extreme highs and lows presented by the deeply ribbed knit. To tame this texture, some will use appliques, patches, or a full-density fill stitch area, but you can stabilize and lift an existing design using what I call a ‘light mesh fill.’ This eliminates your need for specialty toppings like water-soluble film and leaves you with a cool ‘debossed’ effect, wherein the background of your design sinks into the cap. All it requires is the digitizing of a shape larger than your design, copied once to create two stacked, 2mm density, 4mm stitch length fills at 15- and 135-degree angles, respectively. For thick, satin stitch lettering, you can often get away with adding pull compensation and changing your underlay to a structural combination of edge run or contour underlay followed by a double zigzag. This inner scaffolding bridges the deep valleys between ribs and lifts up topstitching. Both tactics are also great for heavy hand-knits and almost any material with a deep pile.
Pre-stretch: Another problem unique to knit caps is that of achieving just the right stretch when hooping. Though it looks somewhat strange when the hat is in a relaxed state, some customers prefer to reduce distortion and wrinkles when the hat is stretched to be worn. If you don’t stretch a knit hat when you decorate, it may look good on the shelf, but as the material behind the design can no longer stretch, you will find that the knit is often badly distorted when the cap is worn, and in some cases, the edge of the cap will try to flip under the strain. You can set and recreate an amount of stretch if you have a measuring tape and full-head hat display or a willing coworker handy. Use a standard number of ribs to create a scale. As an example, we’ll say eight ribs. Grab your measuring tape, place the cap on the mannequin head, measure from ribs one through eight. Examine the cap and get a feel for the space between ribs. Now, when you hoop, try to stretch the hat so the ribs are about the same distance apart as your measurement. You can verify by measuring the eight ribs again when hooped and comparing the total length to your first measurement.
Keeping it together: When stitching unsupported, unconnected letters on knit caps, always use cut-away stabilizer. Don’t cut between letters. When the hat is stretched to fit, letters can often look crooked, like they’re leaning, or look overly spaced out due to the stretch and distortion. Leaving the stabilizer in place to secure those separate elements.
Whether you’re stitching a light or heavy knit, remember to think of the garment structurally and take special note of stability and texture issues.