There are basically two types of graphics files. Raster (also sometimes called Bitmap) images are composed of square, colored pixels neatly residing on a grid. Vector (or Object Oriented) images are defined by straight lines and curves that delineate their shape and position on the page. These file types are distinctly different in how they appear, how they are manipulated, and how they are saved.
Formats
Because of the specific difference in the way image data is configured, there are several different storage systems. Data storage systems are called formats. A format is the method of how a document is saved and encoded. Formats determine what capabilities the image has and which programs can open it. A format is indicated by the file name’s two, three or four-digit extension. For example, JPEG, TIFF, PDF and AI are all indicators of different configurations of data. Each format is like a different language, with some only understood by specific platforms and applications.
To access a particular file, you may need to convert it to a new format, hence you’ll need software that performs this task. But don’t panic! You may already have software installed on your workstation that will make the file conversion a snap.
Native format
Images are formatted for specific purposes, so it is important to know beforehand what the image is going to be used for. Images containing pixels can be saved in a variety of formats, but to ensure later compatibility and to be able to open and edit an image, it’s best to save the image in the native format in which it was created. If you are working on a raster image in Adobe Photoshop for example, save the original layered version as a PSD. If working in Corel PaintShop Pro, save the document as a PSP. The same applies to vector images. Save Illustrator files as AI and CorelDraw as CDR. Using the native formats will ensure that all of the capabilities of the software are available when the file is opened.
The drawback to native formats is that often they are unpublishable to the Web or multimedia applications, unreadable by other software and have unnecessarily large file sizes. Consequently, a version of the original file will have to be saved to a compatible format.
Compression
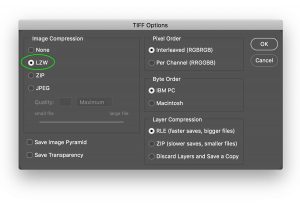
Some formats compress files so that they take up less storage space. TIFF (Tagged Image File Format) saves all of the characteristics of PSD or PSP and decreases the file size using a compression scheme called LZW, named after its creators, Lempel, Ziv and Welsh.
Saving a file to TIFF format provides the option to somewhat reduce the file size and maintain the editing capabilities of the software. Because LZW maintains the quality and reduces the file size it is referred to in computerese as a lossless compression scheme.
JPEG

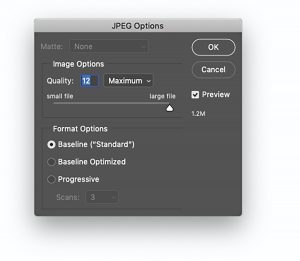
JPEG is an extremely efficient format for archiving a flattened image or saving it for publication to the web. Named for its creators, Joint Photographic Experts Group, the JPEG format can reduce file size to the extreme. Be careful though! When saving images, JPEG format discards critical information as it organizes data into clusters. The quality of the image can be compromised. Because of its propensity to compress images by losing data, JPEG is referred to as a lossy compression scheme. Fortunately, when you save an image as a JPEG a dialog box enables you to determine its quality. I recommend that you choose the highest quality setting whenever possible. Low-quality JPEGs can produce some pretty dismal-looking images, compromising color and contrast and creating extraneous artifacts.
PDF (Portable Document File) is a universal format developed by Adobe Systems in 1991. A file saved as a PDF can be composed of images, editable text, interactive buttons, hyperlinks, embedded fonts, and even video.
PDF file format is used for publishing product manuals, portfolios, eBooks, flyers, job applications, presentations, brochures and numerous types of other documents. Because PDFs don’t rely on the software that created them or any specific platform or hardware, they look the same without regard to the device or platform on which they are opened.
Most users rely on Adobe Acrobat Reader, a free software program, to view PDFs; however they can be opened, edited and saved back to PDF format in Photoshop and Microsoft Word among many other programs.
Converting files
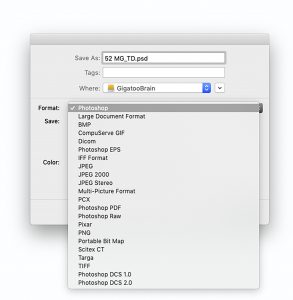
Sometimes it becomes necessary to change the file format of a particular image so that it can be manipulated in different software or published both digitally and to print. If you start with an image saved in the native format of a particular application, it’s a matter of simply opening it and saving a copy in the desired format. In Photoshop, for example, choose File > Save As and specify the target format from the dialog box where there are several to choose from. The Save As dialog box will automatically add the three-digit file extension. The same is true with any format that the software supports. If the software does not support the format, the document will be grayed out in the directory and you will be unable to open it.
If you don’t have software that converts images to the format you need, you can always acquire image conversion software, such as Pixillion, by NCH Software, a conversion utility readily available for download on the web that is reasonably priced.
Vector to raster
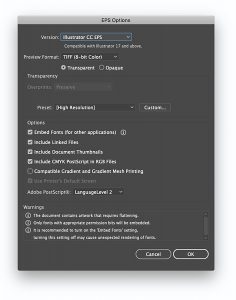
There’s not much to be said about converting a vector-based image to pixels (raster). Simply save the image as an EPS (Encapsulated Postscript) file and open it in image editing software. Simpler still, Photoshop will directly open AI files, but the vector data will be lost when the file’s format is automatically converted to PDF.
Photoshop has a complete set of vector generating tools. If a vector object is generated in Photoshop, such as a shape layer or path, the vector data-minus its content-can be exported to Illustrator and opened as an illustrator document. The exported object(s) will not contain stroke or fill information, but the path will be available for editing with Illustrator’s path editing tools. Fills and strokes and any other Illustrator operation can be applied. To perform this task in Photoshop, choose File > Export > Paths to Illustrator, then open the file in Illustrator.
Raster to vector
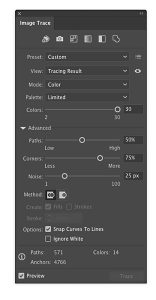
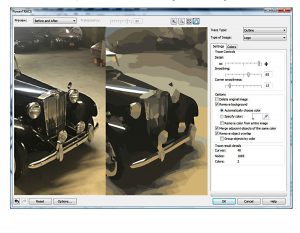
Reversing the process, converting an image composed of pixels to a group of vector objects is a more extensive operation requiring specific software. The pixels are assigned to objects based on their color, and that requires you to make a few informed decisions. Of course, you have to be in a program that supports vectors. Therefore, launch Illustrator or CorelDraw, which both have file conversion features. In Illustrator, Choose File > Place to place the image in an open document. In CorelDraw, choose Import and then Bitmap. CorelDraw’s Power Trace feature has controls similar to Illustrator’s Image Trace. Both programs provide an extensive interface that controls conversion characteristics. You can choose the results to be in Black and White Grayscale or Color. If you choose the Color option you can control the number of colors, and if you expand the panel you have numerous path manipulation options. Be sure to check the preview box to see the changes as they happen.
When the image is traced to your satisfaction, you will need to Expand it (Illustrator) and Ungroup it (Illustrator and CorelDraw). Then you can select any of the vectors with the Direct Selection tool and manipulate them as you would any vector object.
And so…
File conversion is a critical process of the digital graphics workflow. How an image is formatted is determined by what programs will open it, how it can be manipulated and where it can be published. It’s definitely worth knowing what specific formats are used for and how they might affect the quality of your images. Knowing the ropes of file conversion will save you time and enable you to determine the best possible outcome for your images.

