The ability to isolate elements on a picture is an essential skill in the image editing process. Accurate selections determine the quality of an edited image and can be the one factor that makes or breaks the credibility of a manipulated picture. This article explores the types of masks available in most image-editing software packages. I’ll be demonstrating masking techniques that assure seamless editing for accuracy and believability using Adobe Photoshop 2023.
What’s a Mask?
According to my online dictionary, the first and most obvious definition of the word “Mask” is a form of disguise or concealment usually worn over or in front of the face to hide the identity of a person. Of course, this term’s meaning has evolved to include several different applications. Masks are everywhere. During the recent pandemic, masks were used to prevent the spread of disease. Entertainment-wise, masks are used in all sorts of theatrical performances and movies. Firefighters wear them as protection from toxic fumes. Kids wear them on Halloween for fun. Masks used in the graphics industry are quite different. They make it possible to protect areas from exposure or conceal content from view.
Graphic Masks
Masks commonly used in the production of graphic media perform two opposite functions. One part of the mask protects a region of an image from edits, while the other exposes the unmasked region to various effects. Before personal computers were introduced in the nineteen eighties, masking was a manual process. A mask consisted of a piece of orange film called Ruby Lith that was designed to conceal an area of an image from the process camera’s exposure A hole was carefully cut into the film to expose a specific area so that the technician could selectively reveal content when the exposure was made. The technology necessary to achieve these effects required a razor-sharp X-Acto knife, a large process camera, a darkroom, and chemical processing.
Though the process was very time and labor-intensive, believe it or not, all sorts of interesting effects could be achieved this way, including sharpening, blurring, increased contrast, polarization, and many other creative effects.
Masks Galore
Fortunately for the current generation of graphic technicians, software has streamlined the masking process. Isolating image elements is now much faster, easier, and more precise. Each opened image can present a different set of selection and editing problems, consequently, built-in masking techniques are designed to cover any imaginable situation. Masking can be quite complex and labor-intensive and sometimes situations arise where one masking technique is not quite sufficient and must be combined with other masking techniques.
Several types of digital masks share similar characteristics especially in the way they are applied and manipulated. Depending on the type of mask, and current viewing mode, most are displayed either as a black and white or gray thumbnail in the Layers panel or Channels panel, or as a colored overly on the image.
The Ants Go Marching
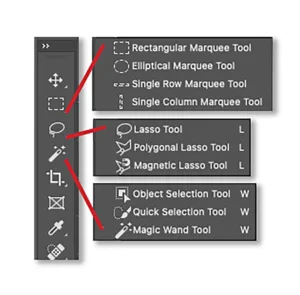
The most obvious means of creating a mask are by using any of the ten selection tools found at the top of the Tools panel (Figure 1). By drawing with these tools, an animated marquee surrounds a selected area. (Figure 2) This marquee is often referred to as “marching ants” because of its resemblance to a column of ants on the move. The outside of the marquee is the part of the image that is masked. The inside is the part of the image that is exposed. When a filter, adjustment, brush stroke or any other feature is applied, the area within the marquee is affected.
Mask Edges

One primary advantage of digital masking is the ability to control the edge of the affected area. The Select and Mask feature (Figure 3) provides precise control over the mask’s boundaries. Select and Mask works on both newly made selections and existing masks. The mask can be viewed in
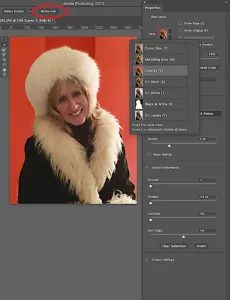
seven different viewing modes each provides a specific viewing experience to best determine the how areas of the image that will be affected. (Figure 4)
Tools
The tools in the upper left corner of the window are for edge refinement that modify an existing selection or mask. These tools modify the current selection by further refining its edge. The most minute details such as the hair or fur can be included or excluded in the edge.
Global Refinements
The four Global Refinements control the characteristics of the selection edge.
Smooth reduces irregular areas of the selection border for a smoother edge.
Feather softens the transition between the selection and the surrounding pixels. When the selection is filled, filtered, painted, adjusted, or moved, the transition is smooth and seamless.
Contrast makes soft-edged transitions along the selection border more distinct.
Shift Edge moves selection borders inward with negative values or outward with positive ones, reducing or enlarging the selection area.
Edge Detection Settings
These are auto-settings that offer automated control over the selection edge.
Radius determines the size of the edge refinement. Use a small radius for sharp edges, and a large one for softer edges.
Smart Radius produces a variable width refinement area around the selection edge. For example, let’s say that a selection encircles a tree. The ambiguous leafy areas might require a larger refinement than the trunk. Smart Radius determines this automatically.
Output
Decontaminate Colors. Replaces color fringes with the colors of the surrounding areas.
Output To Determines whether the refined selection is saved as a selection or mask on the current layer or produces a new layer or a new document.
Select and Mask is the primary mask feature for manipulating selection edges. Applying it to your selections will achieve the perfect selection for your specific circumstances.
Quick Mask
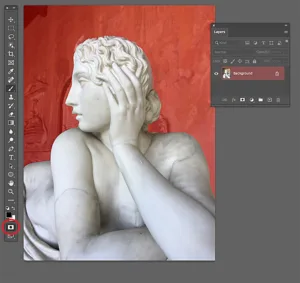
The selection tools are not by any means, the only way to make selections. Sometimes they are not precise enough to do the job and need to be “custom refined” even before entering the Select and Mask workspace. Quick Mask is a fast and reliable way to refine a selection on the fly that takes advantage of the versatility of the Brush tool. After the initial selection is created, click the Quick Mask icon in the Tools panel or press the Q key. The areas surrounding the marching ants are converted to a red colored, semi-transparent field that, incidentally, resembles Ruby Lith. (Figure 5) This mask can be manipulated with the paintbrush and all the numerous brush characteristics that the software provides. Painting with black applies the red mask color to the selection. Painting with white, erases the mask color. Painting with any shade of gray produces semi-transparent areas of the selection, depending on how dark or light the shade is. When the icon is clicked again (or the Q key is pressed) the quick mask is displayed as marching ants complete with revisions, ready for effects to be applied.
Alpha Channels
Creating masks is by far most manual and labor-intensive process in the image editing workflow and therefore, it is important to save the selection mask after it’s been drawn and refined. Completed masks can be saved as

Alpha Channels. Display the Channels panel (Figure 6) and Click on the Save Selection as Alpha Channel icon at the bottom of the panel. Viola! The selection is saved within the document and named Alpha 1. To load the selection press Command (Mac) or Control (Win) and click the channel thumbnail. The marching ants appear, and the area is ready for editing.
Alpha channels are used far less frequently than in the past. Layer masks, vector masks smart filter masks and layer styles have replaced many of the alpha channel techniques. Still, there are times when they can be quite useful in combining and duplicating selection marques.
Layer Mask
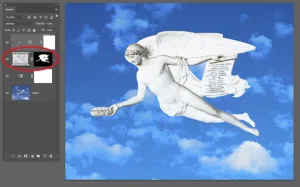
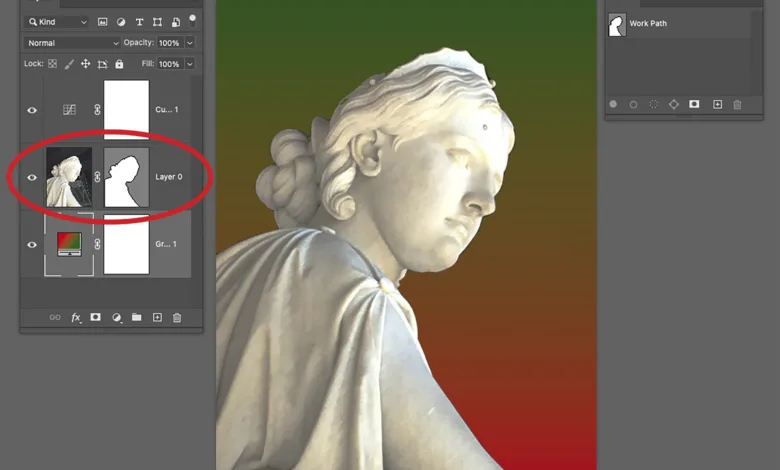
The other types of masks that are commonly used and important to the non-linear workflow are layer masks. Where a selection marquee isolates a region for editing, layer and vector masks conceal and reveal areas of the image. Layer masks can be made by encircling a region of an image with a selection marquee and then clicking the Add Layer Mask icon at the bottom of the Layers panel. The Layer mask can then be painted with white to reveal areas or black to conceal areas. If gray is painted on the mask, the area will be partially concealed or revealed depending on how dark the shade is. Figure 7 shows the results of a layer mask. The photo of the marble background where the angel was originally carved has been masked with a layer mask, revealing the sky layer beneath it.
Vector Masking

The difference between layer and vector masks is how they are made and how they are edited. Vector masks are made with the Path tools and edited with the Path Selection or the Direct Selection tool. The layer displays a gray and white mask thumbnail. Gray represents the area that is concealed and white represents area that is revealed. The path is the boundary between what is seen and what is concealed. (Figure 8)
Smart Filters
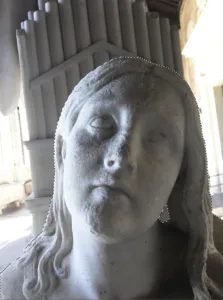
When a Smart Filter is applied to a layer, a mask is created. The layer is first converted to a Smart Object by choosing Convert to Smart Object from the Layer Options menu. In the case of Figure 9,
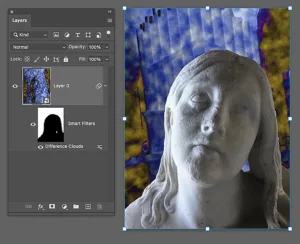
I selected the statue’s background and choose the Render > Difference Clouds filter from the Filters menu. The smart object layer displays a black mask made from the selection to conceal the effect of the filter on the statue’s face. As with layer masks, a white or gray masks reveal or mitigate the effects of the filter.
Twas Ever Thus
Masking is possibly the most important skill to learn in the image editing workflow. It certainly can be the most hands on. Thankfully, gone are the days of cutting Ruby Lith with an X Acto knife. Instead, masks are available at your fingertips in most image editing software packages. Learning to make accurate masks can be challenging because there are so many variables in the image editing workflow that determine what techniques to use. Of course, experiment with the many features of masks to get the perfect results you want. I hope this article has helped declaw creative masking. Naturally, using these tools and techniques can greatly enhance your ability to create amazing credible pictures, so give ‘em a try.