We all make mistakes! It’s human nature to err, and I’m sure if we closely examine our lives there are things that we have done that we wish we could erase. Unfortunately, the past is the past and it’s best to move on. But what if …
Time machine
What if we could travel back in time and undo those unpleasant little errors and mishaps that we regret. Alas, nobody has yet invented the time machine. (I know this because I checked Amazon and looked for one to buy). You can probably guess what I’m about to say next… DRUMROLL! … image editing software programs including Corel PaintShop Pro and Adobe Photoshop both have built in “time machines” that enable us to access any moment in the workflow to make alterations, corrections and erasures. Both programs have similar features that allow multiple undos and non-linear editing. Because I’m primarily an Adobe user, I’ll demonstrate the History “panel” in Photoshop but rest assured, there are similar features in PaintShop Pro’s History “palette”. Although the icons and interfaces are a bit different, the end results are essentially the same.
Undoing
Let’s look at the simplest techniques that instantly reverse unwanted edits. Let’s say you are carefully cloning out the blemishes on Uncle Herman’s portrait. You’ve had one too many double espressos, and your hand is a bit jittery. You slip and drag a little too far and place a rather unsightly blotch on the tip of his nose.

An easily corrected mistake? Yes! The first course of action is to head straight to the top of the Edit menu and choose Undo, (Fig. 1) to instantly revert the image to the moment before you made the ill-fated clone stroke. Better yet, use the key command Cmnd+Z in Mac or Ctrl+Z in Windows. When you choose Undo, a new command on the Edit menu appears –Redo, that restores the undone action. You can toggle back and forth between the previous artwork (Undo) and the later (Redo) by selecting the command again, or better yet, use the key command Shift Cmnd+Z in Mac or Shift Ctrl+Z in Windows. Pressing these key commands reverses the image sequentially backwards or forwards until the beginning or final state is achieved. An additional command in the Edit menu applies to the undo operations.
Toggle Last State, Opt Cmnd+Z (Mac) or Alt Ctrl+Z (Win). This operation toggles back and forth between the current state and the state immediately before it. These key commands are worth remembering because they are among the most frequently used operations.
The history of your workflow
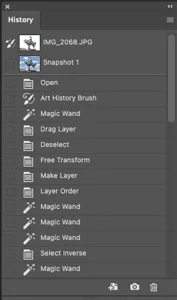
Imagine a workflow where every command, tool application or menu item that you initiate during your work session is recorded and compiled on a sequential list of history states that can be accessed at any time. The recorder for all the states is the History panel found in the Window menu. (Fig. 2). By default, when the image is opened, the History panel displays a snapshot of the image as it appeared when it was last saved. It is from this point on where you will make changes to the image. Each time you perform an operation, the History panel produces a state with the name of the operation or tool that was used—for example, Brush Tool, Levels, Smudge Tool, and so forth. The most recent state is at the bottom of the stack.
The History panel is one of the most dynamic features and the one that can transport you forward and backwards in time to make observations or corrections. Click on any state and the image window displays the image as it was after a command had been applied.
Memory
What enables Photoshop to remember all the History states is, of course, memory. Each state is stored in your computer’s RAM or on the scratch disk. When you exceed the current limit of states, the oldest state is deleted to make room for the most recent state. The number of History states is limited to fifty by default. That number can be increased or decreased by choosing Photoshop (Mac) or Edit (Windows) > Preferences Performance >History States and entering a number from one to one thousand. (Fig. 3)
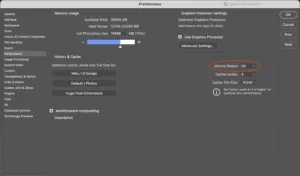
Specifying an excessive number of History states earmarks memory for the History cache and takes the allocation away from Photoshop’s other operations. This could potentially compromise Photoshop’s performance. Whenever possible, keep the number of states at the default.
Changing history
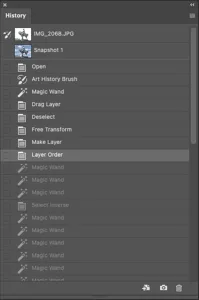
Historians frequently rewrite history depending on their point of view and we’ve certainly seen a lot of revisionist history through the years. In Photoshop and PaintShop Pro, changing history is a little more objective. If you want to move backward in time, click on the desired state in the History panel. The image window displays the image as it was after you applied the edit. All states below it in the History panel are grayed out. (Fig. 4) If you paint a stroke with the brush tool for example, all the grayed-out states disappear.

To avoid losing the grayed-out states, choose History Options from the History panel menu and check the Allow Non-Linear History box. (Fig. 5) You can then eliminate or edit a state in the History panel and preserve all the states below it in the stack. A state can then be altered and saved as a snapshot or document. Work can then be resumed on the current document. I don’t know why Non-Linear History isn’t the default. It should be because it ensures that nothing is lost. That being said, check this box when you first start working and you will be certain that all is preserved.
Snapshots
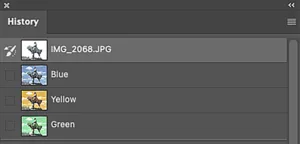
Instead of adding excessive history states, it’s advisable to make a snapshot of the image at key intervals in the editing process. With the current document active, click on the snapshot icon (it looks like a camera) at the bottom of the Layers panel. The snapshot is saved in a list at the top of the panel. If you reach a state in the editing process and are dissatisfied with what you’ve done, click on a snapshot to revert back and continue editing from that point on. You can collect multiple snapshots of key points in the workflow or even multiple versions of the image. (Fig. 6).
Another way to save a snapshot is to click the History panel menu and choose New Snapshot. The dialog box that appears enables you to name the snapshot and determine which combination of layers the snapshot will be made from. Here are the choices:
Full Document makes a snapshot of all the visible layers and the Background.
Merged Layers makes a snapshot of all the layers and merges them into one layer.
Current Layer makes a snapshot of the currently targeted layer.
Documents
Any history state or snapshot can be saved as a document. Select the desired snapshot or state in the History panel and click the new document icon. The image appears as a new document with a snapshot and new history. Don’t forget to save the new document.
History options
Change the behavior of the document’s history by choosing options in the History Options dialog box. In the History panel menu, choose History Options to view or change these settings. Here is what the dialog box presents:
Automatically Create First Snapshot produces a snapshot of the original image upon opening it and places its thumbnail at the top of the History panel.
Automatically Create New Snapshot When Saving generates a snapshot of the current state when saving and adds its thumbnail to the top of the History panel.
Allow Non-Linear History enables you to discard or edit a previous History state without deleting more recent states.
Show New Snapshot Dialog By Default automatically displays the Snapshot dialog box when a new snapshot is created, prompting you to name the snapshots as they are made.
History brush

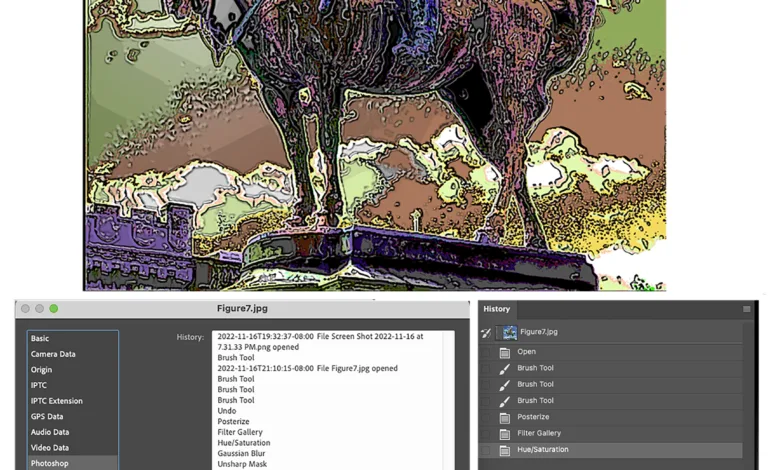
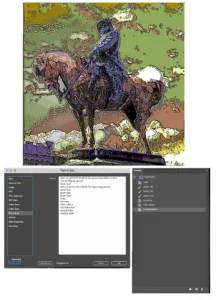
The History Brush will edit specific regions of the current image back to a former state for maximum flexibility. With this tool it’s easy to combine elements from various stages of the document. Simply choose the tool, click the box to the left of the history state, choose brush options and paint. The brush copies the content from the former history state to the current one. (Fig. 7).
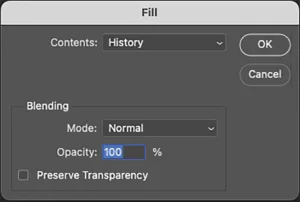
Additionally, Areas can be filled with History from the Fill dialog box. The process is similar to using the History brush, Select an area, click the box to the left of the history state, Choose Edit > Fill > History (Fig. 8)
I should point out that these techniques don’t work if the targeted content is on a separate layer. Tonal and color adjustments on Adjustment layers are also unaffected by the History brush and fill command.
Good news, bad news
The good news is that History features create an extremely dynamic workflow. The bad news is that History states are recorded only for the current work session and are not saved along with the file. Each time a file is saved and closed and then opened again, a new history begins. You can, however, save any snapshot or history state as a document and thereby generate as many versions as you like.
History log
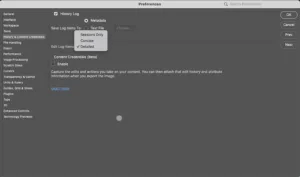
Setting up a History Log in the History and Content Credentials preferences is a convenient way to have a written record of a work session. (Fig. 9) A history log is a written record of the workflow. A History Log can be generated as a Text document, Metadata or Both. Once generated, the metadata is accessed from the File > File Info > Photoshop dialog box (Fig. 10) and the text document is located where you saved it. From the Edit Log Items menu, choose Sessions Only to generate the session date, Concise for a list of tools and commands that were used and Detailed for a complete accounting of each history state including settings and specifications.
History repeats itself
The History panel is the answer to the concept of multiple undos. Whereas some programs provide a system of undoing operations backward in a linear sequence. Photoshop’s and PaintShop Pro’s interactive History enable both sequential and nonlinear editing. Considering the amount of time and effort that goes into most well-edited images, working dynamically is not only wise, it’s essential. These features are insurance against errors and make your experience as rewarding as possible with a minimum of effort.
Even the most accident-prone among us will find that it’s almost impossible to do any permanent damage while working in Photoshop or PaintShop Pro. Because you have the ability to instantly correct errors, no compromises are necessary. Happily, you can reverse any operation at any time. With this in mind you’ll feel secure while experimenting freely with your images.