Working with glass and crystal can be one of the more delicate things you may be asked to do as an engraver. There are a myriad of things that can go wrong, from the easily fixed to disastrous failures. As the old saying goes, one makes mistakes due to a lack of experience, and one gains experience by making mistakes. This will happen with glass and crystal, possibly more than any other material you will work with, and my goal here is to help you avoid making as many mistakes as possible — particularly expensive ones.
Camera-ready artwork is always best if it is in a format that your graphics software can work with. You may find it necessary to redraw the graphic, breaking it down into individual pieces, and bringing the components together when you’re done. Working with glass, you should start off by avoiding a graphic that requires shading. As you gain experience, you may be able to figure out how to produce limited amounts of shading, but that can take some time.
It may be necessary for you to decide to use a completely solid monotone or a completely clear silhouette. In this case, double-check with the customer first, naturally. Hopefully, the customer will arrive with artwork, which could be text and/or graphics, and will hopefully know which font is being used. Your graphics software will probably come with a library of fonts, but if you know the name of the font, you will be able to download it from any of the free font websites available online. Different font providers can make subtle differences in their versions of fonts, so be sure the version you use matches that requested by the customer — or is at least as close as possible.
As always, all the advice provided here is what I found to work for me. Working with glass really isn’t all that different from working with wood, for example. The biggest potential problem occurs when customers bring in their own pieces. They won’t bring a spare award blank for you to play with. Bigger companies often go toward the high-end pieces for their awards, so getting it right is important. You don’t want to ruin a $300 award, which you must replace.
 For flat pieces, it’s relatively simple. After positioning the text and graphics, position and focus your piece. I have found my customers prefer the engraving to be done on the back side of the piece, in which case you will need to invert the graphic so that it reads the right way round when you turn it over. If your machine comes with a materials database, or the manual comes with a library of settings, you can try running at the suggested settings.
Keep in mind that different suppliers will often use different formulas for their glass and crystal, and different machines have their own idiosyncrasies, so the listed settings may need to be tweaked depending on your machine and the blankware. I am comfortable with a different setting than is suggested by the manufacturer and run at 100% power, between 36% and 40% for your speed, and between 360 to 380 PPI.
(You can work with pieces that consist of three or four individual segments mounted on the base. Just remember to adjust the focus relative to each segment, and make sure the distance between the first and last segment allows the engraving head to clear the piece.)
A curved piece is much the same but remember to adjust the focal point to allow for the difference between the lowest point and the highest. I usually opt for a spot somewhere around the middle of the two heights.
Things start to get a little more complex with round pieces. You will need a rotary adapter. (Some manufacturers can provide a “ramped” adapter, which allows you to adjust the gradient of the ramp so you get the taper level on a horizontal basis.)
The simplest piece is a plain round glass with no handles or other attachments to worry about.
- Clean the optics.
- Calculate the engraving page size — diameter x pi, or 3.142. Adjust the page size with your software by adjusting the vertical height.
- Remember to “tell” the machine it is engrave a round piece by selecting the setting for rotary and entering the diameter of the piece. If offered, it is helpful to add the thickness of the piece.
- For a piece that requires a graphic “front and back,” find the measurement for 1/4 and 3/4 of the page height. This is necessary to position the graphics so that they are in the correct position relative to each other. If a graphic is only needed on one side, you only need to find one of these two measurements. (For a one-sided engraving, I usually position the graphic on the centerline for simplicity’s sake. Strictly speaking, with a round piece of blankware and one graphic, the graphic can be positioned anywhere within the boundaries of the page size.)
- Mount the piece in the rotary adapter. Avoid overtightening the adapter — the combination of the heat and the pressure exerted by the adapter can easily break a piece. This gets increasingly possible as you work with thinner pieces.
- Find the point at which the piece is located on the adapter. Put that measurement into your graphic so the graphic is positioned correctly for engraving.
- Focus the engraving head.
- I almost always use a piece of very thin paper, soaked with water, which I position over the spot where I’ll be engraving. This does two things — it helps keep the piece cooler because the heat will be distributed over a greater area, and it can help make sure that no potentially harmful debris gets deposited on the optics. (I have found it possible to work without the wet paper, but prefer not to.) On a large order, I’d recommend cleaning the optics periodically.
- Double-check everything!
You should then be able to engrave the piece safely and correctly.
It now starts to get a little more complicated. For a piece such as a mug, which has a handle attached, you’ll need to rotate the piece so that the handle is positioned 90 degrees relative to the engraving point. This will center the graphic on the mug. Different machines turn the rotary clockwise or counterclockwise. Decide which face you want the engraving relative to the handle and position the graphic accordingly.
Next: a tapered piece such as a pint beer glass. You can follow the directions as described for a curved piece — find a focal point somewhere around the mean diameter of the graphic. Again, proceed as described above.
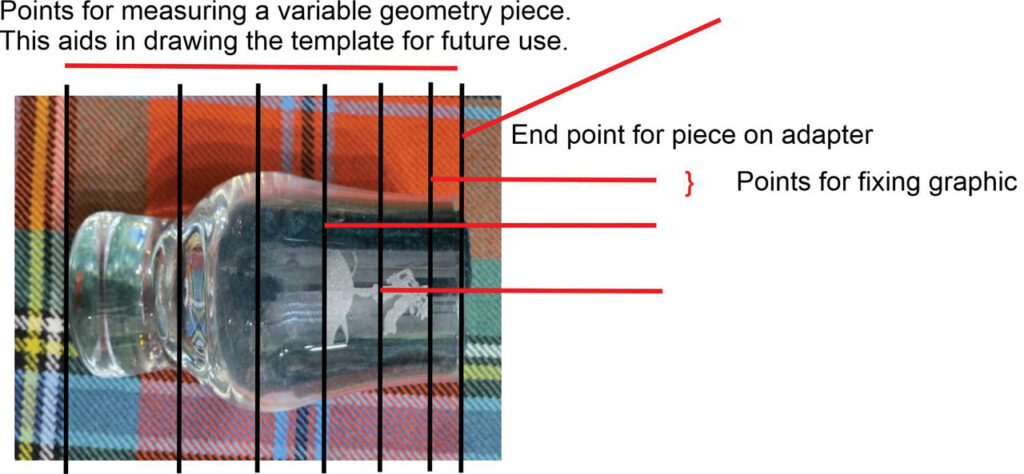
Now to the most complex: a round piece with variable geometry. Getting your graphic right is essential on a piece such as this. It needn’t scare you — what you will do is measure at the critical points of the piece: the mouth, the waist, the major and minor diameters, and account for any tapered base. Proceed as above, basically, with one minor adjustment. Your graphic may need to be positioned over several different diameters. A fairly rectangular graphic will need a little adjustment to avoid distortion. A circular graphic will need to be drawn as an oval to manage the varying diameters.
Just to recap the more important points:
- Good measurements are very important, particularly on round and cylindrical pieces.
- When you have created a template for, say, a round glass, you can save it as a basis for other pieces using the same diameter and length. Only the graphic needs to change as required.
- Always save the template and give it a recognizable name. I have learned that saving it with the basic name with an added descriptor after the template name for pieces that will use different graphics makes the templates easier to find — “rocks glass coat of arms,” as an example.
- You can use the same procedures for crystal as you can for glass. Remember that replacing a broken piece of crystal can get very expensive, so double- and triple-check everything.
- If you intend to offer these pieces as a regular item, you should experiment with different manufacturers to make sure you get blankware from a consistent supplier, one you are most comfortable using with your particular machine.