Try This: Wood Sign Engraved with Laser Foil
Mix and match your own choice of colors and create stunning gifts or décor for upcoming holidays.
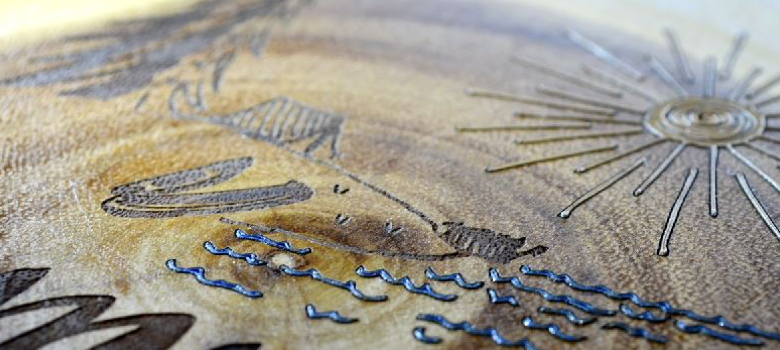
Thanks to a variety of laser foil colors available for engravers, adding multiple metallic accents is easy. In this tutorial, we combine two different colors of laser foil with traditional laser engraving to achieve a unique look on a wooden slab.
Mix and match your own choice of colors and create stunning gifts or décor for upcoming holidays. Just follow the steps below…
Materials Needed:
- Laser engraver (Used here: LS100 CO2 laser)
- Wood slab
- Laser foil (Used here: brushed gold and blue)
Settings:
- Vector
- 60 speed
- 20% power
- Wood settings:
400 DPI, 100 power, 80 speed
Note: Settings may vary depending on your machine and type of wood being used.
Step One: Prepare foil
Since the direct engraving area overlaps with our laser foil area for this particular artwork, we started with lasering the foil first.
Start by cleaning the surface of the wood prior to application in order to avoid any debris trapped underneath the foil. Then, apply the laser foil to the desired area on the wood. Application is fast and easy – just peel off the protective liner on the back to expose the adhesive and apply directly to the engraving surface.
Try to get the foil as flat as possible. Although you are removing most of the material after engraving, any wrinkles or kinks may be noticeable in the finished product.

Step Two: Engrave foil
If you are experienced in CorelDRAW or another graphics software, you can choose to make your own design. The design used in this example was purchased from www.vectorstock.com. All you have to do is pick your favorite design, download, and open the file in your design software.
Send your artwork to the laser using the settings above.

Step Three: Peel and clean
Remove excess foil and clean any residue left over from the laser.

Step Four: Engrave wood
Depending on your design, you may not need to pause your engraving to the remove excess laser foil. However, if “foil areas” of your design are close to other elements, I recommend removing any remaining material to avoid potential overlap.
If you choose to go this route, resume engraving and finish the project.

-Elena Iogha, Gravotech