The good thing about engraving is that it is permanent. The bad thing about engraving is that it is permanent. Anyone that has engraved a customer’s own product or strangely-shaped object can attest to the challenge this presents. Often, you get one chance and one chance only when engraving these unique items.
This simple technique, known as “the flip sheet,” is an effective way to deal with this challenge. This example illustrates a job in which a client requested permanent engraving on a uniquely-shaped decorative knife. The difficulty lies in the fact that the graphics followed the contour of the blade. With the flip sheet technique, this job was not so daunting.
The nice thing about this technique is that you can use the same flip sheet to do multiple pieces. If you had a few of these knives to laser engrave, you could re-use the flip sheet instead of spending time building a fixture.
Materials Needed:
- Uniquely-shaped object (Used here: stainless-steel knife)
- Transparency film
- Masking tape
- Blackened sheet of paper, or if using a CO2 laser: transfer tape and liquid shoe polish
- Laser system
Note: This example uses an nd:YAG laser to allow for marking directly onto the stainless-steel blade without the use of any compounds like Cermark or Cerdec. An nd:YAG is similar to CO2 laser systems, but it has a different method of generating the laser beam using different wavelengths. You could accomplish the same task using Cerdec or Cermark with your CO2 laser engraving system.
Settings: See steps two and five, as they will change.
Step One: Creating a reference point
First, we burnt the artwork on the table bed to show us where the general location of engraving will be. Make sure that you leave ample space around the engraved area, as you will eventually have to eye-ball where the knife is placed. You also need to leave space for the “flip sheet dam” which we will describe later. To physically show us where the artwork will be lasered, we need to have a reference point.
Step Two: Establish the general location of the graphics
When using a CO2 laser, you would lay down one or two layers of transfer tape onto the bed of the laser. After this, apply liquid shoe polish to the transfer tape, which is already mounted on the laser bed. This transfer tape is a thin white paper with adhesive on one side, and it is typically found within the sign industry. Transfer tape is also commonly known as “premask.”
Remember to lower your power settings when laser engraving the liquid shoe polish; otherwise, you could mark your laser bed table. We use an approximate laser setting of 10 percent power, 80 power speed, and mid-range quality setting to burn off the film of shoe polish.
As I mentioned earlier, we chose to use the nd:YAG laser system, and applied a similar technique to the transfer tape and shoe polish method. Instead of using transfer tape with shoe polish, we used a blackened sheet of paper, which was created by running a blank white piece of paper through a photocopier with the photocopier lid being left open. Hence, we are left with a piece of white paper, which is totally covered in black toner ink.
Step Three: Set up the flip sheet and flip sheet dam
Position the knife by using the engraved transfer tape/paper as your guideline. It is not essential to have the exact knife location at this step.
Build a “dam” to hold the flip sheet. It is important that the flip sheet lay parallel to the engraved surface area. In addition, the flip sheet will have to be raised using the flip sheet dam. The height of the dam should simulate the engraved surface. Fasten the dam to the laser bed using whatever technique you are comfortable with. For our purpose, we just used green masking tape.
You must ensure that the dam is stationary and will not move. Next, take a small piece of clear transparency film and tape it to the top of the dam. The size of the clear transparency film should be large enough to cover the engraved area and the dam. Take the cut piece of clear acetate paper and attach it to the dam using masking tape.
Step Four: Refocus the laser
Because you are creating a hinge using the masking tape with the clear transparency film, the masking tape should be slightly shorter than the actual transparency piece. This allows you to easily flip the transparency sheet. Ensure that you re-focus the laser focal point to where the actual engraving location is to be positioned.
Comparable to the law of retail business where “location, location, location” is king, laser engravers need to echo a similar sentiment: “focus, focus, focus.” If you forget to refocus, you could run into some interesting results. Your engraving will undoubtedly be blurry or may not even show up!
Step Five: Engrave the flip sheet
Once again, you need to remember that your focus will be on the actual piece and not the laser bed. Position the knife to the approximate location where you think it will end up. Again, just use the lasered transfer tape as your reference.
You must protect the item where the engraving will go with an oversized piece of scrap material before marking the clear transparency film. Your laser power settings again must be modified to reflect the fact that you are engraving the flip sheet and not the actual knife blade. When burning the transparency film, use approximately 10 percent power, 80 percent speed, and a lower quality setting. As usual, you will have to experiment with the power settings for your own laser.
With the protective scrap material between the knife blade and the clear transparency film, you now laser engrave the actual graphics onto the clear transparency flip sheet. After this stage, you should end up with a slightly burnt or frosted image on the clear acetate. On a CO2 laser, the image is more of a frosted image on the flip sheet whereas the image is more of a melted image for an nd:YAG laser.
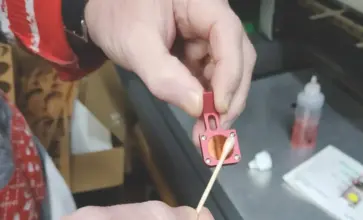
Step Six: Position the item
With the laser-engraved flip sheet sitting on the surface of the knife blade, we just position the knife according to where the graphics look the best. Because we left ample space around the dam and the surrounding area, we can easily move or rotate the knife to suit our own eye.
Once we are happy with the location of the knife, we secure the knife to the table using masking tape. To be certain, we again just place the flip sheet down on top of the knife blade, to ensure that the engraving will be in the proper location.
-Richard Korbyl, Colombia Awards