Try This: Laser Cut an LED Sign
Transform plain-and-simple materials into an eye-catching display.
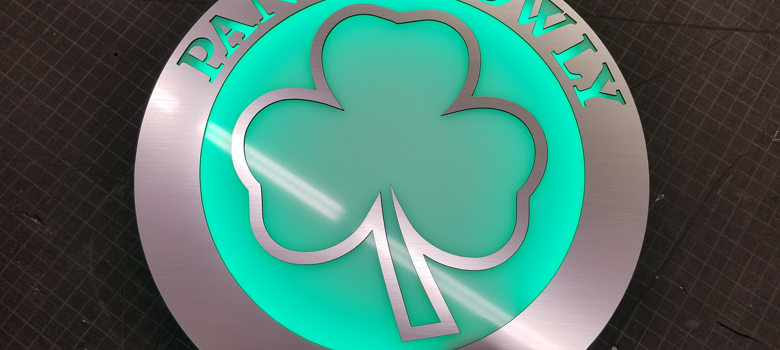
This project transforms plain-and-simple materials into an eye-catching LED-lit sign. The entire sign is based on seven layers of acrylic and a basic LED lighting kit. Here are the steps to how it was created – give it a try yourself.
Materials Needed:
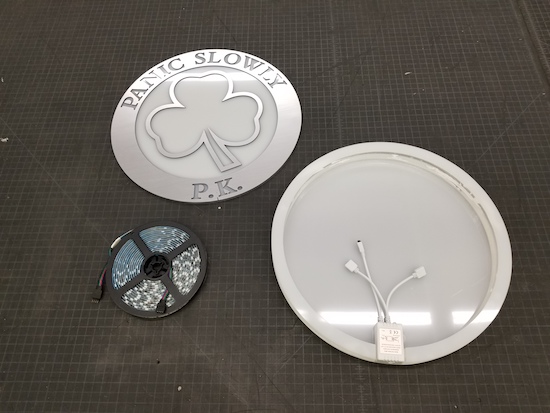
- 1/8″ white sign-grade acrylic
- 3/8″ clear acrylic
- 1/16″ brushed aluminum engraving plastic (Used here: Rowmark LaserMax)
- LED strip light kit (Can bepurchased from Amazon)
- Acrylic glue (Used here: Weld-On SCI GRIP #3)
- Very high bond (VHB) tape
- Adhesive transfer tape
- Graphics software (Used here: CorelDRAW X7)
Cutting Settings:
Used here: 120-watt Epilog Fusion
Aluminum engraving plastic-
- Speed: 15%
- Power: 50%
1/8″ acrylic-
- Speed: 12%
- Power: 100%
3/8″ acrylic-
- Speed: 4%
- Power: 100%
Step One: Design
We found a free vector file for the clover leaf design. Download it here and import to your graphics software.
Step Two: Cut outer ring
Determine what size the aluminum ring around the outside needs to be and make the appropriate font type and size decisions to ensure readability. You can add any text to this layer in your graphics software like we did or leave it as is.
When you’re ready, send your vector to the laser using the aluminum engraving plastic settings listed above.
Step Three: Cut second and bottom layer
Once the top layer is designed, copy and paste the outside cutline and use your laser to cut the second layer and bottom layer as well.
Send to the laser using the 1/8″ white acrylic and corresponding settings listed above.

All images courtesy Treg Countryman
Step Four: Cut middle four layers
I decided that a 1″ inset would be a sufficient amount of area for bonding with acrylic glue, so I drew another circle that was 2 inches smaller. I knew that I wanted the LED power supply to be contained within the sign so that only the power cord would be showing when the sign was complete. To accomplish this, take a measurement of the power supply and subtract that area from the dual ring design. I recommend drawing a box the size of the power supply and then using the weld function in CorelDRAW to create a space just big enough for the power supply. This allows the power supply to attach to the bottom layer while remaining hidden by the aluminum layer on the top.
Send to the laser using the 3/8″ clear acrylic and corresponding settings listed above.
Step Five: Assembly
Start with the bottom layer of white acrylic and then align one of the 3/8″ clear acrylic pieces on top. Then, clamp together. Once everything is aligned, glue them together by running the acrylic glue around the edges and sitting for a few minutes while it bonds.
Repeat this step with the remaining layers of acrylic.
Once the bottom five layers are assembled, the edge of the sign can then be sanded by hand to remove the clear edges and give it a frosted look. The purpose of the frosted look is to diffuse the light emitting from the sides of the sign.
Attach the power supply in the notched area using some VHB double stick tape.
Cut the LED light strips to size, connect to the power supply, and then attach to the inside edge of the sign using the supplied tape from the LED light kit.
Finally, attach the finished top layer of acrylic using adhesive transfer tape to make the final piece of the sign. Then, glue into place on top of all of the other pieces to finish the sign.
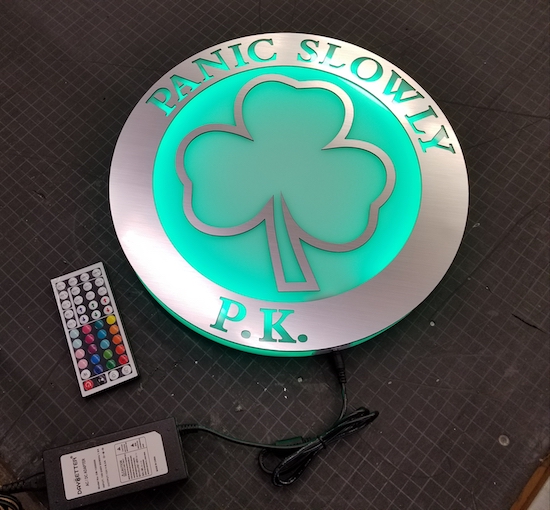
-Treg Countryman, Big Country Laser Engraving & Design