Shop Talk: Project Teamwork
Two companies, one custom sign


My sons and I, and good friend, Tyston Stuart, teamed together to open a start-up tire and auto accessory business next door to WPC Services, and almost across the street from the sign shop.
It was a nervy thing to do. Ask me in five years whether it was a smart move or not, but one of the immediate challenges that had to be met was designing and building a large, custom-lighted sign that would give the kind of exposure a brand new venture needs.
Rick’s Sign Co. is a small commercial sign company, and because of changes in our crew at the time, I was the the only fabricator on staff and had to be careful taking on projects that I couldn’t basically construct on my own. But our WPC workforce is a bit larger and well-equipped with machinery and fabrication know-how, so we teamed together to handle this sizeable project.
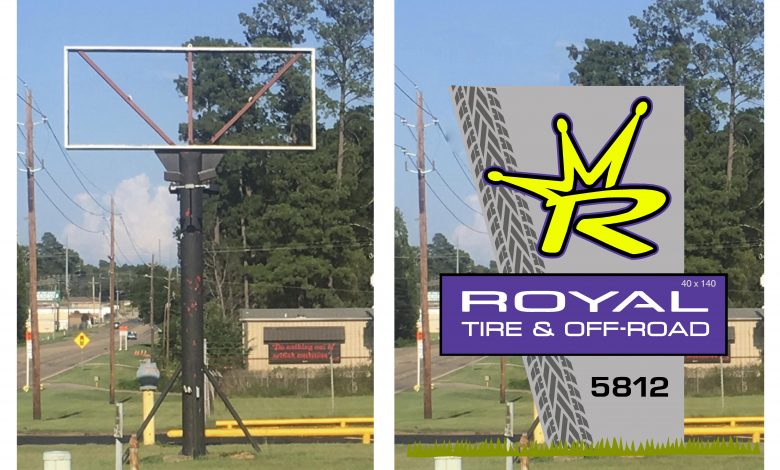
My son, Sloan, had designed a logo for this new business a while back and roughed in a sign layout as well. He turned the final design work and scaling over to me, and once the details and dimensions were nailed down, most of the WPC Services crew worked along with my two sons and me to get the project completed.
I cut all the sign skin panels out of aluminum laminate, with a brushed aluminum finish, as well as all of the parts for two large 3D logos. This was done on one of the CNC machines at WPC, and I also made a full-sized pattern of the sign shape using several 4′ X 8′ sheets of corrugated plastic, which would be duct-taped together. This would allow two large steel tubing frames to be constructed accurately over a perfectly cut pattern.
The original sign pole, minus an old sign we cut down, would be our onsite starting point, but this new sign would be much larger, and built like an oversize monument sign, going from the ground up. It would have large three-dimensional backlit logos and a large lighted wrap-around sign with the company name below the logo. All lighting would be provided via LEDs, and the halo lighting behind the logo would involve an LED controller that would facilitate color changes in sequence, giving the sign a cool visual effect at night.
The WPC fabrication crew, led by Slade and including Juan Navarro, one of our best welders, constructed the large tubular framework that would be the structural part of this double-sided sign. Donny, another of our WPC staff, cut all the tubing components on a Do-All horizontal metal bandsaw, changing the angles of cutting as required to create the sign’s asymmetrical shape.
Next door on the job site, Sloan and Juan cut away the old existing sign structure that had been welded in place, and later, after we became suspicious of the depth of the pole in the ground and the integrity of its concrete footing, they set another one next to it for good measure. This was the best way to guarantee the posts and concrete foundation could handle the sizeable wind load this sign would bear.
When constructing the large framework built with 2-inch steel square tubing, the crew added a very important feature that I would not have thought of; a pair of receivers, or rectangular tubing sleeves, to accommodate forklift forks for lifting it into place over the existing pole.
This simple feature would eliminate the expense of hiring a crane, and the forklift-friendly design also meant that moving the sign from WPC to the new tire shop and holding it in place while the welding was done was simpler and more stable than would be the case with a crane. A forklift was readily available anyway.
One significant task that Juan and I tackled together was fabricating and welding the two very large raised logos, all made from .090 aluminum, approximately 5′ X 7′ in size. The edge depth was 2.5″ to hide the LED lighting. A top layer in a second color would be mounted offset from the hollow part of the logo. The colors, powder-coated, were basically highlighter yellow and royal purple.
Juan and I worked as a team on the first logo, with me cutting the trim pieces to fit, forming them, and holding them in place while Juan did the aluminum tack welding all around. But I found myself alone at the shop late one Friday working into the night to make the second one. With only two hands, not four, it was a bit more of a challenge. But with assists from some odd-slotted weights, I made to keep the edge trim in place and perpendicular while I tack-welded it, step by step the job was completed. After some prep work, cleaning and sanding, those two hollow logos would be headed to the powder coating booth.
Slade and crew worked on the large wrap-around box sign with the company name cut out, backlit with LEDs through white plex inserts. The aluminum pans which were to become the faces were formed on a press brake and later would be beautifully powder-coated.
Sloan and his crew did the powder coating of those two large sign cans, plus the raised logos and their contrasting overlay cutouts that went on the front of each logo. I made the standoff mounts to hold them the right distance from the sign itself for the halo lighting. I also made a full-size install pattern from corrugated plastic and would get the job of installing those large 3D logos using my old bucket truck. Slade’s crew erected the main structure using an available forklift and installed the two lighted company name signs while standing on the ground.
Slade had wired the logos with plenty of LEDs, which were connected to a controller that would cause the lighting behind the large raised logos to slowly rotate through a variety of colors, all reflected nicely off the brushed aluminum finish of the sign’s exterior. He also installed all the LED lighting for the 3′ X 10′ company name signs, which worked very well, and all the LED electronics should provide maintenance-free performance for years to come.
No paint was used on the sign, since all the metal sign components were powder coated, not painted. As mentioned, the sign’s skin was made of pre-finished aluminum laminate, requiring no other coating. Only the large tire tread pattern was done in was plotted black vinyl.
This sign, basically an overgrown monument sign, is quite large. Approximately 14′ tall and about 11′ wide at the top and half that at the bottom, plus the company name sign wraps around and extends past the main structure. But the size is probably not as important as the design, colors and nighttime lighting are.
If the goal was to create something the highway traffic just cannot overlook, I think we succeeded. Just a week or two after it was installed, I found myself giving directions to someone who was headed to the sign shop, and I said, “when you come to the Royal Tire sign on the right, we will be two doors down on the left.”
The caller immediately remarked, “Oh, I know exactly where that sign is. I can find you now, thanks.” This meant for that client, finding a 10-year-old location of a 45-year-old business was made much easier because of a landmark that had been up all of two weeks. I guess we did alright with that Royal Tire sign, which was already becoming a local landmark, but now I need to work on my own sign!
This project involved the skilled work of several members of two companies, acting as specialized crews depending on the task being done, sometimes working together, and sometimes individually. From the design itself to the cutting of all individual parts, welding and fabrication, prep and powder coating, LED wiring, and onsite installation, this was a team effort for sure.
And when the new business opened, one thing it had going for it was a sign out front that passing motorists would not be able to ignore. Which was just what the new venture needed to get open, and to bring clients in for years to come.