Shop Talk: One-Man Billboard, Part II
Recently I was asked to build a large, double-sided road sign, much like a billboard.


A couple of years ago, one of these “Shop Talk” articles was about a small billboard-type sign erected at the end of a local football field for a Ford dealership, which was created in small components and basically built on the spot by one man quite easily. That sign was a bit over a 6′ x 12′ creation, and it was a fun and straightforward job.
Recently I was asked to build a much larger, double-sided road sign, much like a billboard, and since I have only two full-time employees, both female, projects like these that involve a lot of fabrication and later bucket truck work are mostly up to me to complete. So, this large sign, more than 8′ x 20′ in size and with faces on both sides, would be quite a project for just one man. But, breaking it down into manageable components, even the rather large steel posts, the plan would once again be to make a “kit” in which none of the parts would be bulkier or heavier than one man could manage, which requires a bit of planning to say the least.
The concept at least is simple, and it wasn’t long until I was cutting, drilling, fabricating and welding all the parts to make this substantial “kit,” where every part of it would be assembled on the jobsite virtually solo. In the end, most of the site work would be done over the long Thanksgiving weekend, taking out some time to take part in feast and fellowship with family, but greatly enjoying the good weather we had and catching up on getting the project off my list.
The photos will mostly tell the story, and I am sure there are variations of what was done that would work just as well. In the end, I might have done a thing or two differently (and that will be described here), but as far as making a tinker toy-like kit assembled step-by-step with manageable pieces, that aspect of the project was fairly well accomplished. And it was very nearly a one-man job, a large one, so a lot of the photos won’t have anyone in them since I was the only one there most of the time.
The start was to make the posts, which in one piece would be quite heavy and require a crane to erect, actually in three parts each (total of 6 parts). Basically, there was a 5′ 3″ section of 8″ x 8″ tubing that went in the ground, a 12′ section of 8″ x 8″ sq. tubing above the ground, and a top section of 6″ x 6″ tubing that would be totally concealed by the sign face itself. No piece ended up weighing over 200 pounds, and four of the six weighed a whole lot less.
With no one in the bucket at all, lifting 200 pounds, though surely not generally recommended, was easy enough to do. I know that since I weigh nearly that much and my life depends on it lifting me all the time. The foundation sections were set in concrete a bit over 5′ deep in holes I dug by hand, which is good exercise for a 64-year-old. My tractor was down at the time, and we’d had quite a bit of rain, so how hard could it be? Well, it would be a good workout, that’s for sure.
My son Slade showed up to guide the second stage main posts in place over one-inch studs protruding from the first section, resting on adjustable leveling nuts. The final upper piece of each post did not weight much and was easily lifted. A 10-foot step ladder got me to the point of connecting the two. With studs and leveling nuts used everywhere, getting things straight and true was very easy.
Except for the face panels, I brought the entire sign structure over to the job site on one trailer, reduced to manageable pieces and already powder coated. Each frame consisted of an upper crossmember of 3″ x 3″ aluminum tubing, and a lower crossmember the same size, and “C”-shaped frame members at each end defined the rectangle. The top cross member was attached first to fittings pre-welded at the top of the posts, then the “C” shaped ends were attached, and lastly, the lower crossmembers were secured to the posts, and the ends of the crossmembers mated to the ends of the “C” units.
The upper and lower crossmembers were about 12′ long, and the large “C”-shaped units at each end were overall 4’3″ x 8’6″ plus a half inch or so. The long members and the ends were made of 3″ x 3″ tubing, with 1″ x 3″ tubing screwed on the back, making a lip of about 1″ for the sign faces to screw to. We were basically creating our own extrusion. The photos will better show this, but the lip allowed plenty of room to secure the faces around the edge of the sign, and vertical and horizontal cross members were secured to the edge of this 1″ x 3″ tubing using a box full of shop-made brackets.
Except for the internal crossmembers, which were all aluminum and required no finish, everything else was blasted and powder coated in advance, including the six steel post sections. Nothing was over 12′ long, and I was able to do all the pieces on two racks. The entire kit would be carefully packaged with bubble wrap between layers. No welding would be required on the jobsite, and nothing was too bulky to handle by one man or assemble from a one-man bucket.
The one mistake I made was in making the “C” units at each end of the sign frame so large. Being a bit over 4″ x 8″ in size, their own weight caused them to sag a bit beyond 90 degrees. To keep them perfectly square, I had to pull them up with a tie-down strap attached to the corner until a diagonal brace could be put in place, which solved the problem. When I do another job like this, the horizontal members of the “C”-shaped end units will be quite short, eliminating any noticeable sag in advance, and small diagonal braces will be included.
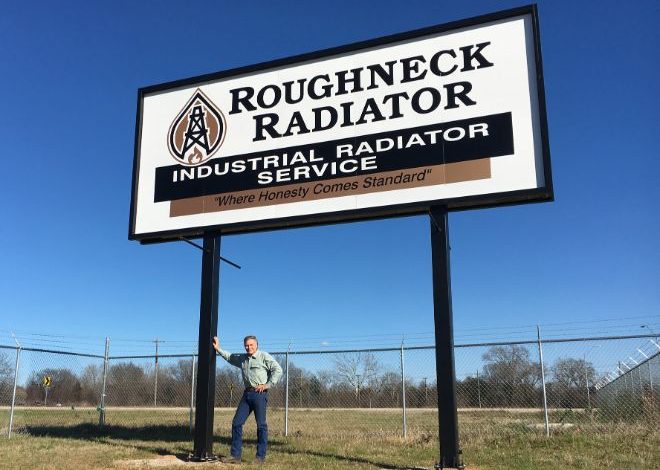
On the jobsite, piece by piece the job went together, building a sign 20′ tall and more than 8′ x 20′ in size, with aluminum laminated faces in five sections on each side. Frances had applied all the graphics back at the shop, marked one set “A” and left the other set unmarked. She did well and the graphics lined up perfect up in the air.
The internal frame that the face panels attached to was mostly made of more 1″ x 3″ aluminum tubing, plus a stringer of 1″x1″ tubing running horizontally across the entire sign. All of these parts were secured using a quantity of shop made brackets, CNC cut and formed on a brake. These were simple triangle parts with holes already in them, and self-drilling screws were used to hold everything together.
?Near the end, my nephew, Jeremy, showed up to hand me the face panels so I could stay in the bucket. The securing of the face panels took a lot of screws, self-drilling wide flathead screws that had been bead blasted and powder coated white in advance. These worked extremely well, and I like oversized screw heads when working with a soft material like aluminum laminate. Previously powder coating them saved the time of having to touch up heads, which would not last like a powder-coated finish anyway.
Perhaps the best thing about this tinker-toy creation is that except for the main posts themselves, all of the sign framework was aluminum, with a powder-coated finish in black that will outlast the signmaker who installed it. The graphics will face or wear out, but faces can be easily replaced with a pile of self-drilling screws by one man in a bucket.
The last step was to fully enclose the edges of the sign with strips of black .040 aluminum to keep out birds, bugs and rain, too. The customer decided he might light it like a billboard, so I had to return to weld electrical fittings in place to give his electrician the means to install the lighting.
The completed sign, way too big to miss, will be a local landmark for decades to come, but few will know that this large structure was basically a solo performance. It was a lot of work, of course, but it was straight-forward and fun, and the kit approach used can be modified easily to fit any sized sign of similar construction.
In the end, the client was very happy with his new plus-size sign and will continue to be satisfied with the years and years of advertising his initial investment will continue to provide.