Shop Talk: Making Screen Printing Magic with Minimal Resources
With the right ink and a minimum of hardware and some scrap lumber anyone can do these jobs profitably and professionally


I’ve been meaning to write this particular Shop Talk for a long time and document each step of the simple setup for small-scale screen print jobs that are turned down by some shops, and are annoyingly inefficient to others, but don’t have to be in either case.
We have several small jobs that have to be screen printed, and we do sign shop screen printing and have the right equipment. But, without any mechanical equipment, or exposure systems, or anything other than a screen, squeegee, stencil, the right ink and a minimum of hardware and some scrap lumber, anyone can do these jobs profitably and professionally. And none of this is hard or complicated.
The little tags that we print for a local specialty shop that makes address signs and yard art are a good project for showing the basic setup required to screen print projects like this. The whole miniature screen press can be put into action with a few minutes notice.
This job required another trick, and that is screen printing both sides in the same print run, so the double-sided job does not have to be done twice. With the right jig setup, when printing rigid materials (not soft plastics or very thin materials), having to wait for the first side to dry and having to clean up everything twice is truly a waste of time and not required at all.
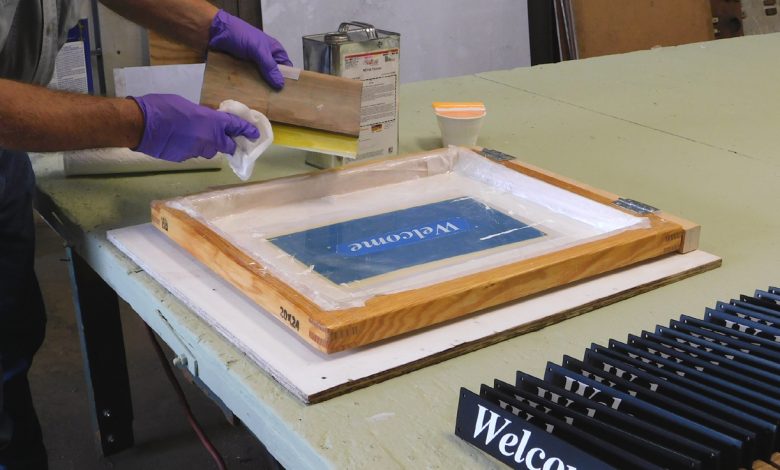
The small table top screen setup in Photo 1 is what we used for this project, and it will be used many times in the future. It will be kept taped, and in register, and can be re-printed in short order. And very little equipment or expertise is required.
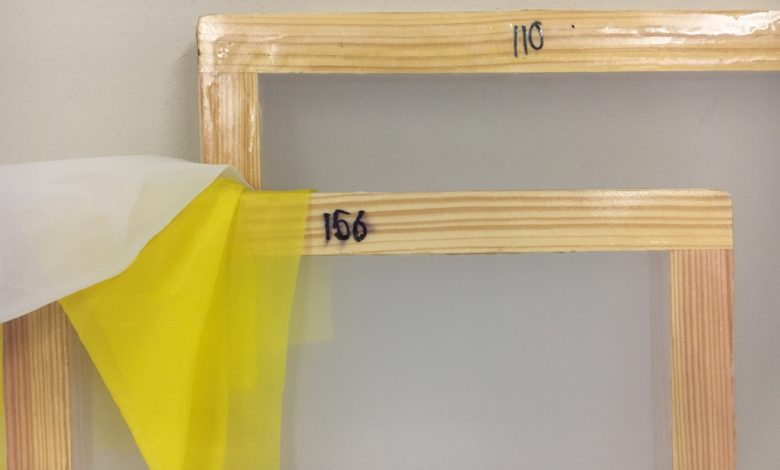
For any screen job, you first need a screen that is a special porous, typically polyester fabric, stretched over a wood or metal frame. We used basically a T-shirt printing screen for screen printing our metal “Welcome” tags, but we still needed the right fabric. In short, if printing a light color over a dark color, one needs a fairly course fabric (roughly 100 tpi, or threads per inch), and for other printing and for holding fairly fine details a screen of roughly 200 tpi would be suitable.
Our screen, used to print decent-sized lettering on black powder coated 1/8″ thick (very rigid) steel tags, was stretched with white 110 tpi. mesh. In Photo 2 there is some yellow fabric, but that typically is used in fine meshes, and for printing half tones and small details, not often the case in the sign business. All of our screens, large or small, have white mesh from 100 tpi to 200 tpi.
We will use a photo stencil, or light hardening stencil, and for exposing our screen we need a “film positive.” For this and many jobs, making one is as simple as applying black vinyl letters to a clear film. The backing film to our capillary film stencil makes great positives. So, we don’t even buy clear film, it is a by-product of our stencil.
The screen is cleaned with soap and water, and contrary to all advice, I scuff the fabric light on the print side with plain “Ajax” powder bathroom cleaner, and then rinse thoroughly. A piece of capillary stencil film of the right size is applied by unrolling it onto the print side of a very wet (baptized) screen. I just wipe off all the excess water immediately and put into a dark, windowless room and allowed to dry completely.
These photo stencil screens can be exposed perfectly using nothing but sunlight, and I am showing this method here because anyone can do it. The squeegee side of a fully dry stencil-coated screen is protected by a scrap of black corrugated plastic first, since light does not need to be bouncing around back there.
Then, the film positive is dusted with a light coat of spray adhesive, then applied to the stencil side, or “print side” of the screen (the side that will contact the print) face down and reading backwards once in place. A small “test strip” of black vinyl is placed just off the positive but on part of the stencil.
When the screen is taken outside and faced toward the sun, the test strip is kept in place about 20 seconds or so, then removed. The stencil everywhere else will have darkened in color, but not what was under the test strip, but it will start darkening immediately after the test strip is removed. The stencil, fully exposed, will have darkened in color about two or three shades and then the color change stops. The small area hidden by the test strip will catch up in changing color, and then fade from view as it does. Voila! The screen is cured and ready to be washed out. In bright direct sunlight, the exposure can be as little as one or two minutes. A cloudy day can expose a screen, if not dark rain clouds, and the screen is faced where the sun should be. Exposure can take 5 to 10 minutes.
The wash out area should be away from direct sun, but it does not have to be a darkroom (in one of our shops we used a north-facing, very shady patio for a washout area), and regular water pressure and a garden sprayer is all that is required to clean out the area not exposed to light, and the art will soon appear as areas of open mesh. The washing must be thorough, repeated at least three or four times, but nothing else is required except letting it dry before setting up to print.
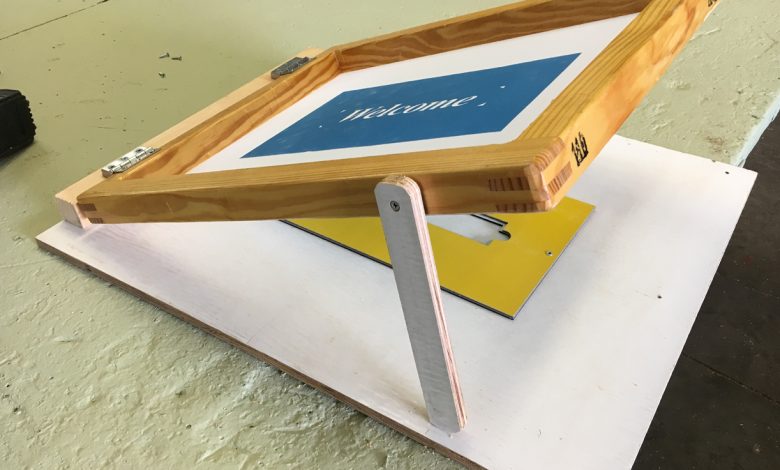
Because we wanted to print one side, then flip the tags and immediately print the other side, I made a jig using two scraps of aluminum laminate material, with the top opening fitting the tag neatly, but the lower cutout being just slightly undersize, providing a lip for the tag to set on so the wet ink would not touch anything. I cut these two items on a CNC machine, but in the past have made things like this many times by hand.
Using a strip of 2″ x 2″ lumber, a scrap of MDO about 24″ x 28″ and our screen, which was 20″ x 24″, I set up a screen printing setup using two hinges, a few screws and spacers, a small wood “kick-leg,” and a sheet metal backstop for our hand squeegee.
Every screen job like this on something other than T-shirts is printed with some “off-contact,” meaning the screen does not come down and touch the substrate until the squeegee passes over it and forces the mesh and stencil in contact with what is being printed. This “off-contact” spacing is typically 1/8″ to ¼”, and was achieved with spacers under the hinges, and simple wood screws on the other end of the screen, very simple and adjustable.
The screen, once securely hinged on our small print table, was tapped with transfer tape and clear packaging tape, leaving the print area open and covering everything else. The double-sided printing jig, which would hold our tags, was registered or aligned with the image in the screen and screwed in place. Then we were ready to print.
Most prefinished metal blanks can be printed with enamel ink (NazDar’s 59000 series ink), but the tags we’re printing were powder coated, which in real terms means printing on hard (polyester) plastic, and an epoxy ink that would bond to this coating was used. It came with a clear hardener that is added in a ratio of four parts ink to one part hardener. Virtually all ink has to be reduced some, and using the correct reducer is a must as well. The viscosity I like is about that of room temperature honey.
For printing, a small amount of the prepared ink is poured in the screen, firm pressure and about a 60-degree angle is applied to the squeegee, and the squeegee is pulled forward while pushing down in contact with the material to be printed. After a print pass, the screen is lifted slightly with one hand, and with almost no pressure and a reverse angle on the squeegee, the ink is returned to its starting point with what is called a “flood stroke.” If the ink is the right thickness it will just sit there until the next print stroke and keep the image or art from clogging up between prints.
The process is simple but requires a little practice. Before long, our 35 tags were printed, on both sides without stopping, and carefully set by their corners only — so no wet ink touched anything — into a 2×4 with slots in it. After drying, slip sheets would be put between each one (so there is no risk of them sticking together), and they are ready for pickup.
A good cleaning of the screen, especially the lettering in the stencil, but leaving it taped and ready to print again, means we can repeat this job in very little time at all. And we know the job is coming back before too long.
This “old school” approach to a screen printed project like this is hard to beat, easily repeatable, and requires minimal equipment to accomplish. And, all repeat jobs are more fun, and more profitable … which is just what the doctor ordered.