How to Print Conical Items With Flatbed UV-LED Printers
Don Copeland offers an explanation on how to print conical items with a UV-LED flatbed printer.
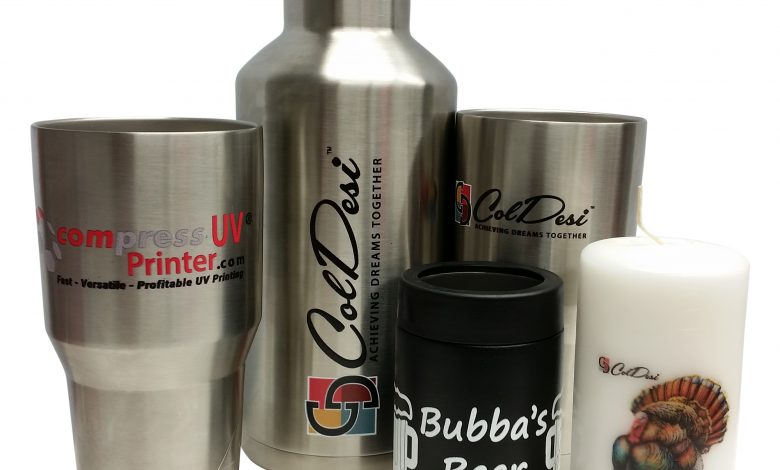
Over the past couple of years, we have seen an explosion in the number of UV-LED flatbed printers used for personalization and recognition. The demand in the U.S. for stainless-steel tumblers and water bottles has skyrocketed. Current growth projections show the stainless-steel tumbler market is set to exceed $1 billion by 2023 with a growth rate of 8-plus percent expected annually. Not only that, but the largest segment of that growth will be in customization for giveaways and promotional items.
Looking at the confluence of these two trends, I wanted to share some techniques and tips for getting quality prints on stainless-steel tumblers and other conical-shaped water bottles and promo items with your flatbed UV printer.
Printing cylindrical items has been pretty straightforward for a while now – only recently has printing on conical items (think Yeti Ramblers, RTIC, Ozark Trail, Member’s Mark, etc., in 30- to 40-ounce sizes especially) become so important to the UV-LED flatbed printing market.
There are three basic things we need to consider when printing on conical items with UV:
One: Is the item suitable?
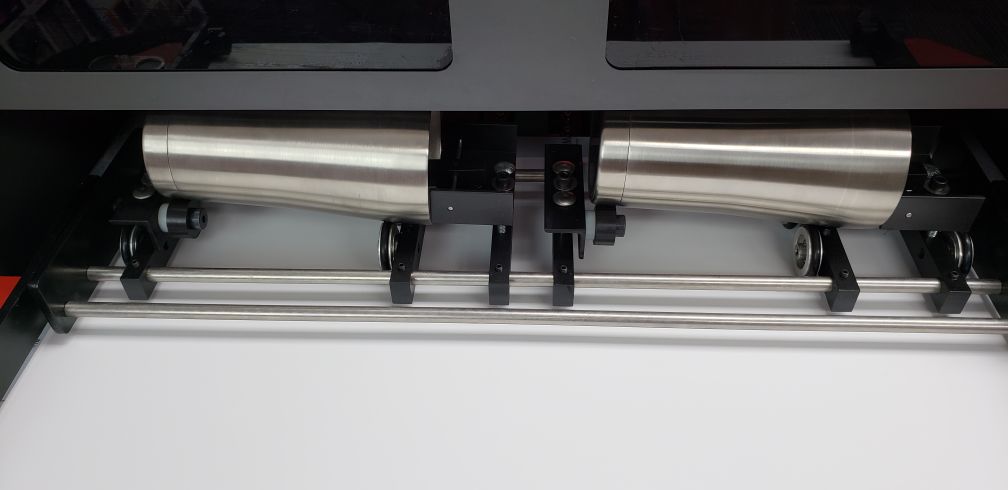
A rotary attachment, or jig, compensates for the shape of a tumbler by presenting a flat-as-possible face to the print heads. (Image courtesy ColDesi Inc.)
UV prints 100 percent flat. A rotary attachment, or jig, compensates for the shape of a tumbler by presenting a flat-as-possible face to the print heads. Then it matches the speed of the print/bed movement with the rotation of the tumbler so you get a clear image.
But not all tumblers are created equal, and the first thing we need to check is the topography of the item:
- Does it have flat sides, or do they arch?
- How radically does it slope from the mouth to the bottom of the printable area?
- If the sides are not flat, how far from the high point on the side can we move (up and down) before we start to see too much gap for a good print?
Based on the answers above, is it realistic to print the desired artwork on the tumbler without radically modifying? Remember, the printer is going to print with “flat” in mind and needs a consistent distance from the print head to do so. Even the best rotary jig won’t compensate for certain shapes.
Two: Will the artwork… work?
We have determined that we do have a flat (or flat enough) area to print on the tumbler – let’s look at the next step: artwork preparation.
Most clients want their logo to be fully viewable from a quick look straight on; if the logo becomes too long, it will wrap around, and the edges may disappear from view when looking straight on.
- Check the art: Is there too much small detail on the artwork to get a consistent print on a curved surface?
- Check the font: If it’s too small, parts of it may not print at all. Try changing to all caps, or even changing from a Serif font to a Sans Serif font.
- Tip: You will also find that black or white text print better, especially on logos requiring a white under base.
Let’s assume that the determined printable height of the logo is 2 inches – does the artwork you are working with look right at this size? Is the artwork you are working with too long?
Three: The setup
Finally, we have determined that the artwork we have will work on the printable area of our tumblers – now we need to load up the tumbler on our rotary attachment and check it for level and repeatability.
- First, we need to make the printable area level and the highest point. Rotary jigs vary, but in general, you need to mount the tumbler with the narrow end on the idler wheels and place a level on the print area and adjust up or down until your tumbler is level in the direction of print head travel.
- Tip: We have found a fair amount of inconsistency in the manufacture of some tumblers, so it is a good idea to load your tumbler and do a quick load/unload sequence on your printer to make sure the tumbler is rolling smoothly with no wobbles or walking on the rotary jig.
- Once this is established you need to orient your tumbler so that any embossed logos are positioned as you desire (normally to the opposite side of your printed logo).
Big Tip: If the output of your UV lamps can be adjusted, as is the case on the Compress iUV600s and iUV1200s, reduce the heat to run a test print. If you do not use adhesion promoter on the stainless-steel surface and turn the lamps down, you will be able to do a removable test print before going live. Once you have the test print perfect, turn the lamps back up, apply adhesion promoter, and start production.
You have to put some time and effort into it, and be ready for a lot of trial and error, to become proficient at printing on conical items, but the rewards are worth it.