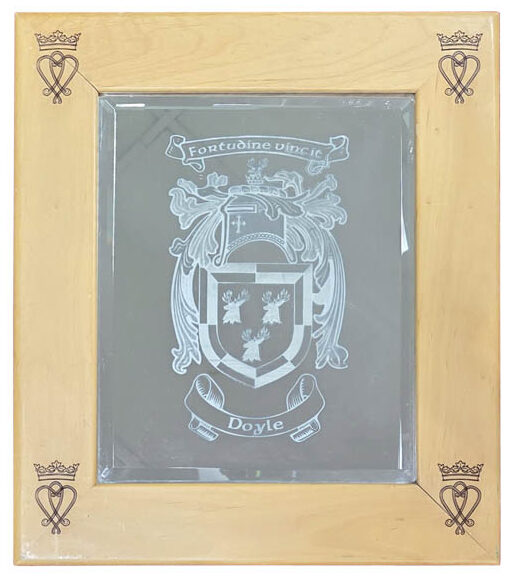
Unusual or unique gifts can be a good way to encourage retail sales, particularly during the holidays. I’m going to be describing how to produce a framed, engraved mirror. As always, this description follows how I do it on my machines.
Frame prep & engraving
This is obviously a two-step process, and I’ll start with the frame. There are several good suppliers who provide consistently high-quality frames and mirrors, and you might find different frames in local stores. As a small business owner myself, I’m a great believer in supporting other local small businesses, so please don’t forget to check out your neighbors to see if they can help. Remember, though, the mirror must fit the frame.
When you have the frame, remove the easel backing and the glass. The glass can be reused for different projects if you wish. Remember, the mirror is going to be thicker than the photograph or picture the frame was designed to hold. The easel backs on the frames I use have rotating tabs that fit into a slot in the frame. The slot will have to be modified to allow the easel to be secured over the mirror. A hobbyist’s rotating tool can be used, or a narrow hobby knife will also work.

Whichever you use, be very careful when widening the slot because taking off too much will cause the frame to crack when you secure the tab. Try the mirror in the easel back, being careful not to force the tabs into place. If necessary, gently take out a little more from the slot.
When that is done, you can work on the engraving. The work I do almost always requires a graphic in two of the corners, if not all four corners. Create your template and measure the frame to get both the outside and inside dimensions. Create a rectangle or square at the corners. This will give you the area to place the graphic. You can also insert text into the graphic, usually centered on the top or bottom side of the frame.
Note: I’ve also seen graphics that cover the entire frame. I’ve never been asked to do this, but it does produce an interesting effect. Maybe I should try it!
When the graphics are situated, place the frame on the machine bed, focus the machine, and run the graphic. After one pass, I lower the bed by between .125″ and .25″. The second pass provides a virtual 3D image, which I think enhances the appearance. When done, clean the frame and set it aside.
Mirror engraving
Now to the mirror. Take the measurements of the mirror, remembering to take the chamfered edge — if the mirror has one — into account. Then prepare the graphic. You’ll be engraving through the silvering on the back side of the mirror. You will be able to produce some shading using grayscale if the graphic is editable. If you’re working with a photograph, producing the image is a little more complicated. There are several products on the market that allow you to work with photographs. Personally, I have enjoyed more success by converting the photograph to a bitmap and then making adjustments to the shading using the tone curve tool in my software.
 I’m not, in any way, suggesting you shouldn’t look into photograph engraving software — I’m simply saying that I am happy with the results obtained using the process I have described. If your software does not provide a means of editing bitmaps, you may be able to adjust shading, or you may have to obtain the appropriate software if working with photographs is going to be a regular occurrence or something you want to offer as a service to customers.
Once the graphic is ready, remember to reverse the graphic to create a mirror image. (Sorry for the pun, but it works in this instance.)
Place the mirror with the silvered image facing up. If the mirror has a chamfered edge, it may be difficult to align the mirror properly. To assist with these cases, I have made up “bumpers” or materials that are square and perpendicular to the bed. Using double-sided tape, I secure the bumpers to the rulers on the bed, making sure they are even. Then you can place the mirror up against the bumpers.
To avoid scratching the face of the mirror, I use a piece of paper to lay the mirror on. If you’ve tried to create shading, remember not to set the power too high. Start with the usual setting for glass and reduce the power. If you have a spare mirror, you can try a test run. If not, then experience will tell you which settings work best.
With the mirror on the bed, dampen a piece of paper sized to cover the area to be engraved. I don’t usually advocate using too much water, but you don’t want the paper to dry out too quickly and have the paper fly off and interfere with the laser beam. Again, experience will tell you whether to run a second pass, at reduced power, to improve the image. It is possible to make a second pass, but don’t move the mirror. The slightest misalignment will ruin your work.
When you’ve run the piece, wash off the back of the mirror. Depending on what kind of paper you’ve used, some residue can stain the engraved pieces. Newspaper can be especially dirty, but don’t worry. A careful washing, using some dish soap, can clean the mirror. When done, remember to dry the mirror completely before placing it inside the frame and securing it.
Now your piece is done, and you’ve created a unique gift. Good luck!