For most of us, the journey of our graphics business began with printed and vinyl, screened, or engraved projects, and all aspects of those were usually designed, fabricated, and controlled under our roof. As our businesses evolved, we have been presented with new opportunities by our clients that represent new challenges to our traditional wheelhouse of products. If you provide signage to your customers as part of your overall business, there will inevitably come the day you will be asked to do some type of electrical sign. While there are many types of electrical sign types, by far and away the most common request is that for channel letters. Let’s take a closer look at what is involved in these types of projects from start to finish.
Wall of fame … not shame
Channel letter projects are usually on an exterior wall. For the inner designer in us, that is our blank canvas. Before we even pick up our brushes, we need to do some basic homework. These projects involve permits, and the municipality where the project is located and what zoning district it is in will define the square footage the sign can be. In addition, if this is a building in a retail district managed by a property management group, there may be additional requirements. It is important to check out all these restrictions and limitations before beginning any design work, as this sets the stage for your project size and type. The significance and details of permitting should never be underestimated. Doing your research up front and sharing those parameters with your client will help significantly in controlling your clients’ expectations of the process and the final product.
That is step one and the most important piece of information needed. A detailed site visit is up next. Here, we want to make exact measurements, take plenty of photos (including straight on for use in presentation drawings), and ask questions about the installation of the project. If this is an older building, is power currently running to the location from a previous sign? If this is new construction, involve the client’s electrician to ensure a dedicated line for the sign is run to the location. Most signs are now run off LEDs (which are considered low voltage) so a dedicated 110/20V line should be sufficient and now is the time to talk about timers or photo sensors. If possible, keep all electrical work to a certified electrician. Better yet, have your client get the electrician for any of that work. The electrician may also have to do the final electrical connection to the completed sign per permitting restrictions.
Don’t underestimate doing your homework here. It is too easy to start moving on a project without it and it will make a mess of things later down the line.
The design is in the details
We now have the basics needed to begin designing. An initial design is important for a variety of reasons. First, we need to show the client a design that fits the criteria to be submitted for permitting and make any tweaks the client might need. If these types of signs are new for you, you will likely use this drawing to send to a wholesale manufacturer to get quotes and to also share with an installer to get installation pricing. Resist your client’s natural response at this point to “give me a ballpark.” You need to get product and install numbers before quoting.
Although channel letter projects are one of the most common exterior electrical sign types, there are a few options that need to be outlined with both your client, wholesaler, and installer. Let’s look at the two most common types and explore the pros and cons of each.

Start your engines
Far and away the most popular channel letter sign is on a raceway. A raceway is usually a fabricated metal box that houses all the electrical wires, transformer, disconnect switch and has the individual letters mounted to it. To “hide” the raceway it is often painted the same color as the building wall. It is the easiest and least expensive project to install. When it comes to installation, time is money and installing premounted letters on a raceway involves a lot less penetrations and fasteners into the wall and only one point of on-site final electrical connection is needed. Most of the hard work is done by the wholesaler, making this option the most turnkey all the way around. Some clients do not like the look of a raceway and some property management companies ban them as well as wall mounted pan signs in favor of individual mounted channel letters.
Individual letters offer a cleaner look by eliminating the clunky raceway and can allow the project to have the letters face-lit, halo-lit or a combination of both. It gives a more unique look and is becoming more and more popular as production techniques have made this a more affordable alternative. Your wholesale fabricator can walk you through the options. These are often less expensive from the wholesaler because they eliminate the cost of the raceway and the labor involved in mounting them to it. Shipping is also often much less expensive, as the individual letters can often be boxed and shipped rather than going freight.
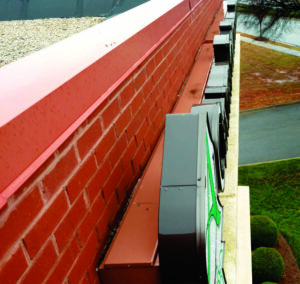
However, your installer is going to more than double or triple their time. Each letter will involve a half dozen holes for the pin mount and one larger hole penetrating entirely through the wall for the letter’s wiring. These holes need to be thoroughly caulked and sealed. The installer will then have a significant amount of time wiring all the wire whips on the inside of the building behind the wall or above the roof on the parapet. The installer will need to have access to those areas to do the work. When these letters are eventually removed, it leaves a “Swiss cheese” hole pattern on the wall that often needs to be patched and repainted.
The raceway option is the easiest and most turnkey option and ultimately the most economical for your client. The individual letters offer creative lighting alternatives and have a very clean look, but will cost more because of the labor-intensive installation and if multiple through-wall penetrations are a concern to the building owner, that needs to be addressed.
Channel letters: Lighting the way

After reviewing your design and quote with your client (that incorporates final numbers received from your fabricator and installer) it is time to ask for your deposit and begin the permit submission. Always get your deposit and a sign off on your quote and drawing before starting the permitting process. Again, resist starting this project with your fabricator until you have applied for and been granted a permit. Keep your client’s expectations in check and let them know the ball is in the municipality’s court (we all know that any government does not move fast). This is completely municipal-dependent, and no two work the same. Some are quick and immediate, and some have a couple week-long process. When you are doing your initial research make a point of contact with the zoning department and ask about the process, so you know what to expect.
With the permit approved, send on any deposit your fabricator requires and review the artwork, file type, and size they prefer for the project. Often a clean, full-size vector art is needed in an AI or EPS for any art that is machined and check with the fabricator on what they prefer for any printed graphics.
Depending on your fabricator’s current workload and the size and complexity of your project, you can expect lead times of two to six weeks. Just keep your client in the loop and don’t over promise things that are out of your control. It’s always better to say six weeks then deliver ahead of time, becoming a hero instead of saying four weeks and delivering two weeks late; you could lose a potential repeat customer and possible referrals from your client.

May the volts be with you
Channel letter projects are a fantastic way to test the waters of electrical sign work for those venturing into a profitable extension of their current product lineup. By utilizing a quality wholesale fabricator and partnering with a local or regional installation company you can leave the specialty manufacturing and challenging sign hanging to the experts. Your role is that of a consultant, designer, and project manager. If you find yourself doing more and more of this type of work, you can make the decision to keep taking on projects of this type in that role or, if warranted, you can look at the equipment and labor investments to bring some pieces in-house.
By having a good understanding of what is involved, doing your due diligence to get pricing, and managing the expectations of your customers, this work is both profitable and easily accomplished. You’ve got this!


