As a young print enthusiast, some of my earliest obsessions with graphic arts were at the local supermarket. While walking through with my parents, it was attention-grabbing floor graphics that captivated me. Different colorful promotions and advertisements could be found in each aisle.
Floor graphics were traditionally printed (offset or screen print) in larger quantities for advertising campaigns. With the evolution of digital printers, floor graphics have become more common. Now they can be found just about anywhere. Most of us tend to look where we walk, creating prime real estate for advertising. Why not run promotions in that space? Especially now with smartphones, everyone tends to be busy looking down while in line at supermarkets and other big box retail stores.
Floor graphics are a great opportunity for advertisers to be noticed while other forms of advertising could be ignored. In my opinion, of all the advertising mediums, floor graphics are the most impactful when done right.
On the inside
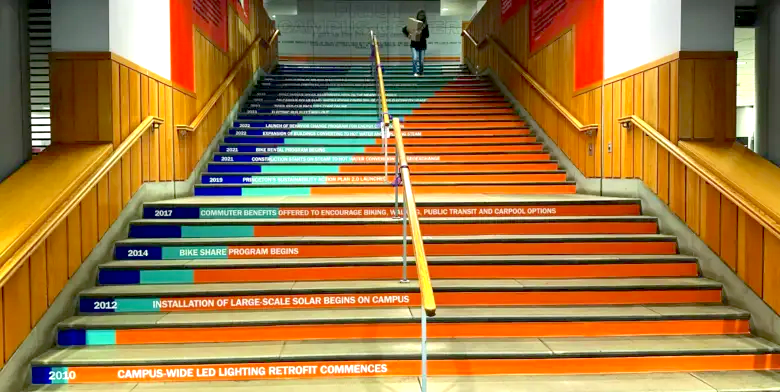
Indoor floor graphics are by far the most common and cost-effective. They can be found in retail and grocery stores, museums, events, and other spaces. The base film must be matched with the corresponding non-skid overlaminate.
When selecting a floor graphic to keep on the shelf, find a multi-use vinyl that can be used for different applications. Minimizing the stock on the shelf will keep money in your pocket. A good film like 3M 40C will cover an array of floor surfaces including tile, sealed concrete, terrazzo, ceramic, and low-pile carpet. It can also be used for window, wall, and spot vehicle graphics as well.
The great outdoors
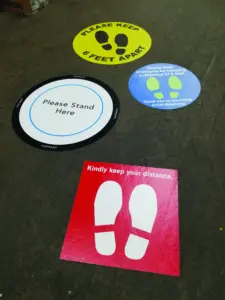
Outdoor floor graphics are more expensive and commonly used for advertising and wayfinding at events. They are short term and typically rated for up to three months.
Outdoor floor graphic applications are more demanding than indoor. They are intended to bond on unsealed concrete, brick or pavement. They have a thicker adhesive and a tougher non-skid laminate to withstand the added foot traffic and the elements they are exposed to.
Floor graphics that do not require laminate
There are a few flavors of no-laminate- required floor graphics on the market. They can be more expensive than a combination of base and lamination for certain applications. The benefit is they can fill a specific niche that a combination floor graphic cannot.
A product made by Jessup called Asphalt Art is a unique foil-based film that is textured and considered non-skid without the use of a laminate. It can withstand both outdoor foot and vehicle traffic. This product would work great for sidewalk and street messaging in parades, for example.
This film is highly conformable to surfaces such as asphalt, concrete, stairs, stone and brick. The result is a convincing painted-on effect.
Outdoor floor graphics are typically very thick and cannot be die cut with standard equipment. Asphalt Art, for example, has foil in the construction of the film to make it durable. This will not work with print-cut workflows that utilize a standard vinyl cutter with optical registration.
If you are going to accept a job make sure there are no die cuts unless you have a CNC with a drag knife. The one downfall of not using laminate is the graphic can rub off from abusive foot traffic before the material withstands its usable life.
Matching lamination for the base film
Typically, there are long-term (12- month) and short-term (3-month) combinations available for floor graphics. Usually, the base is the same, but the laminate determines the lifespan of the floor graphic.
Please check with your supplier what is suitable for the life expectancy of the customer’s requirements. Trying to cheap out and go with the thinner lamination for a longer-term application will only make you look bad in the long run.
Also, a quick tip to help graphics last longer is to avoid square corners. You should add a radius to them wherever possible. Rounded corners have less of a chance of being damaged. Sharp corners cut in the floor graphic are more susceptible to edge lifting in the corners. This can turn into a tripping hazard and shorten the life of the floor graphic.
Slip resistance certifications
With two-part floor graphics the nonskid certification will be assigned to the lamination, not the base. With 1-part floor graphic systems, the non-skid certification will be applied to the base since there is no lamination.
The following are standards set by UL, ASTM and ANSI/NFSI. Keep in mind the certifications mean different things. For example, if you are producing floor graphics for a dance floor, you do not want a material that will give traction to a car driving across it. People would break their ankles dancing when doing the twist by Chubby Checker or whatever the kids are doing nowadays. Finding the suitable skid resistance will help in figuring out which application it best suits.
UL 410 Standard for Slip Resistance of Floor Surface Materials is useful for evaluating slip resistance on virtually all walkway surfaces and finishes. Slip resistance is critical to demonstrating that flooring products are effective as well as safe for occupants so they can avoid potentially dangerous slips and falls or other mishaps.
Manufacturers who achieve the UL 410 certification can label products with the UL certification mark, signaling to decisionmakers that their product has been tested and certified by a respected, credible third party. This provides a notable competitive advantage over other products in the marketplace. (Source: www. ul.com).
ASTM D-2047: With more than a half-century of consistently predictable and accurate testing results behind it, the ASTM D2047 standard continues to be the go-to standard for the floor polish industry, including their manufacturers, material suppliers and all users of floor polish.
D2047 is unique among slip standards in that it provides a compliance criterion for whether a tested polish film will provide a safe walkway surface and whether the term “slip resistant” can be applied to a polish. (Source: sn.astm.org)
ANSI/NFSI B101.1-2022 outlines a test method, including the procedures and devices used for both laboratory and field-testing, to measure the SCOF of hard-surface walkways. In meeting this need, the standard addresses common hard-surfaced walkway materials, such as ceramic and porcelain tile, polished and unpolished concrete, stone, vinyl, wood and synthetic laminates, and such materials with coatings or polishes applied. It does not, however, apply to carpeting of any type. (Source: https://blog.ansi.org/)
ANSI/NFSI B101.3 specifies the procedures and devices used for both laboratory and field-testing to measure the wet dynamic coefficient of friction (DCOF) of hard-surface walkways. This standard provides a measurement procedure setting forth DCOF ranges which facilitate remediation of walkway surfaces when warranted. The test method addresses the common hard-surfaced walkway materials, such as ceramic and porcelain tile, polished and un-polished concrete, stone, vinyl, wood and synthetic laminates, and such materials with coatings or polishes applied. (Source: https://blog.ansi.org/)
Ink limits on floor graphic base
When printing the floor graphic base, it is important to make sure you do not exceed the recommended ink limits of the base film being used. 3M 40C, for example, recommends a total ink limit of 250%. When customers use canned profiles they can easily exceed these limits.
If the film is oversaturated with ink it will not dry properly before laminating. As time goes on the ink will permeate through the vinyl and attack the adhesive, separating it from the base film. This can also cause excessive shrinkage or curl-back. Even worse, when the film is removed the adhesive could separate from the base and stay on the surface. This will be labor intensive to remove or costly to replace.
Seaming larger floor graphics
I have seen this done both ways. With a standard 1″ overlap and with a butt seam. 3M recommends a butt seam should be used for multiple panels that have to be put together for a larger graphic. 3M states: “Overlapped seams are not recommended or warranted.”
If a butt seam is required, it should be pre-cut in the shop before the graphics are packed for install. To cut a butt seam the graphics should be overlapped on the table with the backer on. Both panels should be
taped down to the table securely with perfect registration to one another.
In the middle of the overlap a cut should be made through both panels at the same time. This will ensure perfect
registration of the panels to one another without any gaps between the butt seam. If you try to cut the panels individually with a ruler you will be sure to have unsightly gaps between the panels when installed. The ruler and your eye are not straight enough to achieve this. It could be okay, but not as good when you cut them together like I mentioned.
Wax and floor graphics
What makes a good teacher? Success and failure of your own and learning from others’ successes and failures. Developing relationships and talking shop with others in the industry makes you more knowledgeable. These relationships will allow you to keep and make more money. Being humble and recognizing failure will prevent you from making the same mistake twice.
Sometimes it is the installer’s fault, but not as much as they are typically blamed. There was an experience I had dealing with a large high-end department store. They had a flower show and a huge yellow brick road floor graphic was intended to be the walkway guiding customers through the show.
The yellow brick road had plenty of curves die cut into it. When the installer laid about 30 feet of the winding road he noticed the first 10 feet began to lift from the floor.
The polished concrete floor had a fresh coat of wax applied before the show. The problem was it was applied on top of multiple layers of old wax. It was so thick the adhesive vinyl was separating the wax and lifting it from the floor. It seemed like the floor had never been stripped prior to putting layer after layer of fresh wax on.
I went to assess the problem on-site. I took a fresh piece of material there and applied it to the floor. When I snapped up the vinyl it removed about .060 of wax that immediately came up with the vinyl. There was to some degree a bit of tension from the graphic being applied in curves, but nothing could have anticipated the thick wax separating from itself.
When I supply floor graphics, I make it a point to note the floor should be stripped of wax before applying the vinyl. Due to the rush, a site survey was not performed. It was an odd situation I have never seen before or after that project.
To avoid this, a snap test with the material you plan on using can be performed to confirm the floor finish is securely bonded to the floor surface. If wax is separating from the floor it would be a job to pass on.
Floor surfaces to possibly pass on
I typically deal with a lot of brokers and consultants. When we are asked to quote a floor graphic a game of guess who has to be played. They are typically supplied with limited information when the floor graphic is requested from their customer.
I request answers to the following questions: Is it indoors or outdoors? What type of floor is it? How long is it expected to last? Do you have photos of the area the graphics are being applied to?
If I ever hear “marble or varnished wood” I immediately pass on the project. I have heard horror stories of varnish being damaged on wood floors. Marble is another one. It is a porous stone that can actually drink the adhesive and stain over time.
Standard floor types advertised for floor graphics use are tile, vinyl, linoleum, terrazzo, sealed concrete, and ceramic floors. Marble and hardwood floors are not typically mentioned as they can easily be damaged if the wrong vinyl is used. There are specific niche products designed for them, but if left on too long could still potentially damage the wood or marble surfaces much easier than your standard flooring that was mentioned earlier.
Shipping
Because of the thicker laminates used with floor graphics it is important to roll the graphic out on a 6″ core and then box. This is a recommendation from print manufacturers that I feel is overlooked. This prevents the liner from coming off the vinyl graphic that would create tunnels during shipping and transfer to the install. Tunneling is typically a result of rolling them on a 3″ core or rolling them too tight to put in a core or box for shipping.