Properly finishing a wrap installation can make the surface seem as if it was never vinyl wrapped in the first place. Making this seamless finish requires experience, skill, and, most importantly, paying close attention to detail. Improper finishing can lead to revealing the surface beneath and poorly sealed edges, which slowly peel over time.
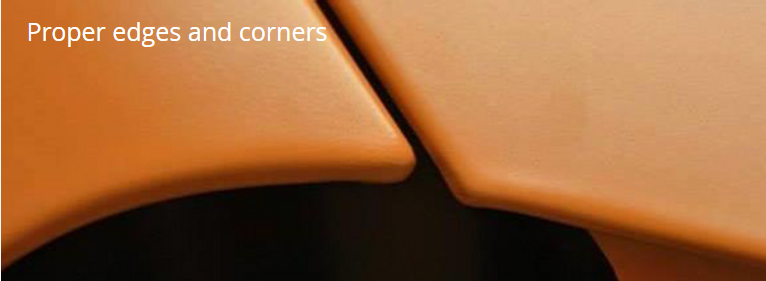
Edges
Edges refer to the space between two panels of the surface—like the space between the front door and fender, for example.
To prepare this area, gently heat the space between the two panels and run your finger down the gap while wearing cotton gloves. This trick helps cure the adhesive over the edges of the gap and helps conceal the surface beneath. Continue this process across all seams on the surface.
Cutting
Cutting requires a sharp blade, or you risk tearing the vinyl instead of slicing it. Cutting takes very steady hands and intricacy, or you may run the risk of cutting the surface and damaging it.
When cutting the edge of a panel, it is paramount that this cut is clean and precise. When cutting, a 2-3mm margin is required for folding around an edge for a paint-like look.
Opposite to what most people think, leaving more than 3mm can actually pose a great risk to your wrap. For a correctly installed wrap, the vinyl’s extremities must be fully installed on the panel. Any loose or floating material not accurately adhered to the panel, or acting as a flap to exposed air, will ruin the integrity of that edge or corner.
To seal an edge, make sure you heat and press the film into place. A trick we like: Use a squeegee to guide the blade on the edges. This gives us clean cuts and a 2-3 mm excess, which is perfect.

Corners
For rounded or sharp edge corners, heat the vinyl until malleable and push the film deep in the corner crevice. Use a moderate amount of heat on the corner to fuse the area. Do not cut when the film is still hot. Just like the edges, you need a clean cut. Make sure the material is flush and installed without flaps and creasing.
Cutting on paint
Cutting on paint is scary, but there is a way of doing it. It takes skill, patience, and a really sharp blade. Gently glide the blade over the film soft enough that you do not cut through the film but rather crease the film’s surface. This crease allows you to pull away the vinyl and make clean cuts without damaging the paint beneath. Wrapcut or Knifeless Tape can also be used if you are not comfortable with the method mentioned above.