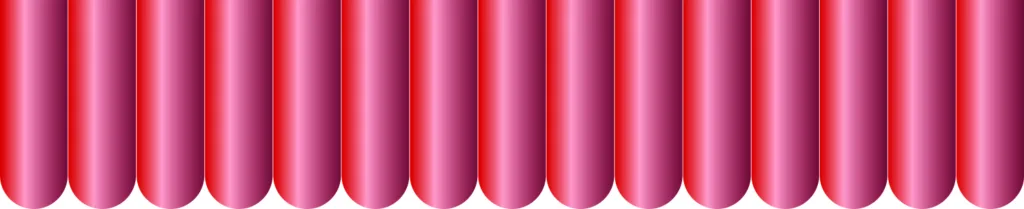
Some time ago, a friend asked me to develop an image she could use to promote a new proposed drama club in print and online. She provided a few possible images for consideration. I then consolidated her suggestions and chose the Mesh Fill feature in CorelDRAW to best reach her desired goal. Fig. 1 is the result of my efforts.
Drama club design
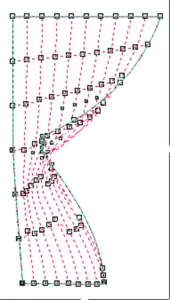
Here are the steps I took to reach the final image. The first thing was to create a basic shape of the curtain. I used the Bezier tool for that. Fig. 2 shows my initial shape with the mesh lines indicated by a red dashed line.
Note that when the Mesh Fill tool is accessed, the default mesh is two columns and two rows, as appears on the taskbar. I changed it to 10 columns and six rows. It is best to keep the shape of the object as simple as possible. As can be seen, some of the mesh lines fall outside the image. This makes it a little more difficult to choose the proper node to color. The simpler the object is, the better.
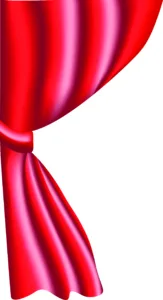
Next is to begin filling the object with appropriate colors by selecting nodes and clicking on the desired color. For this project, I chose to use four colors: maroon (C:0 M:90 Y:50 K:58), dark red (C:0 M:100 Y:100 K:25), light red (C:0 M:100 Y:95 K:0), pale pink (C:0 M:20 Y:20 K:0). By alternating these colors, it allowed me to create the appearance of a pleated curtain as in Fig. 3.
I then selected individual edge nodes at the bottom and moved them up slightly to form the ruffled edge. Next, the drawback sash was created by drawing a rectangle, modifying the corners, and adding an envelope to arc it.
It was then skewed into position. After filling it with maroon, I again chose the Mesh Fill tool, this time with four columns and four rows. I then used the same colors to add the necessary highlights. When I was satisfied with the results, I grouped the two objects, duplicated and mirrored the image, and moved it to the right side of the “stage.”
My next step was to create the valance between the curtains. I first drew a rectangle and rounded the bottom corners, and used a fountain fill with the same colors as before. It was then duplicated and moved over; then the two were blended to get the pleated look in Fig. 4. I moved it behind the curtains and aligned it with their top edge.

With the stage curtains now completed, I began to work on the comedy and tragedy masks. As with the curtain, a basic shape was necessary for each mask, which was drawn again using the Bezier tool. Fig. 5 shows the masks with Mesh Fill applied to each mask, this time with 12 columns and 12 rows.
Each mask was filled with white; then shadows were added with shades of gray to achieve a 3D look. Then the facial details, eyes, mouth, eyebrows, wrinkles, etc., were drawn on top for a finished look. Each of the masks was then rotated. The comedy mask is 15 degrees counterclockwise, and the tragedy mask is 15 degrees clockwise.
A white glow was then added to each with the drop shadow tool. With the completion of the entire image, I selected it all and grouped it. I then drew a rectangle and filled it with a dark blue color. I then power-clipped the group into this rectangle. This finished the design. I then added the “Drama Team” lettering on top.
This image was then exported as a PNG file and emailed to my client. She didn’t like the gray masks but wanted them to be more gold in color. Rather than recoloring them, I converted each to an RGB bitmap and changed the colors in the Image Adjustment Lab. The final design in Fig. 1 was acceptable to my client, so we were both happy.
How to use mesh fill
Using the Mesh Fill feature in CorelDRAW can prove to be a bit tedious and often a bit frustrating. Nevertheless, it can provide some fairly impressive and dynamic visual results. For those not familiar with this feature, I have offered the following simple example of how to create a design and use it to implement some basic functions of the Mesh Fill feature. I first drew a square shape, and rotated it 45 degrees to get a diamond shape.
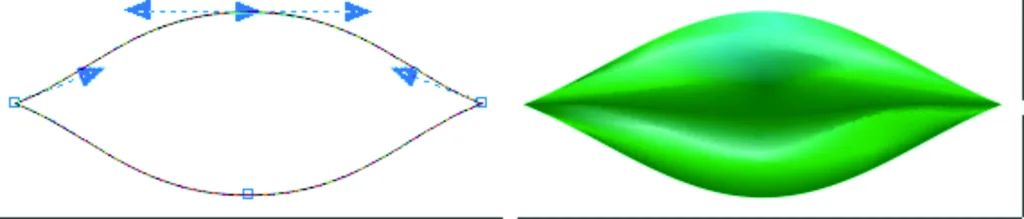
I then stretched it horizontally and converted it to curves. Selecting all nodes, I made them all curves. I then selected the top and bottom nodes and made them symmetrical. This resulted in a smooth image, the basis for a leaf design, as depicted in Fig. 6. On the left is the basic shape, and on the right side is the Mesh Fill rendition of the leaf.

Fig. 7 shows a possible use of the image, duplicating, rotating, and scaling it.
This is a fairly quick and easy exercise to discover the abilities and limitations of the Mesh Fill tool. I urge anyone interested to do something like this to gain the expertise needed to use this powerful feature. There are some other things one needs to know that I’ve yet to discuss.
Things to know
All edge nodes and intersection nodes on a Mesh Fill can be made a cusp, smooth, or symmetrical node with control handles that allow one to modify the fill shape and characteristics. Nodes can be selected individually or several together and moved up, down, left, or right as needed.
Sometimes, moving nodes or adjusting control handles can give unwanted results. One must use discretion in this regard. Fortunately, there is the multiple “undo” feature.
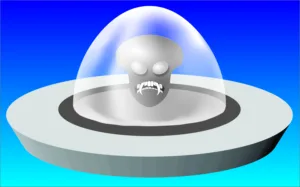
One other thing about Mesh Fill is the ability to add percentages of transparency to selected nodes. Fig. 8 is a cartoon image of a UFO I began and never finished. I want to draw attention to the canopy over the cockpit. With the ellipse tool, I drew the basic shape and filled it with white, then reshaped it. With the Mesh Fill tool, I selected random nodes and made them transparent in various degrees of intensity. The result is the appearance of a clear glass or plastic dome over the cockpit. Kinda cool.
The Mesh Fill tool is probably not something you’ll use every day, but it can prove to be valuable for some projects when needed. This tool should never be intimidating to any user but is a fun way to do something different. After all, should not our job be fun?