What are midtones?
Midtones are simply the tonal value between your darkest and lightest areas of an image.
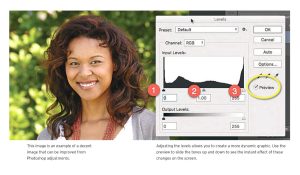
If there isn’t a significant difference between the dark areas and midtones or the light areas and midtones, your print will blend too much and not stand out. Until you begin working with correct midtones, you may not even notice this is an issue. Some RIP programs can correct some of the midtones for you, but it’s always better to visually see the results before the print. Depending on what software you choose, the settings may differ slightly, but the premise is the same: darken your darks, lighten your lights, and bring our the midtones.

For a visual, if you were to print the above portrait using Photoshop, the final result should be more than acceptable. However, if someone has worked with midtones enough, they’ll instantly spot areas where the results could be better. For instance, the tonal values in the woman’s hair—although moving from dark to midtone to light—are very close together. When printed, the hair won’t stand out and will blend together too much.
If someone were to hand-illustrate this portrait, artists are trained to accentuate areas rather than worry about every strand of hair. In distinguishing dark from light areas, we will lose detail. So, it’s essential to know how much detail is safe to lose without making the image look odd. This is done with experimentation for each design; there is no formula you can apply across the board.
Tip: To see changes in dark and light areas better, it’s a good idea to duplicate layers in your design suite and make those changes per layer instead of on the original image. You can always delete layers, but depending on how many changes you make, it could be more challenging to get back to your first design.


