One of the things that keep me interested in our work is that it is so varied. From creating a custom award to blasting headstones or lenses for an aircraft, I have seen a plethora of interesting jobs come our way. The job of creating vintage signs I talk about here is no different. I was contacted by a previous student who was about to retire, asking if I could take over a blasting job that was not viable for him anymore. After discussing the job, I said yes, even though it really wouldn’t have mattered what the job was. I would have helped Tom no matter what. But the job was also intriguing.
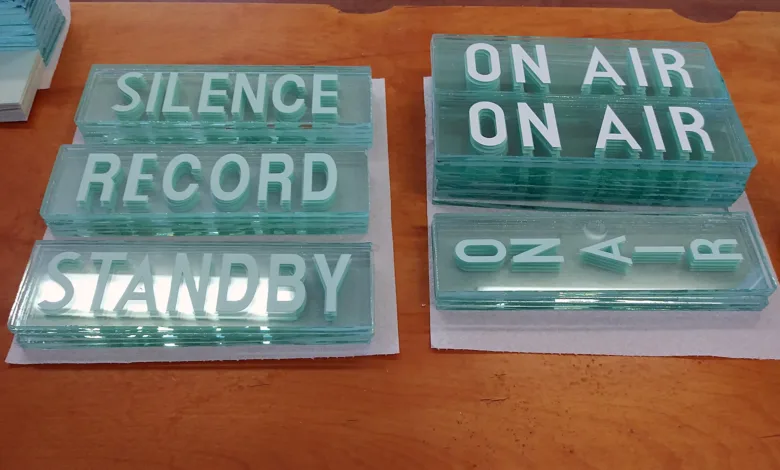
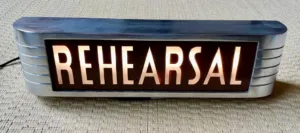
The customer is an antique dealer specializing in vintage signs used in the radio studio scene of days gone by. There are plenty of collectors of such memorabilia, and the client relayed to me that the original signs often came with either missing or broken glass lenses. He had also created a replica of the housing for these signs as there seems to be more demand than actual old pieces available. So, the project was clear: produce the glass lenses to fit into the housing to complete the replica of the various signs saying such things as “On Air,” “Recording,” “Rehearsal,” “Audition,” “Applause,” “Silence,” and “Standby.” I was a little amazed to find out the signs were not all made with the red background, which I had known, but that there were signs with a dark brown background, and that is what this customer wanted.
Preparing the glass
To make these signs would involve cutting glass pieces to the specified size of 2 7/8″ X 10″ X ¼” thick. This project would use just ordinary plate glass or jade glass, as some of you may know it by. This is nothing special and can be easily ordered from any glass supplier. It is helpful for such an undertaking to know about cutting glass. Having started many years ago as a stained-glass artist, I hoped that my cutting abilities, especially of ¼”
thick glass, would be remembered by my hands doing the work. I needed to cut 72 pieces. When all the cutting was done, I had to do something about the edges of each piece. After cutting, the edges would be raw and very sharp. Not knowing who would be handling these items, I decided to play it safe and run each piece through my diamond grinder, which breaks the edge and makes it safe to handle by anyone. This, of course, increases the production time considerably, but I wanted to be on the safe side. After the grinding, which happens with a slurry of water, all the pieces were covered with dried glass dirt and had to be washed off and dried. Only then could the actual production work begin.
Selecting the stencils
All these signs needed to be blasted in reverse, meaning the letters of each word would stay covered while the whole background was to be blasted. Not only was the background to be blasted, but it needed to be brought to a depth of about 1/8″ over the whole background. Anyone having done background blasting like that would know how difficult it is to achieve the depth smoothly, without lumps and bumps. To facilitate this type of blasting, I decided to use our pre-cut stencils made from soft vinyl that would withstand all the blasting at a higher pressure. This meant applying the stencils, removing the cover sheet, and then weeding each stencil. But since the lettering was large, the weeding was not an issue and went pretty quick. Of course, it also helps to have had years and years of experience doing the
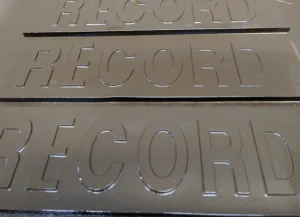
weeding, knowing what to watch for, and being able to use the X-ACTO knife accurately. To speed up the production process, it makes sense to complete all the steps at one time, so we had cut and ground all the glass at one time, applied all the stencils at one time, and did all the weeding before moving on to the blasting process.
Blasting the signs
Working on the blasting process all at once for all the signs is really important because you have to get into the “zone” for what you are doing. It usually takes blasting a couple of pieces before you can settle into a pattern you’ll use to accomplish the desired results. I know many of you think that with a lot of experience, one should know right away how to go about blasting a project, but that is just not so. I usually have a general idea, but the real process shows up once I begin blasting and trying various things. Knowing that I had to achieve quite a bit of depth, I increased my pressure pot to about 50-60 pounds of pressure. Otherwise, the job would take forever. My blasting process: first blast in horizontal lines across the whole surface a couple of passes, then do the same blasting vertical, up and
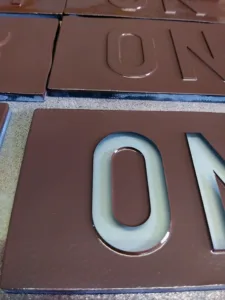
down, before settling into a pattern of going across the whole glass surface in a circular pattern. Anytime you establish a pattern, you also have to watch that you keep about the same distance to the glass and do not change your speed. Otherwise, you will end up with variations in the glass surface and most likely with quite pronounced lumps and bumps, which will show up really well once you begin the painting process. So “steady as she goes” is the mantra here. Overall, it took 10 to 15 minutes to blast each sign, depending on how many letters the word had. All in all, it took about 18 hours to blast all the signs.
Cleaning and painting
Since all the signs needed to get painted, it was very important to really clean the surface of each sign. I blew each sign off with compressed air, but I knew that using really fine abrasive would leave a lot of dust in the pores of the roughened surface. So, after blowing them off, I also dipped them into warm water and then immediately patted them dry to avoid water spots on the blasted surface. The next step was to paint the signs. I placed about eight at a time on a Masonite board to take them outside for spray painting. Luckily, our weather is usually so good that we can do that year-round without having to get a paint booth set up with an exhaust. We had tried a couple of
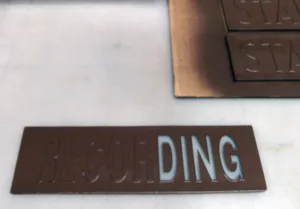
different brown paints and settled on the leather brown from Rust-Oleum. When spray painting, it is important to spray in thin layers and, most importantly, to turn the board a few times to spray from different directions so that the sidewalls of the letters would also get evenly covered. Again, it is important to spray thin layers, so the paint won’t puddle at the base of a letter. Mistakes can’t be corrected and will usually require a do-over, which eats away at production time and profit.
Final clean up
The paint needs to dry to the touch but not completely cure, since we painted across the whole sign and all the stencils still cover the letters. If you wait until the paint is cured and then try to remove the stencils, the paint will have formed a bond and will tear the paint along the
stencil cut lines, leaving a serrated edge to the paint, which is not desirable at all. So, you need to wait for the dry-to-the-touch time to begin the peeling process. Each paint is different, and you need to read the instructions on the paint you are using to find out this window of time. After all stencils are peeled, we leave the sign to dry for another couple of days to fully cure the paint before packing them up for shipping.
