UV printing technology energizes and excites all of us. With nearly limitless applications spanning multiple industries, the reach of the technology goes beyond general printing and personalization. Isn’t it all the possibilities that attract us to UV printing?
I have done service and sales in the printing industry for 26 years. Our company has been involved in offset printing, digital toner printing, and now UV printing. UV printing is by far my favorite technology to date. It has brought great profit margins back to entrepreneurs and businesses, small or large.
What gives me great confidence is getting to install UV printers and watching these crazy, cool machines transform lives, families, and companies. However, some challenges must be overcome. Decisions must be made.
Setup
We can avoid many problems if we make sure the machine is set up correctly the first time. We must make sure the correct ink is in the machine. You may need to have some test printing done to be sure the ink adhesion is good on your product or substrate.
UV inks vary in flexibility and hardness. With UV inks, the harder the ink, the more water, chemical, and scratch resistance it has. Harder inks are well suited for materials like powder coats, glass, hard plastics, and metals. Flexible inks are softer and better suited for materials like TPU, leather, thermal plastics, and films. However, the hard and flexible inks in some instances can cross over. Therefore, some initial test printing might be needed. Getting the right ink the first time eliminates a lot of trouble before it even starts.
Training
In my opinion, the biggest factor in being a successful UV printer operator is training — good, high-quality on-site training. Common misoperation mistakes include not controlling ink overspray, not controlling UV light reflection, and not setting a proper head gap.
You need to know your machine’s maximum head gap. The head gap is the distance from your print head to the deepest point of the object you are printing on. For some printers, it is 3mm, while others can be as high as 8mm.
Printing methods
Now that we understand head gap, let’s talk about printing methods. At some point in UV printing, you will want to bleed off the edge of the object you are printing on. This means your image is bigger than the object to ensure edge-to-edge print coverage of said object.
This is completely acceptable if you have something next to your object for that ink to bleed onto. It could be a laser-cut jig or a simple block of wood or foam. It doesn’t have to be sophisticated or fancy. All we are trying to prevent is an excessive amount of in mist due to overspray. If you don’t take this precaution, you will have UV ink overspray everywhere. This overspray will stick to components and print heads and can cause damage.
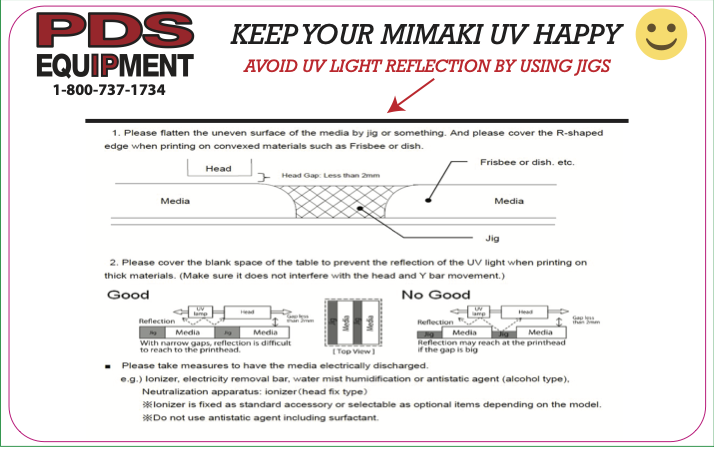
This method also helps control the UV light from reflecting on the surface of the print heads. When we print taller objects on UV printers, we need to fill in the gaps between the objects. The light from the UV unit will be able to shine into the void between the objects and shine excessive light onto the surface of the print heads. This can damage the heads. A precision jig may be necessary depending on the complexity of the object and production numbers. I have also had customers use Legos, wood, foam, and cardboard to fix the issue.
Check out the graphic below for a visual of what to look for when avoiding UV light reflection.
Adhesion
Good adhesion is important to all of us. Some materials are very UV ink friendly. Other materials require a little work.
One of the best tools for good adhesion is having jettable primer in one of your ink channels. With this, the machine prints a primer layer and UV cures it. Other options include wipe-on primers. There are some great wipe-on primers on the market. You can also use flame-treating as a surface prep in conjunction with a wipe-on primer. This would be done with a simple propane torch. You are not trying to heat the surface, just lightly hit the surface to burn off impurities and hydrocarbons.
On the advanced side of flame-treating is PYROSIL. This flame treating method works very well on substrates like glass and metals.
Seek answers
If you are not sure if you are doing something correctly, seek the answer. I encourage you to develop partnerships. Attend trade shows like GPX. Look for UV training events. We do these completely free, and they are open to anyone who wants to learn. Your vendors should be a partner; they should be there for you when issues pop up. We can cultivate a great culture around this amazing printing process. I am here to help in any way I can.