How Do I Engrave Hundreds of Plates and Keep Them in Order?

Video courtesy Engraving Concepts.
I once had a client who landed a huge order, close to 1,000 tags, for an electrical contractor. These tags were full of “cryptic” information that made no sense to anyone except the contractor – numbers, dashes, commas. As you might suspect, the contractor provided this information in an Excel worksheet; how else could he keep up with such a massive amount of information?
While he had many years of experience with both mechanical and laser engraving, this type of work was far outside the shop owner’s typical business, but he knew he could import the data from Excel and his laser engraving system was capable of marking the specified material. He used CorelDRAW’s PrintMerge feature to populate 24″ X 12″ plastic sheet stock – 10 sheets with 96 3″ X 1″ tags/plate. A laser was used to engrave and then cut out the tags.
At the completion of each sheet, the tags were scooped off the laser’s bed and dumped into a box. He was sure his new client would be pleased with the turnaround time, which was only one day. But when the client came in to pick up the tags, he said, “I can’t use them that way. My guys could never get those sorted out and applied to the proper location as required by my contract.”
Instead of a highly profitable order, the shop owner lost his tail on the deal. It took one employee and laser combination only one day to engrave/cut and “box” the order. It took two highly paid employees and one part-time employee three days to sort the tags and provide them in a useful manner.
Those who specialize in this type work, often called industrial engraving, have developed a method to keep the finished product in a logical, useful order. Others, after a disaster as just described, swear to never take on such a task again. We’ll use this experience to illustrate one of many potential solutions that could have turned that order into the profitable, one-day job that the engraver anticipated. It will involve CorelDRAW, a laser engraver, a 12″ shear, and an employee capable of concentration for a few hours.
Most agree that nothing beats a laser engraver for creating high-quality text and graphics consistently and quickly on plastic tags, but it’s pretty hard to beat a well-maintained shear when it comes to cutting out those tags after laser engraving. While not every engraver owns one, if anything can beat a shear for production, it would be a safety saw provided by several awards and personalization suppliers. Any engraving shop will be more profitable if it uses equipment it has which is best acclimated.
Many of the most productive shops continue to increase the percentage of time their lasers are engraving text and graphics. The laser is not making them any money while employees are picking up small pieces from the laser bed and attempting to keep pieces in proper order. Consider inserting and removing full sheets of plastic whenever possible, and a shear or saw to separate the individual tags.
Back to the task of keeping the plates in proper order. Often it is preferable for the plates to be engraved in column order rather than in row order. When creating an Imposition Layout in CorelDRAW, it is possible to have the plates oriented down and across rather than across and down. See figure 1 and figure 2 to illustrate.

Figure 1 Across & Down–Row then Column
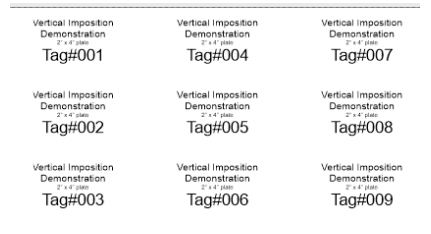
Figure 2 Down & Across–Column then Row
Now consider a full 24″ X 12″ sheet and see if one can use this configuration to cut the plates and have them automatically be in the same order as in the worksheet. See figure 3.
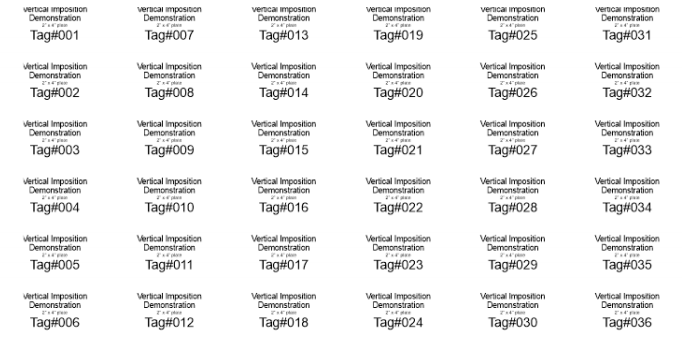
Figure 3
We’ve engraved all the copy and will now carefully set our shear’s backstop to the exact width of the plate and cut the first column -the column including tag one – second column, etc., until we have a stack of “columns” with the last column on top. Now reset the backstop to the height of the tag and cut from the last tag from the column, in this case 036. After cutting all plates in reverse order, you’ll have 36 plates.
Go to File>Print Preview and then from the menu bar, use the Settings>General to confirm your laser is the current Printer. Click the Imposition Layout tool, which is the second tool in the toolbar on the left side of Print Preview window. From the What to Edit list box in the Property Bar, select Edit Margins, click the Auto Margins icon to turn it off. This will bump the layout to the upper left corner. See figure 4.
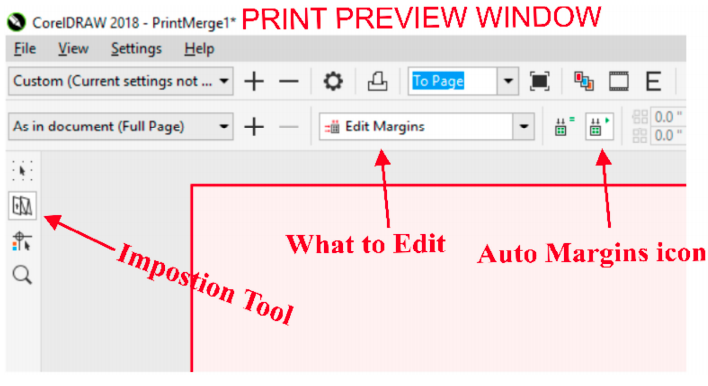
Figure 4
-Roy Brewer, Engraving Concepts