From retail spaces to corporate environments and rec centers, you can use murals to customize, modernize, and transform any space, and they can be added to practically any surface. But, before you can hop into this offering, you need to be aware of some dos and don’ts for designing.
-
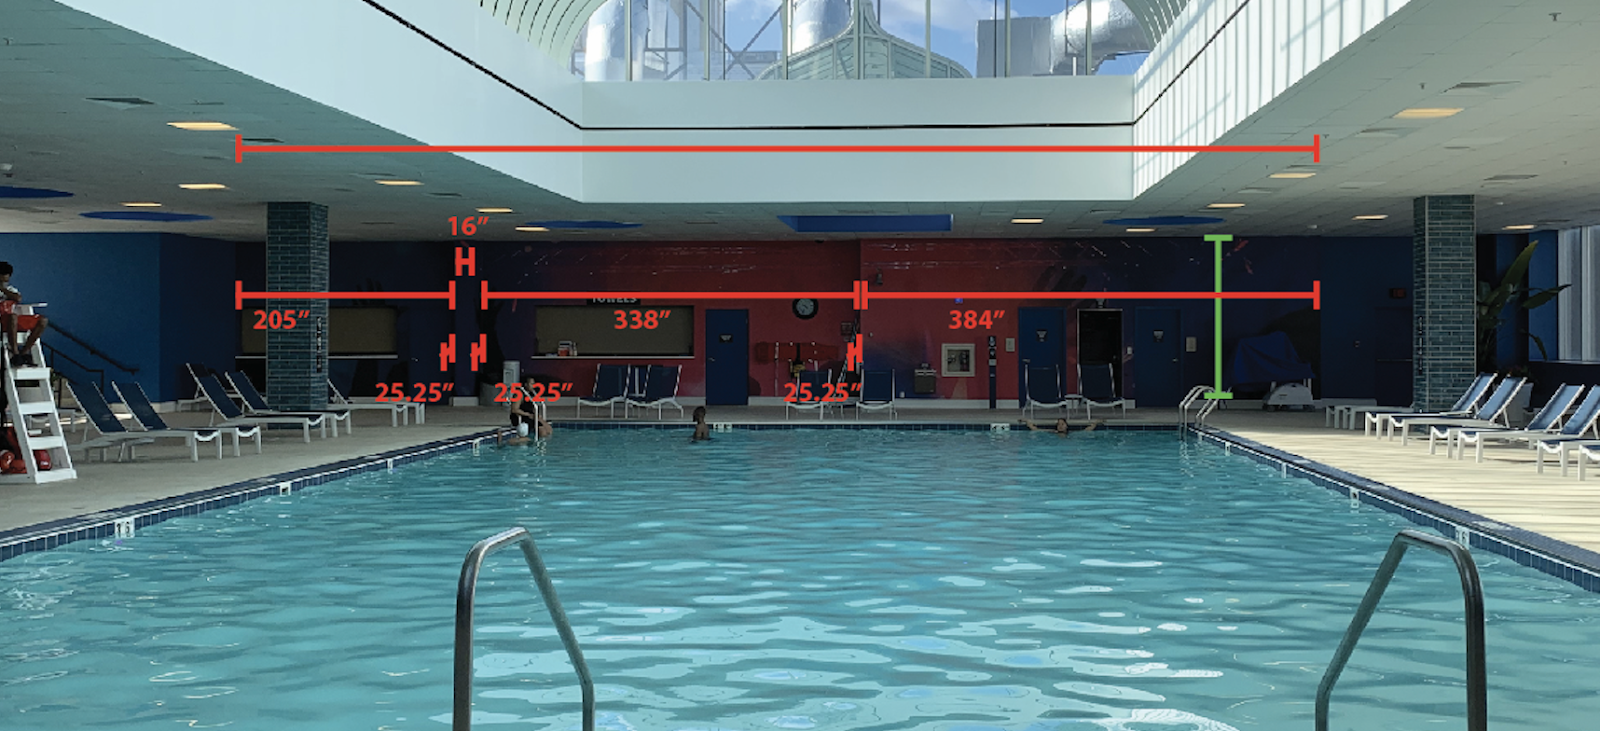
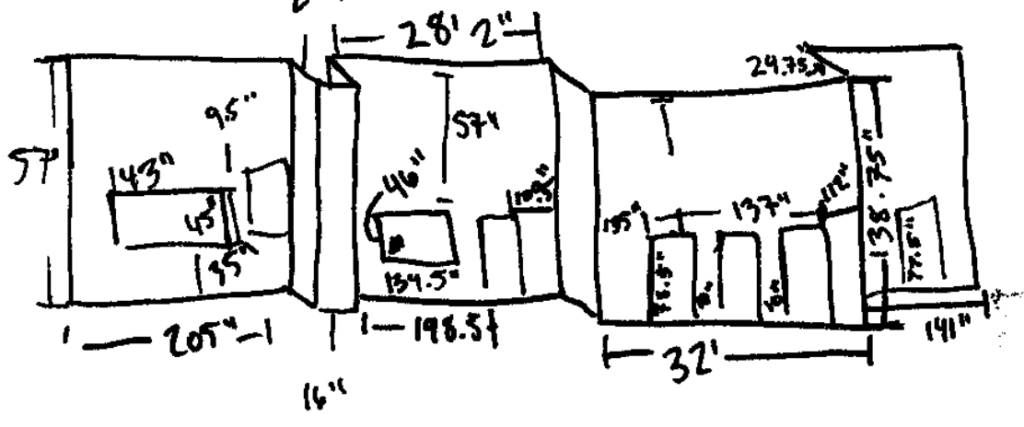
Do … a site survey by taking pictures of the wall(s).
Take direct, straight-on, level photos — not on an angle. Take measurements (overall width and height). You want to be sure you measure the space as accurately as possible. Be sure to account for baseboard and ceiling moldings and door and window trim. Don’t forget about obstacles like fire extinguishers, outlets, shelves, fire alarms, utility boxes, etc. All of these should be accounted for in the design and layout. Store these photos and dimensions on your server/computer/drive to be used by your design team, along with any other notes about the project.
-
Do … create a design template.
Take the photos from the site survey and scale them up in Photoshop to the dimensions provided (full scale at 72 DPI is typically fine). Make any adjustments to the perspective if necessary without deforming the photo (hence the reason for direct/straight photos while onsite). Mask out the design area, leaving the ceiling, floor, and any obstacles, so the masked area can be used for designing on. This also makes it more “realistic” when proofing to the customer.


-
Don’t … skew or misscale these pictures.
They will be used to create the actual, scaled design files. So if anything was missed here, it could be disastrous on the production or installation side of the project.
-
Do … start the creative process with a mood board (like any other creative project).
You may also want to start with a basic design questionnaire, likely given to the customer during or right after the sales process. This will help the design team understand what the customer is looking for in the end. When you start designing, be sure to incorporate sufficient bleed on all four sides of the design file — at least 3″ to be safe. Send a proof to the customer for review and final approval (after any requested revisions).
- Pro tip: If you are using photographs in the actual design, be sure the resolution is high enough so it’s not too pixelated when enlarged to full-scale output.
Here’s an example that might make it easier for an installer to get started:
Let’s say your wall wrap has five horizontal panels. To make it easy for your installer to start dry-fitting, have them start from left to right. “Panel 1” (leftmost panel) will have no bleed on the left side or top. Provided the sales or site-survey measurements are accurate, the installer knows they can simply line up “Panel 1” flush to the top left corner wall and begin to dry-fit from there.
Panels 2-5 all have bleed (up to 1″ on all four sides). Once the dry-fitting is finished, the installer can make any adjustments necessary to be sure there’s 100% coverage top-to-bottom and side-to-side. If so, they start to install Panel 1. Doing this will save a lot of time on the installation/setup onsite and possibly even a bit of aggravation for the installer.
You MUST communicate this information to the installer, either verbally and/or in writing on the installation proof as well. Be as clear as possible because if they assume there is bleed on “Panel 1” like the rest of the panels, it will throw off the wall wrap entirely.
-
Don’t … forget to add enough bleed.
Even if you’ve got the best site surveyor in the business, not all walls are actually straight, even, or plumb, and this can cause major problems.
-
Do … set up the files for final production.
If the template was set up properly, at 100% scale at 72 DPI, then this part is easy. Turn off the unnecessary layers in Photoshop, leaving just the design showing. You should also delete any unused layers, but be certain to SAVE AS (and rename), making a copy as an uncompressed TIFF. Include the proper bleed, then send it to your production department.
- Pro tip: Be in communication with your production department on how they are paneling the job for the installers. In other words, where should the installer start? Will “Panel 1” include bleed on both sides or only one?
-
Don’t … accidentally overwrite your original design files with the flattened production files.
You don’t want to accidentally overwrite your original design file, so be sure to save a copy.
With this must-know list of dos and don’ts, you’ll be seamlessly designing murals in no time.