


The image may be perfect in most respects. The contrast is fine, the color works, the composition is well balanced and the content has potential. The problem is that it’s short on drama. Controlling what is sharp and what is blurred can make a picture really pop. In this article we’ll look at techniques that heighten the impact of an image by fine-tuning focal elements.
Depth of Field
The term “depth of field” is derived from phenomenon of the gradual blurring of visual elements. The areas of focus are crisp but the surrounding areas that are further from the camera blur as they as they recede in space. In a camera, this optical effect is achieved by increasing the size of the lens aperture when the exposure is made. The wider the aperture the shorter the depth of field. A similar effect can be achieved with far more control after the exposure is made by using a Photoshop filter that mimics focal length. Adjusting the depth of field can emphasize the important regions of an image and make them dominant by blurring surrounding areas that compete for the viewer’s attention.
Blur Gallery
Filters in Photoshop’s Blur Gallery create this effect using controls that simulate traditional camera settings. There are several choices including Field, Iris, Tilt/Shift, Path and Spin blurs and these filters can be used in several ways. This article will show you a few techniques that control depth of field to target focus on specific elements.
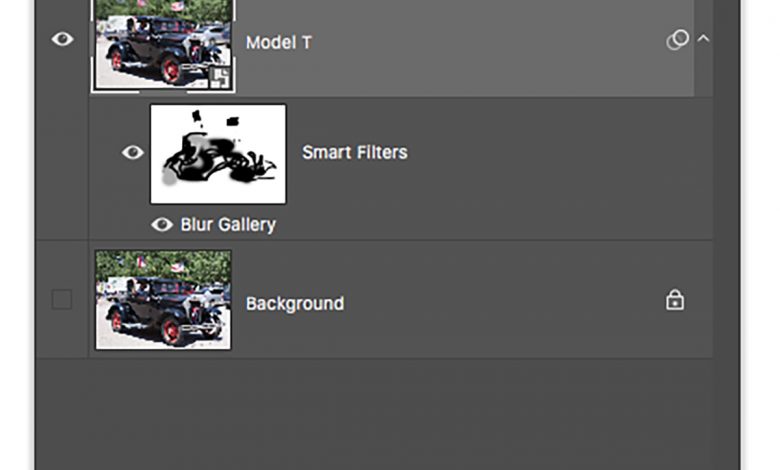
Because you’ll be using a single filter, I suggest that the background layer be duplicated and then converted to a smart object. This way you’ll be working in a non-linear workflow and you’ll be able to tweak the adjustments at any time during the process.
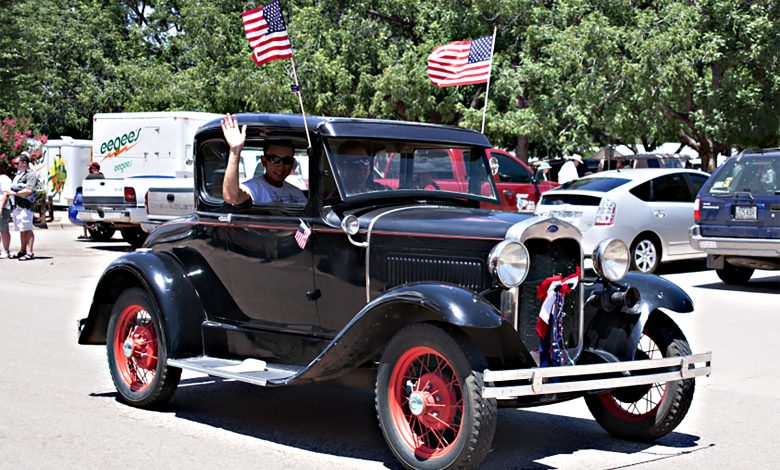
- To begin, open an image. The image I’ve chosen contains a lot of visual noise-like the cars in the background-that competes with the main subject (see Figure 1). The plan is to blur the noisy areas and maintain the natural focus on the vehicle. By the way, if you want to try this using this image, Go to: https://drive.google.com/file/d/14Osxqc9vM49v886CU-zpyTE-Hzb9VpAG/view?usp=sharing where you can download the image.
- In the Layers panel click the Background layer to target it. From the Layer Options menu choose Duplicate Layer.
- Make any tonal adjustments that you deem necessary. You can use Levels, Curves, Hue Saturation or any other adjustment you that will improve the overall tonality. It’s advisable to use adjustment layers for this purpose.
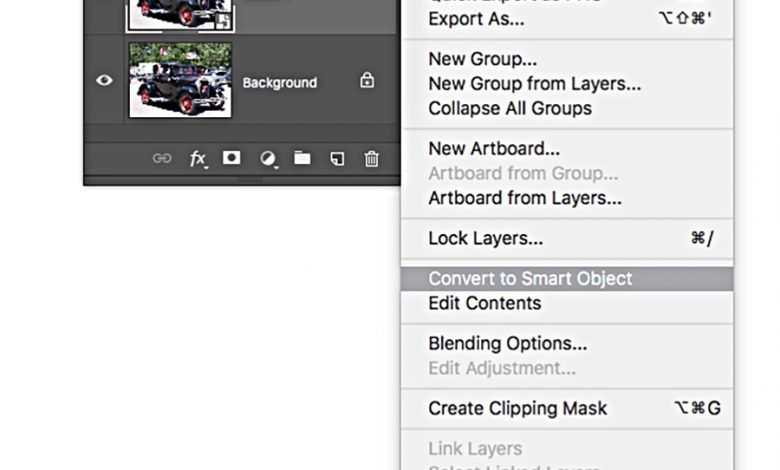
- From the Layer Options menu, choose Convert to Smart Object (see Figure 2).
Field Blur
The Field Blur option is the perfect place to start on an image like this one. Go to Filter > Filter Gallery > Field Blur. Initially the filter is applied uniformly to the entire image (see Figure 3). The circular pin icon in the middle of the screen is the blur control.
The right side of the Blur Gallery interface contains two panels: The Blur Tools panel at the top with the Field Blur controls and options, and the Blur Effects panel at the bottom with some extra options for the Bokeh effect as shown in Figure 4 (more on Bokeh in a bit).
The Options Bar at the top of the interface contain a few handy controls too that will enhance the blur effect (see Figure 5). If the High Quality box is checked, the preview is rendered a bit more slowly, but more accurately. Preview shows the result of any changes in the blur filter’s settings. When unchecked, you can view the original image without any blur. Click the (curved arrow) to remove all of the blur pins and start over.
Pin Points
The power of the Field Blur filter or any of the Blur Gallery filters for that matter lies in the ability to establish pins at various locations on the image. Each pin has separate controls, either by dragging the slider in the control panel or by dragging the pin clockwise to increase or counter-clockwise to decrease the blur effect. The pins can be repositioned, simply by dragging them.
To build the field blur effect, drag the default pin, click on top of the area that you want to stay in focus, then change the blur amount to 0. No blur effect will be applied. Drag your mouse to where you want to apply the blur effect and click once to add a new pin. You can add as many pins as you need (see Figure 6). As you can see in this picture I have placed more than 30 pins. Each one precisely controls the focus of its region. To implement the Field Blur effect click OK when you’ve completed blurring the image.
Masking
Sometimes the pins are not precise enough to control the effect and overlapping areas become blurred that should be in focus. You can clean up areas with the filter mask that is part of the smart object layer as I have done with the flags and other areas on the car. (see Figure 7A, 7B) Click the mask, and choose the Brush tool. Use a soft, round brush. Press D then X to set the foreground color to black, and paint areas where you want to remove the blur effect. Paint with gray to partially mask areas. Masking gives you more precise control over the location and intensity of the blur.
Tweaks
Inevitably you’ll have to tweak the effect and return to the Filter Gallery to make a few adjustments. Easy Peasy! Click on the Blur Gallery icon in the layers panel to display the interface. Make adjustments and click OK.
For final tweaks I find that the Blur tool is effective and very precise because it’s manual. Duplicate the Smart Object layer and rasterize it (Layer > Rasterize > Smart Object) Choose a soft brush and set the strength to between fifty and one hundred percent. Drag over small edges that need final blurring.
Iris Blur
As we’ve seen with the Field Blur filter, the focus is controlled by adding pins in various locations and dialing the amount of focus on each pin. The Filter Gallery offers a few alternatives to account for any type of image where the location and intensity of the blur needs to be controlled. The Iris Blur for example, extends the blurred areas outside a specific circumference. This can come in handy when you want to be more specific in the focused region.
In this case I want to emphasize the jumper by keeping him in sharp focus and gradually blur the areas around him. I also want the man who is looking over the bridge in focus too (see Figure 8). You can access the jumper image at: https://drive.google.com/file/d/1qpZ5WTYY1Yo5hfoFXsaW9czM8ZxYpetq/view?usp=sharing
I’ve duplicated the layer and converted it to a smart object. Then I opened the Blur Gallery and selected Iris Blur. A circular-shaped bounding box surrounds the figure. This is the key to manipulating the blur (see Figure 9). The area outside the edge of the ellipse is where the blur occurs. As with Field Blur, the intensity of the blur is controlled by dragging the circular slider clockwise or counter clockwise or by dragging the slider in the control panel. From the inside edge of the slider to the center of the ellipse is where the blur transitions from maximum to minimum intensity.
When the cursor is dragged inside the ellipse the transition controls become visible. The shape of the oval can be changed into a round cornered rectangle by dragging the white square. Dragging the white circles inward to increase or outward to decrease the focus modifies the focal transition. Dragging the dots on each side of the box modifies the size and angle of blur (see Figure 10). By clicking the guy on the bridge, another pin is added to maintain focus (see Figure 11).
Bokeh Effect
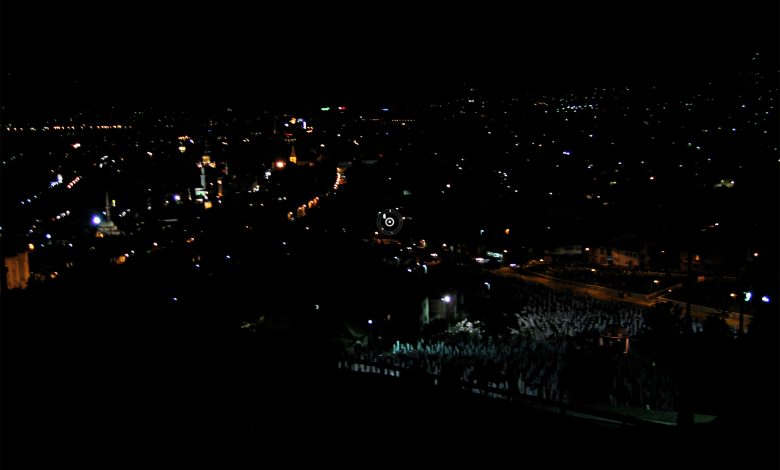
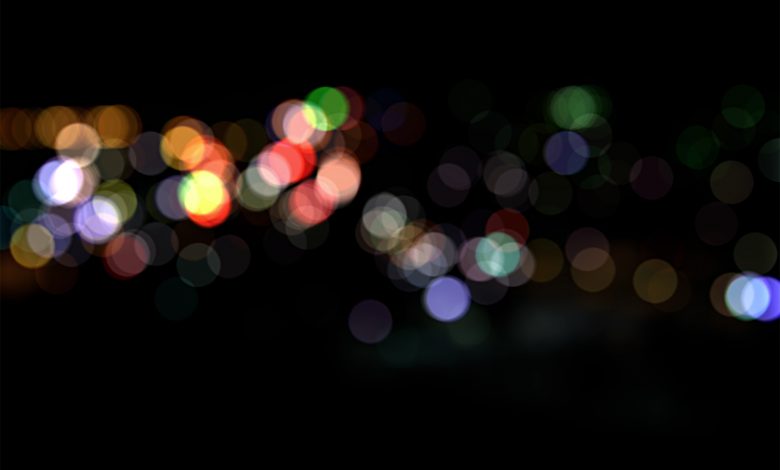
In looking at the Filter Gallery you’re probably wondering what the Bokeh effect is. Briefly explained, bokeh is simply the effect created when the camera lens renders out-of-focus points of light. If you have an image with a few points of light in front of a dark background, or an image with contrasting you can achieve that effect with any of the Blur Gallery filters with the Bokeh box checked (see Figures 12A,12B,12C)
Blur Filters Work Similarly
All of the filters in the Blur Gallery work basically the same way. Pins are established in the regions that need to be blurred and the intensity of the blurred area is adjusted. The additional filters-the Tilt/Shift, Path and Spin blurs-differ only in the shapes that they affect, so if you know how to use one filter it’s quite easy to figure out the others. These filters offer control over the depth-of-field and specific regions of the image that need to be in focus. It’s worth experimenting with these five filters individually or in combination to create precise areas of focus and diffusion.