The Trick to Achieving Proper Halftones
Halftones are achievable for anyone at any level of experience! Don’t feel intimidated. It all starts with knowing the steps to achieve them. I am a person that needs repetition, as well as a clean and clear standardization of processes to learn something and do it properly. Here are the key points you need know to achieve control of your screen variables and accomplish proper halftones:
- Clean screen
- Suitable screen mesh selection
- Proper EOM
- Appropriate dot on your film
- Appropriate exposure time
- Dot gain control
 START WITH A CLEAN SCREEN
 START WITH A CLEAN SCREEN
First things first, make sure your screens are adequately cleaned and degreased. If you aren’t sure what this means, then you probably need to first dive into your screen reclaiming process. If you don’t have a good screen, building on it won’t make it better. You’d never build a house on a weak foundation.
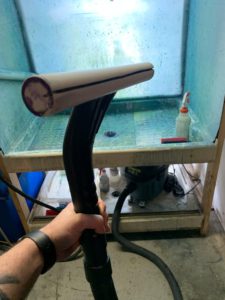
There are lots of options out there, so reach out to your supplier to see what they recommend for the products you use. I would highly suggest always looking toward dip tank processes for ease of use. If your screen has debris of any sort, including leftover chemicals or grease from being mishandled, it will cause issues with fine line detail like halftones. Make sure to flood rinse your screen to clear it of chemistry. I also recommend using a rounded vacuum wand (pictured left) to vacuum-clean any excess water on the screen after reclaiming. This will help prevent dust from settling on the screen. It also allows for a quicker drying process.
SCREEN MESH SELECTION
A proper halftone has to be able to hold its true size on the mesh through exposure and printing. To do that, make sure you are utilizing the best mesh for the job. It is a standard that most halftones are printed on a medium-mesh to high-mesh screen. A safe bet is a 230 mesh. You can go up or down from there based on your LPI size. If you don’t know where to start with mesh selection and would like to learn more about mesh counts and their standard use, as well as a quick rule of thumb formula to determine mesh counts and LPI output you can download a free Mesh Cheat Sheet here.
PROPER EOM
EOM stands for “emulsion over mesh.” Most manufacturers recommend 10-20% past the threads. You can use a digital coating meter to test this if you have one, but you likely don’t because who has one of those?
So, here is a little trick an emulsion manufacturer rep taught me a while back that I’ve used to train new printers. It seems to be accurate even after testing with one of those expensive micron meters.
- Coat the shirt-facing side of the screen (sharp or round, I usually recommend round)
- With one coat applied, hold the screen up to a safelight in your darkroom and inspect the ink-side of the screen. If it results in a matte finish, it means the fibers are still showing, indicating you need more emulsion. Coat the shirt-facing side again.
- Repeat these steps until the ink-side has a glossy appearance
- Coat the ink-side one time
- Put screens in a dry rack (ink-side up) and try to keep the humidity no higher than 50%
PROPER DOT ON YOUR FILM
Make sure that you are using some kind of clean film output for your halftones. Many shops that are using vellum will have a tough time exposing halftone because of the nature of vellum printing. The vellum can sometimes skew in size, and the white of the vellum can cause light undercutting on the edges of your printed dots. In other words, it’s not highly recommended to use vellum for fine detail or halftone film needs. Use a transparent film solution that almost all vendors offer. If you are using RIP software or just outputting a heavy dot to your film through your printer, make sure that the dot is as light-blocking as possible. You want to make sure your dot does not shrink down when exposing it due to partially transparent dots on your film.
PROPER EXPOSURE TIME
To hold the dots on your film accurately, you have to expose it within its acceptable window before small dots and lines start cutting in, and details get lost in the light.
One of the hardest questions I receive via email or phone calls is, “What should my exposure time be?” It’s not hard to find the answer, but if I don’t know the shop, the exposure unit bulb type, the humidity level, the thickness of the emulsion, screen count, emulsion type, film type, or LPI it’s impossible to give you an accurate answer. This is a science, so you have to control the variables and do the work for the answer. But, don’t let that scare you. Where there is science, there are processes and help!
Get an exposure calculator. Call your supply rep and ask them what they offer in exposure calculators with a step wedge. The step wedge is a processed film of actual black to clear transparency that blocks light in increments of 10% that you marry to a film of detailed data including stroke weight, font size, and halftones. Follow the instructions on the calculator to expose a test screen and find the answer to your time. If you’re not sure where to start, begin very high. If you have a time you think works, start by multiplying that time by two and exposing with your calculator. Do this again and again until you have found the best results for your equipment and supplies. This should be done for each mesh size.
DOT GAIN CONTROL
Once your screen is exposed correctly, you now have to print your halftones and make sure you are keeping them true to the art.
Pro tip: After burning, place your screen in a water-only dip tank for a minute. This will loosen the image and make it easier to spray out, lowering the risk of pressure washer blowout.
Dot gain is the usual suspect to halftone printing. This is when the size of the dot seems to grow larger or elongate on press. This is a big issue, that will ruin a print and make a press operator want to pull out whatever remaining hair they may have left!
Once again, I have some simple solutions for you to walk through to make sure you have the proper dot. That said, this is going to focus on printing with an automatic press. However, the same principles apply to manual printing. The only hard part is the metric since you don’t have gauges in your arms saying how many pounds of pressure you’re using. If you are printing manually, read these carefully, and you’ll be able to diagnose each print you do one by one and determine how to make it better during your next pull of the squeegee.
Durometer: Durometer is referring to how hard or soft the squeegee rubber is. A hard durometer squeegee will help prevent your dot gaining. The harder it is, the less ink is applied. Be sure not to shear it too much because it can result in a low deposit of ink. I often fall back to a triple durometer 65/90/65 squeegee, or a standard 90. Play with your squeegee rubber and see which you like best.
Speed: The speed at which your squeegee pulls the ink will also have a significant effect on dot consistency.
Angle: A more acute angle means more ink. If you are at a 45-degree angle from the surface, you will pull and press against the edge of the squeegee, causing more ink to flood through the image.
Pressure: How hard you push down on the mesh with the squeegee has a big say in the ink deposit as well. To a point, not pushing enough will result in the ink gasket not being dropped out of the emulsion stencil, however, once clearing, the more pressure you put past the clearing point will also cause the surface to sheer and lay less ink down. You must find that sweet spot between clearing the screen and not limiting the ink deposit more than intended.
Matt’s Metaphor: Butter your toast! If you want to lay a lot of butter down, your knife is at a decent angle, not pressing down too hard to scrape the toast but enough to allow a good deposit of butter and the speed is smooth and steady to spread evenly. Think of printing the same way: the faster the butter knife, the less butter; the closer the knife is to a 90-degree angle, the less butter. It’s a simple metaphor that works.
Follow these steps, and you will be on your way to printing perfect halftones in no time. Once you get your feet wet, you’ll be able to jump into the deep end and amaze yourself and your customers with the detail of work you can do. Work on your checklist and get halftoning perfected today. Keep on ink’n on!